Deploy client-side (static) web app built by Flet

I edited width, alignment, etc. of my Flet code originally written as a desktop app to make it work as a web app. In this post I’m going to introduce how to build and deploy your Flet app as a static website (client-side, HTML + JavaScript). This deployment should work on an ordinary web hosting server, and you don’t need to know about web server side technology. You can learn how to add Google AdSense advertisement to your Flet web app as well.

Preparation

Please refer to my previous post and build your environment. It’s mainly targeting macOS. The sample Flet app code is used in this post.

How to build Python GUI app on macOS with Flet

In case you’re looking for server side deployment

My another post below introduces how to depoloy your web app on an Apache web server. Should you have a Nginx web server, refer to the official guide.

Host Flet web app behind Apache web server by Reverse Proxy

Build as a web app

Complete the preparation steps 1 through 12 in the other post. Build options won’t make much difference for web, so simply run the command below. It takes some time to complete.

flet build web

Test locally

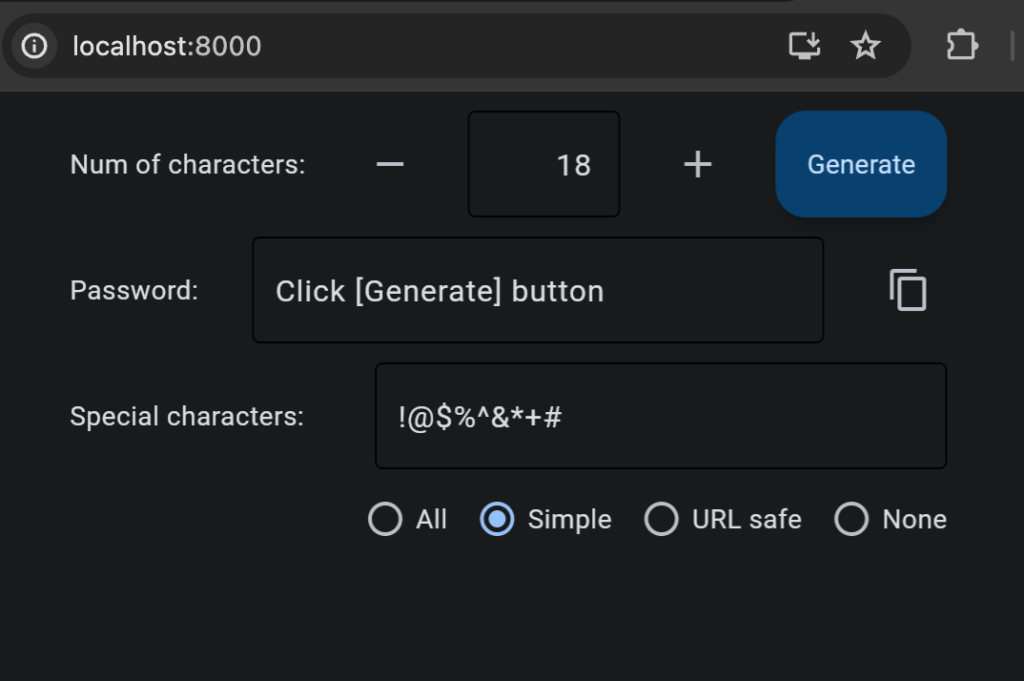
Built files are placed in build/web. Let’s test locally before pushing to a server. Execute the command and open the URL (http://localhost:8000) in your web browser.

python -m http.server --directory build/web
# Press Ctrl + C to exit.
On Chrome it works as expected.

Little more steps to upload

Specify the directory name

In this example, the web app will be deployed to https://blog.peddals.com/fletpassgen, so change the path in index.html. (By adding a build option --base-dir "/directoryname/" you can avoid this step, but you cannot test locally.) Edit index.html like the below. Make sure you have the directory name between slashes (/).

  <base href="/fletpassgen/">

Compress the entire folder

Change the folder name from web to the directory name, and compress it as a single file. You get fletpassgen.tar.gz as a result of these commands:

cd build
mv web fletpassgen
tar cvzf fletpassgen.tar.gz fletpassgen

Upload and extract

Upload the compressed file

To upload the compressed file to a hosting server, this example uses the scp command in Terminal.app. Replace username, hostname and upload directory based on your account details.

scp fletpassgen.tar.gz username@hostname:~/public_html

Login server and extract the file

If ssh is allowed, login your server and extract the file like the below. The directory has to be extracted in the correct location. In this example the web app will be in the subfolder /fletpassgen/ so it’s extracted in the document root of the website.

ssh username@hostname
cd ~/public_html
tar xvf fletpassgen.tar.gz
rm fletpassgen.tar.gz

Access the site by web browser

Your web app is ready now. URL should be like this: https://blog.peddals.com/fletpassgen/

After showing an icon for some moments then your web app will start working.

Few things to check if it’s not working

With this building method (static web app), the total size of files tends to be big. My example resulted 28MB in total. As the first access will take some time to download all required files, you have to be patient and wait until the app to be ready to start.

In case you don’t even see the icon after several seconds, take a look into the directory name in index.html, actual name of the extracted directory, user/group ownership and access permissions.

Tips and notes

Use same code for desktop and web apps

You may notice the layout of contents is broken when opening your app in web browser (I did!) Use ft.Container to place contents and width= property having the same value as page.window_width= so the horizontal layout will be kept in a wider window. For a simple app, having the below parameters keeps your app at the top center even in a web browser.

    page.vertical_alignment = ft.MainAxisAlignment.START
    page.horizontal_alignment = ft.CrossAxisAlignment.CENTER

File size is big

As I wrote, even this small app (Python code is approx. 3.9KB) becomes 28MB in total after a build. You need to put your eye on the available disk space.

App keeps running once loaded

Since this deployment method does not require a code to be running on the web server, your app keeps running in a web browser even when the network is down. For a simple tool it can be an advantage (I don’t know who needs a new password when offline, though).

Copy button won’t work on Safari (macOS and iOS)

This is a known issue. Hopefully it will be resolved in the near future, but at this moment copy works on Chrome but not on Safari. I added a code to hide the copy button based on the user agent, but it does not work. flet build web deployment won’t be able to get user agent unfortunately. You need to deploy as a server-side app if you want to add browser specific features.

Bonus: add Google AdSense advertisement

You can find this type of information for Flutter quite easily, but some of the ways I found didn’t work for my Flet app. If you’re looking for a solution, try this:

Get AdSense strings

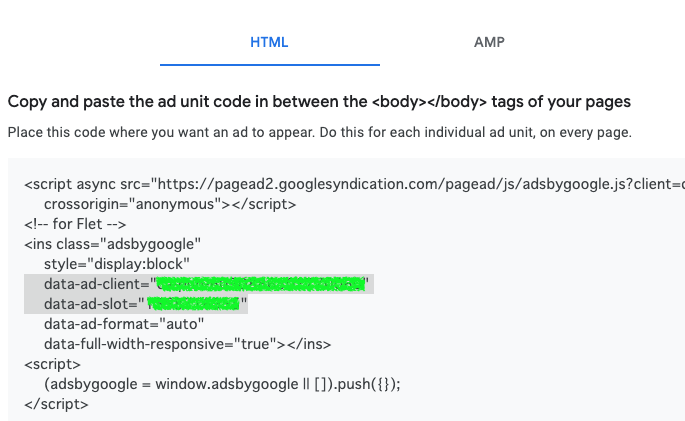
Login your Google AdSense account, create new ad or click on the Get code < > icon of an existing ad to get strings.

Google AdSense > Ads > By ad unit > Display ads > Give it a name and Create > take note of the below two lines.

             data-ad-client="xxxxxxxx"
             data-ad-slot="yyyyyyyy"

Add style to index.html

Edit the index.html file in the Flet web app directory and add the below CSS code, right above the </style> tag. Line numbers are just reference (Flet ver. 0.19.0).

    footer{
        width: 100%;
        height: 100px;
        text-align: center;
        padding: 0;
        position: absolute;
        bottom: 0;
        z-index: 100;
    }

Add <footer></footer> block to index.html

Right above the last line </body></html> of the index.html, add the below code. Replace highlighted xxxxxxxx and yyyyyyyy with strings you copied.

  <footer>
    <style>
    .example_responsive_1 { width: 320px; height: 100px; }
    @media(min-width: 500px) { .example_responsive_1 { width: 468px; height: 60px; } }
    @media(min-width: 800px) { .example_responsive_1 { width: 728px; height: 90px; } } 
    </style>
        <script async src="https://pagead2.googlesyndication.com/pagead/js/adsbygoogle.js"></script>
        <!-- Home_Page -->
        <ins class="adsbygoogle"
             style="display:inline-block"
             data-ad-client="xxxxxxxx"
             data-ad-slot="yyyyyyyy">
        </ins>
        <script>
    (adsbygoogle = window.adsbygoogle || []).push({});
    </script>
  </footer>

Save the file. You’ll see a horizontal ad at the bottom of the web page. If you just created a new ad, it may take some time for it to appear. Enjoy!

Image by Stable Diffusion

Date:
2024-Jan-29 0:04:44

Model:
realisticVision-v20_split-einsum

Size:
512 x 512

Include in Image:
masterpiece, best quality, retro future, successful upload of application

Exclude from Image:

Seed:
3400661084

Steps:
20

Guidance Scale:
20.0

Scheduler:
DPM-Solver++

ML Compute Unit:
CPU & Neural Engine

Host Flet web app behind Apache web server by Reverse Proxy

Flet, desktop and web app framework is really useful for Python developers. With only little modifications, your standalone desktop app can be hosted on a web server. In this post you can find how to self-host your Flet app on an Apache web server. This is not covered in the Flet official website.

Quick introduction of Flet.

Flet is a Python framework to build desktop or web application without having knowledges of GUI or web frontend. Flet is developed based on Flutter mobile app framework developed by Google for the Dart language. You’ll find word “Flutter” when you writing codes and getting errors with Flet. I’m not going to provide more information around Flet or Flutter in this post.

What I’m going to demonstrate in this post

The goal is publish a Flet app on an Apache web server using TCP port based reverse proxy. In my case the web app is only accessible within the LAN. Should you have a publicly accessible Apache server (and admin privileges), you can publish your app to the public. The Flet official webpage Self Hosting introduces the process to publish on an NGINX web server. You can do pretty much the same thing on an Apache web server by following this post.

Environment

  • Ubuntu 20.04 LTS
  • Apache 2.4.41

High-level steps

  1. Install requirements on Ubuntu server.
  2. Build a Python virtual environment and install Flet.
  3. Prepare a Flet app code.
  4. Enable Apache modules required for reverse proxy.
  5. Write an Apache configuration file.
  6. Write an auto-start configuration file.

Detailed steps

Install requirements on Ubuntu server.

As introduced in the official website, you need to install GStreamer to execute Flet app on a Linux server. Simply follow the steps and install requirements.

sudo apt-get update
sudo apt-get install libgstreamer1.0-dev libgstreamer-plugins-base1.0-dev libgstreamer-plugins-bad1.0-dev gstreamer1.0-plugins-base gstreamer1.0-plugins-good gstreamer1.0-plugins-bad gstreamer1.0-plugins-ugly gstreamer1.0-libav gstreamer1.0-doc gstreamer1.0-tools gstreamer1.0-x gstreamer1.0-alsa gstreamer1.0-gl gstreamer1.0-gtk3 gstreamer1.0-qt5 gstreamer1.0-pulseaudio

Build a Python virtual environment and install Flet.

I use pipenv as below. Use your preferred virtual env and install Flet. Flet supports Python 3.8 and above.

pipenv --python 3.11
pipenv shell
pip install flet

Prepare a Flet app code.

Just for testing, let’s use a code posted on the official website. To check simple interaction, I copied Counter app and saved as counter.py. Change the last line as below.

ft.app(target=main, view=None, port=8501)

Quick explanation: view=None won’t open GUI or web browser window, and port=8501 sets the TCP port to listen to. As long as it does not conflict on your server, any port number works fine. By executing python3 counter.py, you can see the app on web browser if installed on your web server by opening http://localhost:8501. Next step is publishing to external access.

Enable Apache modules required for reverse proxy.

At least following 4 modules are required to configure Apache as a reverse proxy. As Flet uses web socket, wstunnel is also required. Following commands enable modules, load modules and check Apache status respectively.

sudo a2enmod proxy proxy_http proxy_wstunnel headers
sudo systemctl restart apache2
sudo systemctl status apache2

Write an Apache configuration file.

In this example, accessing flet.dev.peddals.com will open the Flet web app. In my environment, access to the subdomain uses always HTTPS as posted separately. So, listening port is 443, and reverse proxy port is 8501 that the Flet app is listening to. Please edit these based on your environment.

Line 13-14 for wss:// may not be required.

<VirtualHost *:443>
	ServerName flet.dev.peddals.com

	SSLEngine on
	SSLCertificateFile /etc/letsencrypt/live/dev.peddals.com/fullchain.pem	
	SSLCertificateKeyFile /etc/letsencrypt/live/dev.peddals.com/privkey.pem

	ProxyRequests Off
	ProxyPreserveHost On

	ProxyPass /ws ws://localhost:8501/ws
	ProxyPassReverse /ws ws://localhost:8501/ws
	ProxyPass /ws wss://localhost:8501/ws
	ProxyPassReverse /ws wss://localhost:8501/ws
	ProxyPass / http://localhost:8501/
	ProxyPassReverse / http://localhost:8501/

	ErrorLog ${APACHE_LOG_DIR}/flet.error.log
	CustomLog ${APACHE_LOG_DIR}/flet.log combined

</VirtualHost>

Load Apache configuration (check syntax, load config, and check status).

sudo apachectl configtest
sudo systemctl reload apache2
sudo systemctl status apache2

Now, let’s execute python3 counter.py and check if the web app opens from a client PC. If you removed the lines for wss:// and the app kept loading, add them, reload, and try again.

Write an auto-start configuration file.

Let’s follow the Flet official page and write an auto-start configuration file. Below is an example in my server. Save this as fletcounter.service.

[Unit]
Description=Flet Counter Service
After=network.target

[Service]
User=handsome
Group=handsome
WorkingDirectory=/home/handsome/codes/flet
Environment="PATH=/home/handsome/.local/share/virtualenvs/flet-xuR7EMBP/bin/"
ExecStart=/home/handsome/.local/share/virtualenvs/flet-xuR7EMBP/bin/python3 /home/handsome/codes/flet/counter.py

[Install]
WantedBy=multi-user.target

Modifications:

  • Description= as you like
  • User= and Group= your own username (whoami)
  • WorkingDirectory= is the full path to the directory of counter.py.
  • Environment="PATH= is the full path to the directory of python3 (output of which python3 up to bin/)
  • ExecStart= first arg is full path to Python3 (output of which python3), and the second arg is the full path to the Flet app.

Lastly, start and enable it as a service by following the official page. The target of the symbolic link (#2) is the file created in the previous step.

cd /etc/systemd/system
sudo ln -s /home/handsome/codes/flet/fletcounter.service
sudo systemctl start fletcounter
sudo systemctl enable fletcounter
sudo systemctl status fletcounter

That’s all. Access your app from a client PC and confirm the counter opens. When possible, reboot your server and confirm the service starts automatically.

Trouble that I encountered.

In my environment, loading of the app kept forever initially. I finally figured out that the reverse proxy settings needed wss:// as well as ws:// (the NGINX config on the official page does not have wss:// either). It took me some time to figure out that wss stood for Web Socket Secured, just like https stood for http Secured. However, another Apache server doesn’t require wss — my SSD for the web server (Raspberry Pi) died after reverse proxy setup, and needed to build another. I’m still not sure why wss was required…

Image by Stable Diffusion

Date:
2023-Nov-25 23:02:10

Model:
realisticVision-v20_split-einsum

Size:
512 x 512

Include in Image:
cartoon, clolorful,
modern ladies working at post office classifying letters

Exclude from Image:

Seed:
4084494267

Steps:
23

Guidance Scale:
11.0

Scheduler:
DPM-Solver++

ML Compute Unit:
CPU & Neural Engine

Pythonista 3.4 is out now (supporting Python 3.10)

I thought the development discontinued…, but I was wrong!

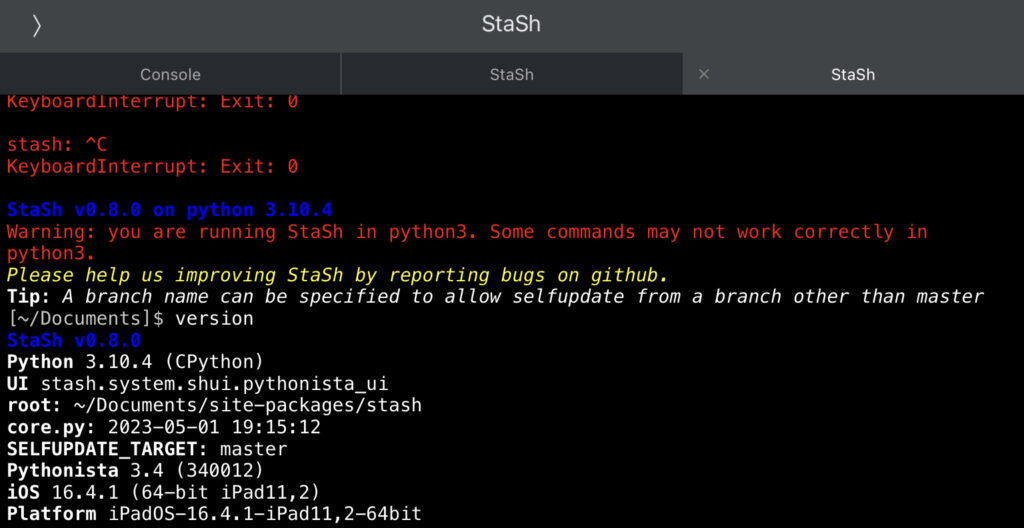
Running on iPad. Output of Stash version command. See Python is 3.10.4.

Python is now 3.10.4. Python 2 is no longer included.

After 3 years of silence, the great Python IDE for iOS/iPadOS, Pythonista 3 is finally released. You can now execute your Python 3.10 codes.

Pythonista 3 ← Link to the App Store

For details (not very much, tough), visit the official website below:

https://omz-software.com/pythonista/docs-3.4/py3/ios/new.html

Since Python 2.7 is no longer included, you cannot run codes written in Python 2.x directly. E.g. SSH command in StaSh does not run unless you make a few changes (I’ll post another article how you can make the ssh command work).

StaSh, a bash-like shell environment for Pythonista is not fully compatible yet. Installer works, and pip command is able to install packages, but somehow entries in the .stashrc file is not fully loaded – only the fist line becomes available.

StaSh installation

It is recommended to cleaninstall Pythonista 3 to install StaSh. Even in the last few days the installation process changed, so I recommend to visit the official Github constantly. For me the dev version works better (mainly ‘ls -l’). You can copy the command below and execute in Console to install the dev version.

url = 'https://raw.githubusercontent.com/ywangd/stash/dev/getstash.py'; import requests as r; exec(r.get(url).text.replace('master', 'dev'))

As advised, exit and relaunch Pythonista 3, and run launch_stash.py located in “This iPhone” to execute the StaSh shell.

Let’s install Django 4.0 (latest 4.2.1 won’t work.)

As far as I testd, Django version 4.0 can build the test page. Latest version 4.2.1 will be installed if you do not specify the version number, however it won’t run with an error regarding openssl_md5 when you launch django-admin. Copy and execute the below in StaSh.

pip install django==4.0

In my case, StaSh installation logs and pip show Django reads version 4.2.1 but in Console, import django then print(django.__version__) shows “4.0” correctly.

Anyways, after a successful installation of Django, restart Pythonista 3, launch StaSh and execute the below:

django-admin startproject mysite

You can now add an argument below to manage.py in the editor window (press and hold ▷ button then add the arg) and run.

runserver --noreload

If you see an error message “CommandError: You must set settings. ALLOWED_HOSTS if DEBUG is False“, simply ignore for now and restart Pythonista 3 then run manage.py again. Also, allow network access if asked by iOS.

If all goes well you see the URL http://127.0.0.1:8000/ . Either tap to open in Pythonista built-in browser or copy-paste in a web browser to open the page. Congrats! A rocket GIF image means your Django site is working! I have a few Django in StaSh/Pythonista articles in my website for little more detailed instructions.

I never expected an update so I’m happy.

Recently I was playing anotehr iOS app, a-Shell which is a Unix/Linux-like shell environment where you can write and run Python 3.11 codes. I like it as it’s more like a standard CLI shell with multiple programming languages, you can edit code in vim editor, etc. One thing I was disappointed about is the behavior of Django and Flask web apps — you need to open web browser and a-Shell back and forth to process the code. Pythonista 3 is a great IDE and StaSh is a nice tiny shell to play with. I expect StaSh will catch up soon. I’m back to Pythonista 3 and will post more articles.

Image by Stable Diffusion

This is totally off topic — I start adding details of Mochi Diffusion generated image when I add one as an eye-catching image. This one was generated with only 20 steps so looks bit scary, kinda typical AI generated image, but when I increased to the max 50 steps of Mochi Diffusion, people didn’t that look happy. Decided to go with more passionated image. And it should be more suitable than a free-of-use beautiful photograph of nature which isn’t related to the article at all.

Date:
2023年5月6日 14:35:09

Model:
realisticVision-v20_split-einsum

Size:
512 x 512

Include in Image:
cartoon, people happy with a new release of software

Exclude from Image:


Seed:
3343127351

Steps:
20

Guidance Scale:
11.0

Scheduler:
DPM-Solver++

ML Compute Unit:
CPU & Neural Engine
© Peddals.com