Deploy client-side (static) web app built by Flet

I edited width, alignment, etc. of my Flet code originally written as a desktop app to make it work as a web app. In this post I’m going to introduce how to build and deploy your Flet app as a static website (client-side, HTML + JavaScript). This deployment should work on an ordinary web hosting server, and you don’t need to know about web server side technology. You can learn how to add Google AdSense advertisement to your Flet web app as well.

Preparation

Please refer to my previous post and build your environment. It’s mainly targeting macOS. The sample Flet app code is used in this post.

How to build Python GUI app on macOS with Flet

In case you’re looking for server side deployment

My another post below introduces how to depoloy your web app on an Apache web server. Should you have a Nginx web server, refer to the official guide.

Host Flet web app behind Apache web server by Reverse Proxy

Build as a web app

Complete the preparation steps 1 through 12 in the other post. Build options won’t make much difference for web, so simply run the command below. It takes some time to complete.

flet build web

Test locally

Built files are placed in build/web. Let’s test locally before pushing to a server. Execute the command and open the URL (http://localhost:8000) in your web browser.

python -m http.server --directory build/web
# Press Ctrl + C to exit.
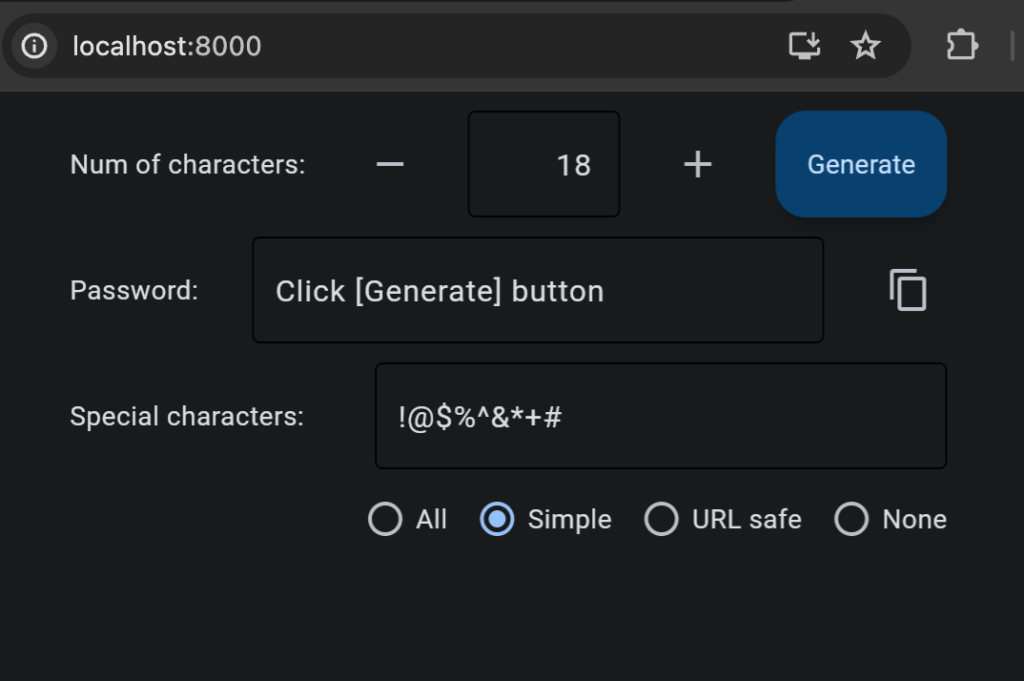
On Chrome it works as expected.

Little more steps to upload

Specify the directory name

In this example, the web app will be deployed to https://blog.peddals.com/fletpassgen, so change the path in index.html. (By adding a build option --base-dir "/directoryname/" you can avoid this step, but you cannot test locally.) Edit index.html like the below. Make sure you have the directory name between slashes (/).

  <base href="/fletpassgen/">

Compress the entire folder

Change the folder name from web to the directory name, and compress it as a single file. You get fletpassgen.tar.gz as a result of these commands:

cd build
mv web fletpassgen
tar cvzf fletpassgen.tar.gz fletpassgen

Upload and extract

Upload the compressed file

To upload the compressed file to a hosting server, this example uses the scp command in Terminal.app. Replace username, hostname and upload directory based on your account details.

scp fletpassgen.tar.gz username@hostname:~/public_html

Login server and extract the file

If ssh is allowed, login your server and extract the file like the below. The directory has to be extracted in the correct location. In this example the web app will be in the subfolder /fletpassgen/ so it’s extracted in the document root of the website.

ssh username@hostname
cd ~/public_html
tar xvf fletpassgen.tar.gz
rm fletpassgen.tar.gz

Access the site by web browser

Your web app is ready now. URL should be like this: https://blog.peddals.com/fletpassgen/

After showing an icon for some moments then your web app will start working.

Few things to check if it’s not working

With this building method (static web app), the total size of files tends to be big. My example resulted 28MB in total. As the first access will take some time to download all required files, you have to be patient and wait until the app to be ready to start.

In case you don’t even see the icon after several seconds, take a look into the directory name in index.html, actual name of the extracted directory, user/group ownership and access permissions.

Tips and notes

Use same code for desktop and web apps

You may notice the layout of contents is broken when opening your app in web browser (I did!) Use ft.Container to place contents and width= property having the same value as page.window_width= so the horizontal layout will be kept in a wider window. For a simple app, having the below parameters keeps your app at the top center even in a web browser.

    page.vertical_alignment = ft.MainAxisAlignment.START
    page.horizontal_alignment = ft.CrossAxisAlignment.CENTER

File size is big

As I wrote, even this small app (Python code is approx. 3.9KB) becomes 28MB in total after a build. You need to put your eye on the available disk space.

App keeps running once loaded

Since this deployment method does not require a code to be running on the web server, your app keeps running in a web browser even when the network is down. For a simple tool it can be an advantage (I don’t know who needs a new password when offline, though).

Copy button won’t work on Safari (macOS and iOS)

This is a known issue. Hopefully it will be resolved in the near future, but at this moment copy works on Chrome but not on Safari. I added a code to hide the copy button based on the user agent, but it does not work. flet build web deployment won’t be able to get user agent unfortunately. You need to deploy as a server-side app if you want to add browser specific features.

Bonus: add Google AdSense advertisement

You can find this type of information for Flutter quite easily, but some of the ways I found didn’t work for my Flet app. If you’re looking for a solution, try this:

Get AdSense strings

Login your Google AdSense account, create new ad or click on the Get code < > icon of an existing ad to get strings.

Google AdSense > Ads > By ad unit > Display ads > Give it a name and Create > take note of the below two lines.
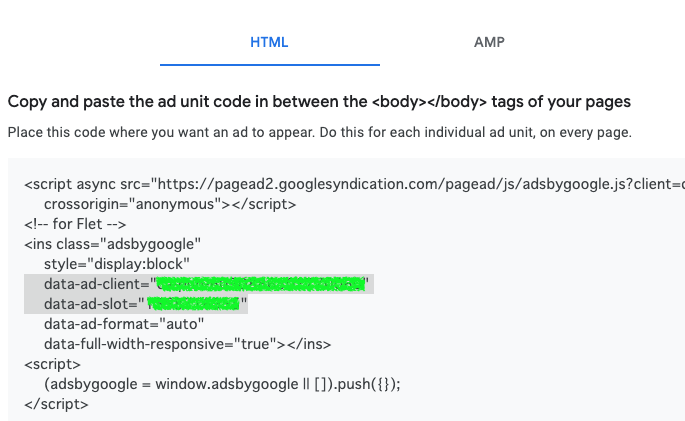
             data-ad-client="xxxxxxxx"
             data-ad-slot="yyyyyyyy"

Add style to index.html

Edit the index.html file in the Flet web app directory and add the below CSS code, right above the </style> tag. Line numbers are just reference (Flet ver. 0.19.0).

    footer{
        width: 100%;
        height: 100px;
        text-align: center;
        padding: 0;
        position: absolute;
        bottom: 0;
        z-index: 100;
    }

Add <footer></footer> block to index.html

Right above the last line </body></html> of the index.html, add the below code. Replace highlighted xxxxxxxx and yyyyyyyy with strings you copied.

  <footer>
    <style>
    .example_responsive_1 { width: 320px; height: 100px; }
    @media(min-width: 500px) { .example_responsive_1 { width: 468px; height: 60px; } }
    @media(min-width: 800px) { .example_responsive_1 { width: 728px; height: 90px; } } 
    </style>
        <script async src="https://pagead2.googlesyndication.com/pagead/js/adsbygoogle.js"></script>
        <!-- Home_Page -->
        <ins class="adsbygoogle"
             style="display:inline-block"
             data-ad-client="xxxxxxxx"
             data-ad-slot="yyyyyyyy">
        </ins>
        <script>
    (adsbygoogle = window.adsbygoogle || []).push({});
    </script>
  </footer>

Save the file. You’ll see a horizontal ad at the bottom of the web page. If you just created a new ad, it may take some time for it to appear. Enjoy!

Image by Stable Diffusion

Date:
2024-Jan-29 0:04:44

Model:
realisticVision-v20_split-einsum

Size:
512 x 512

Include in Image:
masterpiece, best quality, retro future, successful upload of application

Exclude from Image:

Seed:
3400661084

Steps:
20

Guidance Scale:
20.0

Scheduler:
DPM-Solver++

ML Compute Unit:
CPU & Neural Engine

How to build Python GUI app on macOS with Flet

Flet version 1.18.0 released on the last day of year 2023 introduced a newer way of building apps that run on other computer, smartphone or website without setting up Python and Flet environment. I tried to build a macOS app and encountered a weird issue — a plain window opened with a text “Hello, Flet!” and I could not figure out how to fix it. A few days later, newer version 1.19.0 was released, and it had multiple fixes for build related issues. In this post I’d like to share how I built macOS app in Python with Flet. Once you set up your development environment, building process is really straight forward.

Official announcement in discord: https://discord.com/channels/981374556059086931/981375816489402408

Official GitHub change log: https://github.com/flet-dev/flet/blob/main/CHANGELOG.md

Official flet build guide: https://flet.dev/docs/guides/python/packaging-app-for-distribution

Quick introduction of my sample code

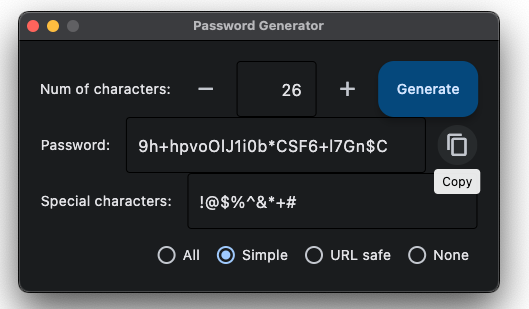
As an example I’m going to use my simple Password Generator app. The main purpose of this post is to introduce how to build GUI app with Flet, so I’m not going to write about too much of this sample code. As you can see in the screenshot below, you can edit number of characters and special characters to use. Copy button copies the password to clipboard. It’s fun to see how strong passwords the app generates by checking with online services like this one (bitwarden).

If you’re interested you can grab the code from this GitHub: https://github.com/tokyohandsome/passgen.py/blob/main/fletpassgen.py

Sample app you can build by following this guide. Number and special character set are editable.

Environment

  • macOS: 14.2.1
  • Python: 3.11.6
  • Python virtual environment: pipenv (version: 2023.10.24)
  • Modules: flet (version: 0.19.0)
  • Rosetta
  • Xcode: 15.2
  • Git: 2.29.2
  • cocoapods: 1.14.3_1
  • Flutter: 3.16.7

High level steps

  1. Build a virtual environment.
  2. Install Flet (version 0.18.0 or newer. 0.19.0 used in this post)
  3. Write a Flet app code or grab one.
  4. Test the code in your environment.
  5. Install requirements such as Flutter to build Flet app.
  6. Create a folder and work in there.
  7. Create assets folder and place an icon image.
  8. Copy your Flet code as main.py.
  9. Change the last part of main.py to ft.app(main).
  10. Create requirements.txt and add required modules.
  11. Clone build template from official GitHub.
  12. Edit copyright in the template.
  13. Build your app.

Little more detailed initial steps (#1~4)

Use your favorite virtual environment tool. Python version has to be 3.8 or newer. Install flet by executing pip install flet without specifying the version or flet==1.19.0. If you have not written your Flet app code yet, grab one from somewhere like the official site or from my GitHub if you’d like. In this post I’m going to use the fletpassgen.py as an example. Confirm it works by python3 fletpassgen.py then move forward.

Install requirements such as Flutter to build Flet app. (step #5)

To build as a desktop/smartphone/web app, you need to install Flutter, Dart, and a few other stuff based on the requirements. Once this process is done, you don’t need to redo unless anything goes wrong. Below steps are for Apple Silicon macs specifically. Skip any step if you’re already done.

1. Rosetta: Execute below to install.

sudo softwareupdate --install-rosetta --agree-to-license

2. Xcode 15: Download Xcode 15 from Apple’s website. Click on Download at the top of the page then double click on the installer.

3. Cocoapods: Execute below to install.

brew install cocoapods

4. Git: Execute below to install.

brew install git

5. Flutter: Follow the steps at the middle of the page and download Flutter SDK for your CPU (Intel or Apple Silicon such as M1, M2, M3…). Move the zip file to somewhere like ~/development/, unzip (double click), and add path to the commands to your PATH variable (rename handsome to your username, add below line to your ~/.zshrc then execute source ~/.zshrc to load the setting).

export PATH="/Users/handsome/development/Flutter/flutter/bin:$PATH"

Preparation for build (steps #6~12)

When you’re done all the above steps, create an app folder, go inside and perform the remaining steps. In this example the app name is fletpassgen.

mkdir fletpassgen
cd fletpassgen
mkdir assets
open assets

The above last command opens the assets folder in Finder where you can place a 512×512 pixel icon image named like icon.png (supported formats include .bmp, .jpg, and .webp). I don’t have anything else, but you can place other resources such as audio and text files used by our code.

Side note about icon: Flet can build app without an icon provided - it uses its own icon. I used Mochi Diffusion, a desktop app version of the AI image generator Stable Diffusion to generate the app icon which is also the top of this post. Prompts, model, etc. can be found at the last part of this post.

Next, copy your Flet app code as main.py.

cp ../fletpassgen.py main.py

If the last line of the code to call the main function is not ft.app(main), change so.

#if __name__ == "__main__":ft.app(target=main) <-- this needs to be changed to the below:
ft.app(main)

requirements.txt has to have needed Python module to run your Flet app, but pip freeze > requirements.txt caused several errors for me. In this example, flet was only needed (other imported modules are Python built-in). See the official guide for details especially when you’re building iOS or Android app.

flet

You can clone the build template from the official GitHub to your local folder and edit copyright which can be shown by Command + I (macOS). Use your favorite editor if you are not good at the vi (vim) editor.

git clone https://github.com/flet-dev/flet-build-template
vi flet-build-template/cookiecutter.json

I edited highlighted lines 7-9 of cookiecutter.json in the flet-build-template folder.

{
    "out_dir": "",
    "python_module_name": "main",
    "project_name": "",
    "project_description": "",
    "product_name": "{{ cookiecutter.project_name }}",
    "org_name": "com.peddals",
    "company_name": "Peddals.com",
    "copyright": "Copyright (c) 2024 Peddals.com",
    "sep": "/",
    "kotlin_dir": "{{ cookiecutter.org_name.replace('.', cookiecutter.sep) }}{{ cookiecutter.sep }}{{ cookiecutter.project_name }}{{ cookiecutter.sep }}",
    "hide_loading_animation": true,
    "team_id": "",
    "base_url": "/",
    "route_url_strategy": "path",
    "web_renderer": "canvaskit",
    "use_color_emoji": "false"
}

Build your app (final step #13)

If you don’t care of options, simply execute flet build macos and you get an executable app. Below longer command adds version number and the above edited copyright. (Correction on Jan 25, 2024, thanks to the issue answered by the author.) To specify the build template location, use --template option followed by a relative path.

flet build macos --build-version "1.0.1" --template flet-build-template

Give it some time to complete and when you see Success! congrats, your app is built! Under build/macos/ you can find your app fletpassgen.app. It took around 3 mins and 10 secs to build it on my M1 mac mini. Output of the successful build process log is like below:

Creating Flutter bootstrap project...OK
Customizing app icons and splash images...OK
Generating app icons...OK
Packaging Python app...OK
Building macOS bundle...OK
Copying build to build/macos directory...OK
Success!
Screenshot in color

App is Universal

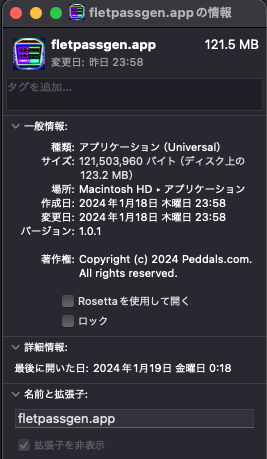
Type: Application (Universal). See version 1.0.1 and Copyright (by Cmd + I) as well.

Just like other mac apps, you can move the app to your Applications folder and double-click to launch. I was not asked to approve in the Privacy and Security. Not tested yet, but it should run on an Intel mac as well since it’s a Universal app. It opens and works just like the Python code. My sample app opens the Flet default size window momentarily then resizes as specified – I suppose there’s a better way to code.

Do I like it?

I love it! I used to use tkinter and pysimplegui to build desktop apps, but Flet is much easier with better looking/modern interface. Building process is straight forward, and app works great. Just like 3D printer changed productivity of nonprofessional DIYers in the real world, Flet lets you make your ideas real on your computer and share with your family, friends, colleagues and others. Hope you find it useful and enjoy as well!

Image by Stable Diffusion

Date:
2024-Jan-15 23:05:04

Model:
realisticVision-v20_split-einsum

Size:
512 x 512

Include in Image:
masterpiece, best quality, retro future, cyber, disco computer, password generator

Exclude from Image:

Seed:
3224310018

Steps:
20

Guidance Scale:
20.0

Scheduler:
DPM-Solver++

ML Compute Unit:
CPU & Neural Engine

(solved) macOS Finder didn’t open Documents and subfolders directly.

Not sure when it started, but Finder didn’t open ~/Documents and its subfolders directly. Somehow I managed to get it fixed. If you have the same issue, it can be fixed.

Decided to troubleshoot (finally).

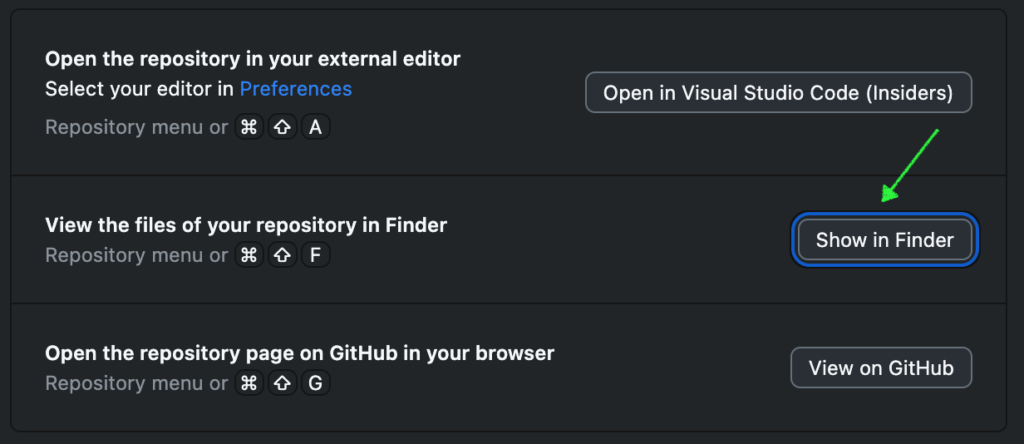
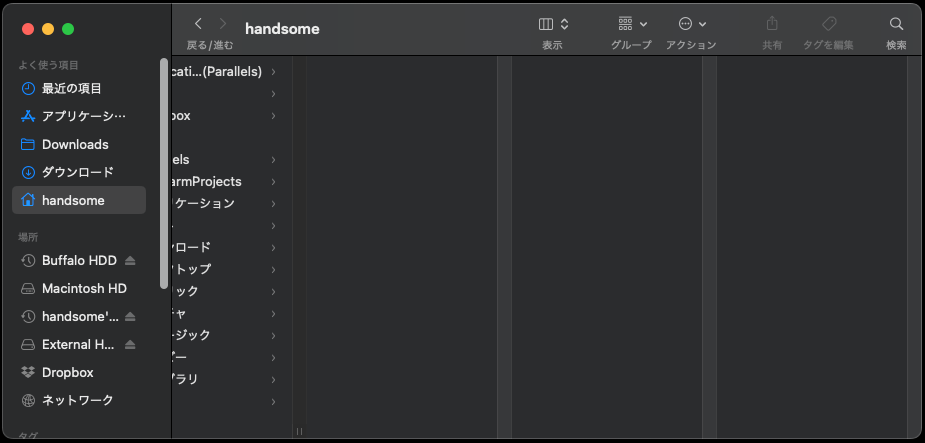
Current running macOS version is Sonoma 14.2.1. I might have first noticed this issue when the macOS version was Big Sur 11.0 — Finder didn’t open folder by executing open ~/Documents/Python/fuga in Terminal.app, but it was not a big deal at that time. Today, I was playing with GitHub Desktop app and once again noticed the issue — the Show in Finder button didn’t open the local repo but my home directory instead. Something was (still) wrong.

↑ this button opened the home directory ↓ instead of the local repo folder (my UI is Japanese.)
Local repo located a couple folders under the Documents folder

Symptom

Open command in Terminal didn’t open any folder under ~/Documents in Finder. I was able to navigate to lower levels folders in the same Finder window, so I had the right permissions. Subfolders in ~/Music, ~/Downloads, etc. had no problem to be opend. Go menu > Recent Folders and right-click > Open in New Tab resulted the exact same issue. Only Documents and its subfolders didn’t open directly in Finder in any way.

How I fixed it.

I tried multiple things for a couple hours and nothing helped. Finally, changing the folder view to List from Column seemed to have worked. Little more details follow: Open the Documents folder in Finder then select List from the View icon or drop-down.

or List from drop-down

From the window’s action menu or Finder’s View menu, select Show View Options to open the settings window. Command + J shortcut does the same thing.

Check “Always open in list view” then click on “Use as Defaults” at the bottom and close the window. Now the Documents and its subfolders open in the list view directly by the open command in Terminal.

I won.

Finder still changes view of window somehow whether you like it or not. So, I moved around/opened new windows/changed views/closed windows several times to reproduce the issue, but it never happened again (so far). I don’t know if the above steps was the right way, but the issue is gone.

Things that I tried but didn’t work/help, just for your info.

  • Search in the internet — could not find the exact same issue.
  • Reboot
  • Boot in safe mode.
  • Run Disk First Aid
  • Remove all app’s Documents folder access permissions, reboot and granted again.
  • Compare permissions of Documents and other folders.
  • Check Console.app

Image by Stable Diffusion

Date:
2024-Jan-3 17:56:25

Model:
realisticVision-v20_split-einsum

Size:
512 x 512

Include in Image:
comicbook-style, gray hair guy looking for a missing folder in a book library

Exclude from Image:

Seed:
2520942867

Steps:
20

Guidance Scale:
20.0

Scheduler:
DPM-Solver++

ML Compute Unit:
CPU & Neural Engine
© Peddals.com