Run ssh on Pythonista 3.4

I managed to run ssh.py written in Python 2 on StaSh for Pythonista 3 (ver. 3.4). Here I share what I did.

Note

The StaSh ssh command is not the best ssh client as it makes iPhone warmer than usual, and StaSh does not have dedicated control or escape virtual key which are well used in Linux/Unix systems. So, I would suggest a SSH client app such as Termius if you’r looking for a serious SSH client. This post is rather for those of you who are interested in running (converting) Python 2 scripts on Pythonista 3.4.

Pythonista 3.4 does not include Python 2.7 any longer. Scripts written in Python 2 need to be converted to Python 3 scripts. The script ssh.py comes with StaSh was written in Python 2. Converting it by the Python 2 to 3 tool was not enough.

“Python 2 to 3” tool can be found under the tool menu.

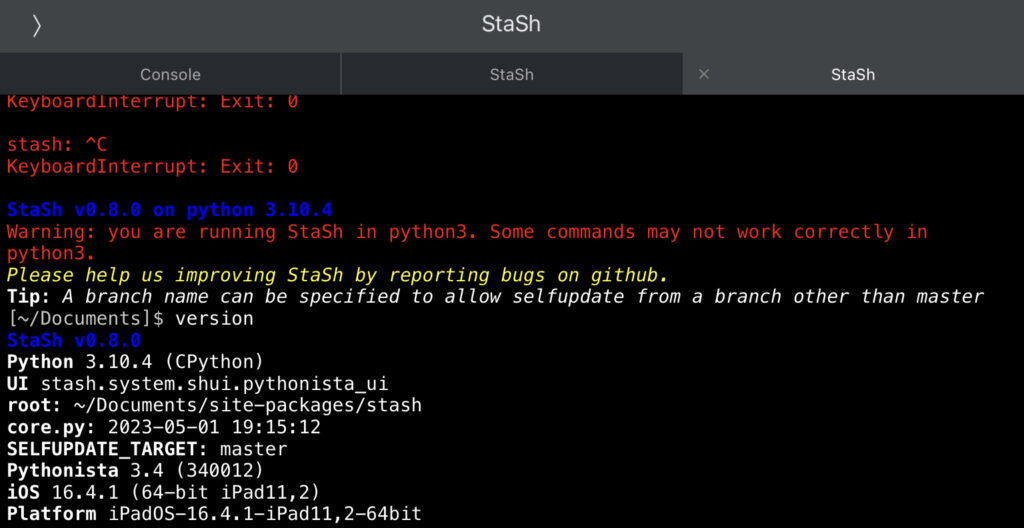
Version info (StaSh version command)

$ version
StaSh v0.8.0
Python 3.10.4 (CPython)
UI stash.system.shui.pythonista_ui
root: ~/Documents/site-packages/stash
core.py: 2023-05-05 18:00:40
SELFUPDATE_TARGET: master
Pythonista 3.4 (340012)
iOS 16.4.1 (64-bit iPhone10,2)
Platform iOS-16.4.1-iPhone10,2-64bit
BIN_PATH:
  ~/Documents/bin
  ~/Documents/stash_extensions/bin
  ~/Documents/site-packages/stash/bin

StaSh is the latest dev version as of May 12, 2023 (Please refer to another post for the StaSh installation.)

List of things I did

I restarted Pythonista 3 as needed. (You can find how to generate SSH keys in my other post. It has a tip to adjust number of rows.)

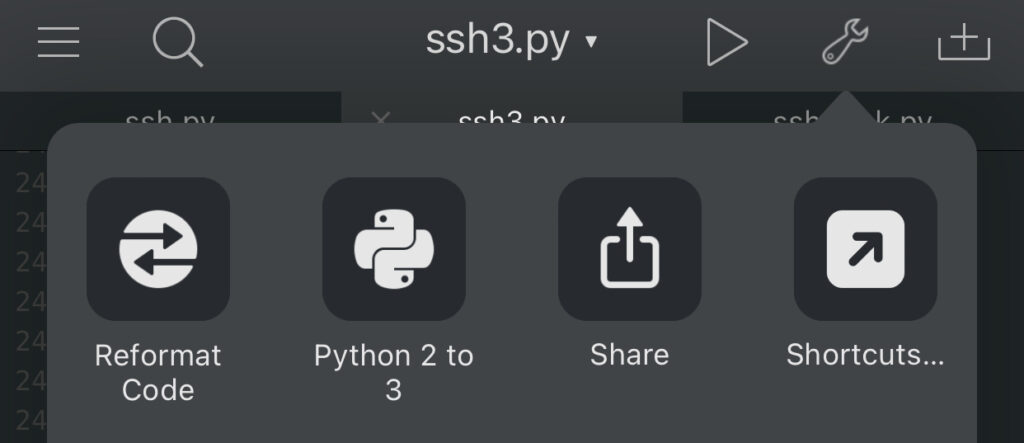
  1. Copy ~/Documents/site-packages/stash/bin/ssh.py to ~/Documents/stash_extensions/bin as ssh3.py
  2. Open ssh3.py and execute the “Python 2 to 3” tool. Apply all suggestions.
  3. Edit function vk_tapped() and treat vk.name as int (details below)
  4. Open ~/Documents/site-packages/stash/system/shscreens.py and execute the “Python 2 to 3” tool. Apply all suggestions.
  5. Replace / with // on lines 541 and 576 of shscreens.py. They are now like this: idx_line, idx_column = idx // (ncolumns + 1), idx % (ncolumns + 1)
  6. Execute the command ssh3 in StaSh

Actual code after the changes of the vk_tapped() function is below. Lines 242-262. Rename vk.name to vk, and replace'k_tab' with relative integer. By this change, virtual keys like Tab, Up, CC work on the SSH server as tab, up arrow and control+C respectively.

    def vk_tapped(self, vk):
        if vk == 7:
            self.send('t')
        elif vk == 0:
            self.kc_pressed('C', CTRL_KEY_FLAG)
        elif vk == 1:
            self.kc_pressed('D', CTRL_KEY_FLAG)
        elif vk == 6:
            self.kc_pressed('U', CTRL_KEY_FLAG)
        elif vk == 9:
            self.kc_pressed('Z', CTRL_KEY_FLAG)
        elif vk == 2:
            self.kc_pressed('UIKeyInputUpArrow', 0)
        elif vk == 3:
            self.kc_pressed('UIKeyInputDownArrow', 0)

        elif vk == 10:
            if _stash.terminal.is_editing:
                _stash.terminal.end_editing()
            else:
                _stash.terminal.begin_editing()

Actual errors and helpful info to fix

I got the below error after converting shscreens.py to a Python 3 script (step #4):

system/shscreens.py", line 578, in load_pyte_screen
    c = pyte_screen.buffer[idx_line][idx_column]
TypeError: list indices must be integers or slices, not float

Somehow adding int(idx_line) and int(idx_column) before line 578 didn’t resolve this issue. Helpful info (or answer) was found in this old issue:

My guess would be that stash uses / division for line/column indices. On Python 3 / always produces a float. The fix is simple: replace it with flooring division //.

https://github.com/selectel/pyte/issues/123

Another error that wast the reason of the change step #3 was this:

  File "stash_extensions/bin/ssh3.py", line 230, in vk_tapped
    if vk.name == 'k_tab':
AttributeError: 'int' object has no attribute 'name'

I am still not sure how this worked in Python 2. Without fixing this you can establish a VPN connection, but virtual keys won’t function. To fix this issue, I added print(vk) at the top of the def block. After connecting an SSH session, I pressed each virtual key (Tab, Up, CC, etc.), opened Console to confirm the number and replaced with the name. There should be better way but this worked.

Lastly this was the reason of my motivation to make the ssh command work.

StaSh works with both Pythonista 2 and 3, though not all commands support python3.

https://github.com/ywangd/stash

Image by Stable Diffusion

Off topic: The eye-catch image was generated by Mochi Diffusion, a Stable Diffusion client for macOS. Added “SSH” on the AI generated image using a graphic editor. Below is the details:

Date:
2023/5/6/ 22:31:24

Model:
realisticVision-v20_split-einsum

Size:
512 x 512

Include in Image:
cartoon, a young man waring glasses, super happy

Exclude from Image:


Seed:
3826992198

Steps:
20

Guidance Scale:
11.0

Scheduler:
DPM-Solver++

ML Compute Unit:
CPU & Neural Engine

Pythonista 3.4 is out now (supporting Python 3.10)

I thought the development discontinued…, but I was wrong!

Running on iPad. Output of Stash version command. See Python is 3.10.4.

Python is now 3.10.4. Python 2 is no longer included.

After 3 years of silence, the great Python IDE for iOS/iPadOS, Pythonista 3 is finally released. You can now execute your Python 3.10 codes.

Pythonista 3 ← Link to the App Store

For details (not very much, tough), visit the official website below:

https://omz-software.com/pythonista/docs-3.4/py3/ios/new.html

Since Python 2.7 is no longer included, you cannot run codes written in Python 2.x directly. E.g. SSH command in StaSh does not run unless you make a few changes (I’ll post another article how you can make the ssh command work).

StaSh, a bash-like shell environment for Pythonista is not fully compatible yet. Installer works, and pip command is able to install packages, but somehow entries in the .stashrc file is not fully loaded – only the fist line becomes available.

StaSh installation

It is recommended to cleaninstall Pythonista 3 to install StaSh. Even in the last few days the installation process changed, so I recommend to visit the official Github constantly. For me the dev version works better (mainly ‘ls -l’). You can copy the command below and execute in Console to install the dev version.

url = 'https://raw.githubusercontent.com/ywangd/stash/dev/getstash.py'; import requests as r; exec(r.get(url).text.replace('master', 'dev'))

As advised, exit and relaunch Pythonista 3, and run launch_stash.py located in “This iPhone” to execute the StaSh shell.

Let’s install Django 4.0 (latest 4.2.1 won’t work.)

As far as I testd, Django version 4.0 can build the test page. Latest version 4.2.1 will be installed if you do not specify the version number, however it won’t run with an error regarding openssl_md5 when you launch django-admin. Copy and execute the below in StaSh.

pip install django==4.0

In my case, StaSh installation logs and pip show Django reads version 4.2.1 but in Console, import django then print(django.__version__) shows “4.0” correctly.

Anyways, after a successful installation of Django, restart Pythonista 3, launch StaSh and execute the below:

django-admin startproject mysite

You can now add an argument below to manage.py in the editor window (press and hold ▷ button then add the arg) and run.

runserver --noreload

If you see an error message “CommandError: You must set settings. ALLOWED_HOSTS if DEBUG is False“, simply ignore for now and restart Pythonista 3 then run manage.py again. Also, allow network access if asked by iOS.

If all goes well you see the URL http://127.0.0.1:8000/ . Either tap to open in Pythonista built-in browser or copy-paste in a web browser to open the page. Congrats! A rocket GIF image means your Django site is working! I have a few Django in StaSh/Pythonista articles in my website for little more detailed instructions.

I never expected an update so I’m happy.

Recently I was playing anotehr iOS app, a-Shell which is a Unix/Linux-like shell environment where you can write and run Python 3.11 codes. I like it as it’s more like a standard CLI shell with multiple programming languages, you can edit code in vim editor, etc. One thing I was disappointed about is the behavior of Django and Flask web apps — you need to open web browser and a-Shell back and forth to process the code. Pythonista 3 is a great IDE and StaSh is a nice tiny shell to play with. I expect StaSh will catch up soon. I’m back to Pythonista 3 and will post more articles.

Image by Stable Diffusion

This is totally off topic — I start adding details of Mochi Diffusion generated image when I add one as an eye-catching image. This one was generated with only 20 steps so looks bit scary, kinda typical AI generated image, but when I increased to the max 50 steps of Mochi Diffusion, people didn’t that look happy. Decided to go with more passionated image. And it should be more suitable than a free-of-use beautiful photograph of nature which isn’t related to the article at all.

Date:
2023年5月6日 14:35:09

Model:
realisticVision-v20_split-einsum

Size:
512 x 512

Include in Image:
cartoon, people happy with a new release of software

Exclude from Image:


Seed:
3343127351

Steps:
20

Guidance Scale:
11.0

Scheduler:
DPM-Solver++

ML Compute Unit:
CPU & Neural Engine

Select the Python version (2.x or 3.x) per a file basis in Pythonista 3

There are two Python versions available in Pythonista 3

In Pythonista3, you can select Python version to execute your code – tap and hold the right triangle next to the file name and select 2.7 or 3.6. Usually 3.6 which is default should be fine, but in case you need to run a code written in Python 2.x you’ll need this feature.

6DF76B93-53C3-4D19-B1AD-37FD314A1BD5.jpeg

Some commands on StaSh are written in Python 2.x

Some commands on StaSh, the shell-like powerful CLI add-on to Pythonista3, are written in Python 2. So, if you run it without specifying the version, you get the warning message below.

StaSh v0.7.2 on python 3.6.1
Warning: you are running StaSh in python3. Some commands may not work correctly in python3.
Please help us improving StaSh by reporting bugs on github.

In case you need to install Python 2 packages, you have to run StaSh in Python 2.7 and the warning message won’t appear.

StaSh v0.7.2 on python 2.7.12

Selecting the version everytime you launch StaSh is not smart, is it? 

Specify the Python version to execute your code

When you write a code, it is usually meant to be executed by a specific version, either 2.x or 3.x. Just like macOS or Linux, well, even simpler, you can specify the Python version at the first line – this method is called “Shebang”.

#! python2
# coding: utf-8
# Write your Python 2 codes below

Now you got the idea – yes, add the Shebang to a copy of the launch_stash.py and add it as a shortcut along with the original code so that you can quickly launch StaSh in your desired Python version.

There are lots of useful legacy codes/packages written in Python 2 you can find in pip, in the Internet or books. Don’t spend too much time to hand-code and convert into Python 3. Simply run as-is and/or have Pythonista3 convert it to version 3 – you can find Python 2 to 3 tool in the spanner menu: 

IMG_9338.jpeg

Enjoy!

iOS Pythonista 3: Using SSH

Use SSH in Pythonista 3 (StaSh)

SSH in StaSh seems not to work if a passphrase is given to create keys. I found some hosting servers do not accept passphrase (password) to connect using SSH. In this post you can find a way to careate SSH keys in Pythonista 3 (SSH command in StaSh) with no passphrase.

Generate SSH keys in StaSh

$ ssh-keygen -t rsa -b 2048

Secret key and Public key are generated in the following path.

~/Documents/site-packages/stash/.ssh
$ ls
id_rsa id_rsa.pub

Copy the public key “id_rsa.pub” to your SSH server’s appropriate location.

SSH command to connect to your server

$ ssh username@username.xsrv.jp -p 10022

Above is an example to connect to XServer hosting server that I use. Change username, host name (“username.xsrv.jp” in this example) and port number (10022 in this case).

When you first run the ssh command in Pythonista 3, a terminal emulator “pyte” will be installed automatically. In this case you’ll see global name 'pyte' is not defined error message and need to quit and relaunch Pythonista 3.

Additional Notes – Set number of lines

Once the above is complete, you will want to add an alias (shortcut command) to the .stashrc file (Reference), copy the SSH keys to another SSH app, iOS device or computer. Make sure that you do not share “ids_rsa” the secret key file with anyone. Create .ssh folder in the same path if you use Pythonista 3 in another iOS device and place the ids_rsa file.

When connecting to a host, you will notice at least 3 lines from the top will be hidden as StaSh’s shortcut keys and iOS’s software keyboard will use 3 lines of the bottom of your screen. This is very annoying especially when you use ‘vi’ command to edit a file. To avoid this issue, one manual way is to use “stty” command to set your screen size (number of rows) every time you SSH to a server. Refer to examples below and find the best number for your environment.

$ stty rows 51 # Works best for iPad mini 2 + Bluetooth keyboard
$ stty rows 27 # Works best for iPhone 8 Plus with iOS software keyboard

Install py-tree on Pythonista3

How to install py-tree on Pythonista3 and use it easily.

With py-tree command, you can list files and directories in a tree view

[mysite]$ tree
.
|-- db.sqlite3
|-- manage.py
|-- mysite
|   |-- __init__.py
|   |-- settings.py
|   |-- urls.py
|   `-- wsgi.py
`-- polls
    |-- __init__.py
    |-- admin.py
    |-- apps.py
    |-- models.py
    |-- tests.py
    |-- urls.py
    |-- views.py
    `-- migrations
        |-- 0001_initial.py
        `-- __init__.py

Not only in Pythonista3 but also in many cases, you want to see all directories and files of your project in a better format in CLI, StaSh in Pythonista3’s case. The py-tree command is the solution.

Installation

You can easily install by running the following command in StaSh (type strings after the command prompt [stash]$ and hit [enter]).

[stash]$ pip install py-tree

Run the command by entering only “tree”.

Entering a dash “-” character in iPhone is a bit annoying so let’s create an alias tree.
In StaSh, you can create .stashrc file which works like .bashrc file for Linux’s  bash shell. Follow the example below to create an alias.

[stash]$ cd site-packages/stash/
[stash]$ la
.gitignore .stash_history .stash_tips .travis.yml CHANGES.md LICENSE README.md __init__.py bin docs getstash.py lib man stash.py system
[stash]$ touch .stashrc
[stash]$ echo "alias tree='py-tree'" >> .stashrc
[stash]$ cat .stashrc
alias tree='py-tree'
[stash]$ la
.gitignore .stash_history .stash_tips .stashrc .travis.yml CHANGES.md LICENSE README.md __init__.py bin docs getstash.py lib man stash.py system

Quit and relaunch Pythonista3 to let StaSh load the .stashrc file. Now you can use the tree command. Woo-hoo!

Create and edit files with different file extension than “xxx.py”.

You cannot create a file like “.stashrc” in Pythonista3 as it adds surfix “.py”. Also, once a file is created, it won’t appear in the file list to edit. So, when you need to create such a file, use touch command then use edit command to edit it in Pythonista’s Edit screen. ls -a or its alias la is the command to show invisible files in StaSh.

Summary

PurposeStaSh CommandExample
Create invisible file.touchtouch .invisible
Edit file in Pythonista3.editedit .invisible
List files including invisible files.ls -a
or simply
la
la
(la .*
lists only invisible files.)

Install and Setup Django in Pythonista3 (iOS app)

How to Set up Django in Pythonista3, iOS app for iPhone and iPad:

First, make sure you have StaSH installed in your Pythonista3 app.

In StaSH execute following command:

pip install Django==1.11.6

Select version “1.11.6” or Long Term Support version available. See Djangoproject.com website for the latest LTS version available. (Comment added on Jun 12, 2021) you may be able to execute “pip install django” and the version 3.2.4 will be installed. Specifya version only when necessary.

Quit and launch Pythonista <– This is one of most important steps when you make changes to Pythonista3!

Create an application (in stash)

django-admin.py startproject mysite

Quit and launch Pythonista

Open /mysite/manage.py
Go to console and run:

import sys
sys.path

Locate and copy a line like below where “…” is device specific.

/private/var/mobile/.../Documents/mysite

Go back to the edit page (manage.py).
Add a line like below under “import sys” — replace “PASTE HERE” with the line copied in the prev step. (Comment added on Jun 12, 2021) Removed unnecessary “=” after “append”.

sys.path.append(“PASTE HERE”)

So, it will look something like below:

sys.path.append("/private/var/mobile/Containers/Shared/AppGroup/C1F57ABC-DDDD-EEEE-FFFF-B0B0E0B0B0E7/Pythonista3/Documents/mysite/")

Quit and launch Pythonista

Open /mysite/manage.py, tap and hold the play (run) button and enter “runserver --noreload” as an argument. You may need to copy and paste “--noreload” without double-quotes.


If you see unforseen errors, quit Pythonista and relaunch then follow the steps again.
If successful, you see something like below in the Console:

Performing system checks...

System check identified no issues (0 silenced).

You have 13 unapplied migration(s). Your project may not work properly until you apply the migrations for app(s): admin, auth, contenttypes, sessions.
Run 'python manage.py migrate' to apply them.
November 03, 2017 - 20:46:35
Django version 1.11.6, using settings 'mysite.settings'
Starting development server at http://127.0.0.1:8000/
Quit the server with CONTROL-C.

Now, open http://127.0.0.1:8000/ in Safari or any other web browser.

Version 3.2.4

If you see the “Congratulations!” page, your setup is complete, and it’s time to move forward to programing your own site/app.
Make sure you quit and relaunch Pythonista to properly apply your changes to your Django sites/apps.

StaSH log (installation of Django 1.11.6):

[~/Documents]$ pip list
[~/Documents]$
[~/Documents]$
[~/Documents]$ pip install django
Querying PyPI ...
Error: Source distribution not available for Django: 2.0b1
[~/Documents]$ pip install Django==1.11.6
Querying PyPI ...
Downloading package ...
Opening: https://pypi.python.org/packages/13/26/f3841e00663027ba7cf7ce7ba2cabb682a83cf0629bef013d70bebefa69d/Django-1.11.6.tar.gz
Save as: /private/var/mobile/Containers/Data/Application/20C8FA54-EEEE-FFFF-8888-3BACC5555555/tmp//Django-1.11.6.tar.gz (7874450 bytes)
7874450 [100.00%]
Extracting archive file ...
Archive extracted.
Running setup file ...
Handling commandline script: django/bin/django-admin.py
Package installed: Django
Dependency available in Pythonista bundle : pytz
[~/Documents]$
[~/Documents]$
[~/Documents]$ which django
[~/Documents]$ pip list
Django (2.0b1) - A high-level Python Web framework that encourages rapid development and clean, pragmatic design.
[~/Documents]$
© Peddals.com