
Flet version 1.18.0 released on the last day of year 2023 introduced a newer way of building apps that run on other computer, smartphone or website without setting up Python and Flet environment. I tried to build a macOS app and encountered a weird issue — a plain window opened with a text “Hello, Flet!” and I could not figure out how to fix it. A few days later, newer version 1.19.0 was released, and it had multiple fixes for build related issues. In this post I’d like to share how I built macOS app in Python with Flet. Once you set up your development environment, building process is really straight forward.
Official announcement in discord: https://discord.com/channels/981374556059086931/981375816489402408
Official GitHub change log: https://github.com/flet-dev/flet/blob/main/CHANGELOG.md
Official flet build guide: https://flet.dev/docs/guides/python/packaging-app-for-distribution
Contents
- 1 Quick introduction of my sample code
- 2 Environment
- 3 High level steps
- 4 Little more detailed initial steps (#1~4)
- 5 Install requirements such as Flutter to build Flet app. (step #5)
- 6 Preparation for build (steps #6~12)
- 7 Build your app (final step #13)
- 8 App is Universal
- 9 Do I like it?
- 10 Image by Stable Diffusion
Quick introduction of my sample code
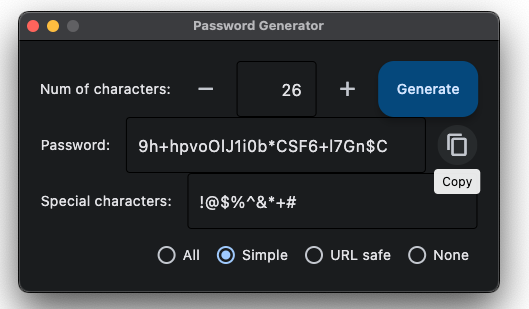
As an example I’m going to use my simple Password Generator app. The main purpose of this post is to introduce how to build GUI app with Flet, so I’m not going to write about too much of this sample code. As you can see in the screenshot below, you can edit number of characters and special characters to use. Copy button copies the password to clipboard. It’s fun to see how strong passwords the app generates by checking with online services like this one (bitwarden).
If you’re interested you can grab the code from this GitHub: https://github.com/tokyohandsome/passgen.py/blob/main/fletpassgen.py
Environment
- macOS: 14.2.1
- Python: 3.11.6
- Python virtual environment: pipenv (version: 2023.10.24)
- Modules: flet (version: 0.19.0)
- Rosetta
- Xcode: 15.2
- Git: 2.29.2
- cocoapods: 1.14.3_1
- Flutter: 3.16.7
High level steps
- Build a virtual environment.
- Install Flet (version 0.18.0 or newer. 0.19.0 used in this post)
- Write a Flet app code or grab one.
- Test the code in your environment.
- Install requirements such as Flutter to build Flet app.
- Create a folder and work in there.
- Create
assetsfolder and place an icon image. - Copy your Flet code as main.py.
- Change the last part of main.py to
ft.app(main). - Create
requirements.txtand add required modules. - Clone build template from official GitHub.
- Edit copyright in the template.
- Build your app.
Little more detailed initial steps (#1~4)
Use your favorite virtual environment tool. Python version has to be 3.8 or newer. Install flet by executing pip install flet without specifying the version or flet==1.19.0. If you have not written your Flet app code yet, grab one from somewhere like the official site or from my GitHub if you’d like. In this post I’m going to use the fletpassgen.py as an example. Confirm it works by python3 fletpassgen.py then move forward.
Install requirements such as Flutter to build Flet app. (step #5)
To build as a desktop/smartphone/web app, you need to install Flutter, Dart, and a few other stuff based on the requirements. Once this process is done, you don’t need to redo unless anything goes wrong. Below steps are for Apple Silicon macs specifically. Skip any step if you’re already done.
1. Rosetta: Execute below to install.
sudo softwareupdate --install-rosetta --agree-to-license2. Xcode 15: Download Xcode 15 from Apple’s website. Click on Download at the top of the page then double click on the installer.
3. Cocoapods: Execute below to install.
brew install cocoapods4. Git: Execute below to install.
brew install git5. Flutter: Follow the steps at the middle of the page and download Flutter SDK for your CPU (Intel or Apple Silicon such as M1, M2, M3…). Move the zip file to somewhere like ~/development/, unzip (double click), and add path to the commands to your PATH variable (rename handsome to your username, add below line to your ~/.zshrc then execute source ~/.zshrc to load the setting).
export PATH="/Users/handsome/development/Flutter/flutter/bin:$PATH"Preparation for build (steps #6~12)
When you’re done all the above steps, create an app folder, go inside and perform the remaining steps. In this example the app name is fletpassgen.
mkdir fletpassgen
cd fletpassgen
mkdir assets
open assets
The above last command opens the assets folder in Finder where you can place a 512×512 pixel icon image named like icon.png (supported formats include .bmp, .jpg, and .webp). I don’t have anything else, but you can place other resources such as audio and text files used by our code.
Side note about icon: Flet can build app without an icon provided - it uses its own icon. I used Mochi Diffusion, a desktop app version of the AI image generator Stable Diffusion to generate the app icon which is also the top of this post. Prompts, model, etc. can be found at the last part of this post.
Next, copy your Flet app code as main.py.
cp ../fletpassgen.py main.pyIf the last line of the code to call the main function is not ft.app(main), change so.
#if __name__ == "__main__":ft.app(target=main) <-- this needs to be changed to the below:
ft.app(main)
requirements.txt has to have needed Python module to run your Flet app, but pip freeze > requirements.txt caused several errors for me. In this example, flet was only needed (other imported modules are Python built-in). See the official guide for details especially when you’re building iOS or Android app.
fletYou can clone the build template from the official GitHub to your local folder and edit copyright which can be shown by Command + I (macOS). Use your favorite editor if you are not good at the vi (vim) editor.
git clone https://github.com/flet-dev/flet-build-template
vi flet-build-template/cookiecutter.json
I edited highlighted lines 7-9 of cookiecutter.json in the flet-build-template folder.
{
    "out_dir": "",
    "python_module_name": "main",
    "project_name": "",
    "project_description": "",
    "product_name": "{{ cookiecutter.project_name }}",
    "org_name": "com.peddals",
    "company_name": "Peddals.com",
    "copyright": "Copyright (c) 2024 Peddals.com",
    "sep": "/",
    "kotlin_dir": "{{ cookiecutter.org_name.replace('.', cookiecutter.sep) }}{{ cookiecutter.sep }}{{ cookiecutter.project_name }}{{ cookiecutter.sep }}",
    "hide_loading_animation": true,
    "team_id": "",
    "base_url": "/",
    "route_url_strategy": "path",
    "web_renderer": "canvaskit",
    "use_color_emoji": "false"
}
Build your app (final step #13)
If you don’t care of options, simply execute flet build macos and you get an executable app. Below longer command adds version number and the above edited copyright. (Correction on Jan 25, 2024, thanks to the issue answered by the author.) To specify the build template location, use --template option followed by a relative path.
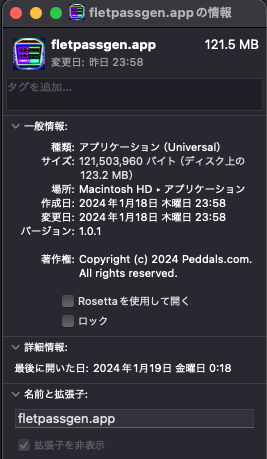
flet build macos --build-version "1.0.1" --template flet-build-templateGive it some time to complete and when you see Success! congrats, your app is built! Under build/macos/ you can find your app fletpassgen.app. It took around 3 mins and 10 secs to build it on my M1 mac mini. Output of the successful build process log is like below:
Creating Flutter bootstrap project...OK
Customizing app icons and splash images...OK
Generating app icons...OK
Packaging Python app...OK
Building macOS bundle...OK
Copying build to build/macos directory...OK
Success!
App is Universal
Just like other mac apps, you can move the app to your Applications folder and double-click to launch. I was not asked to approve in the Privacy and Security. Not tested yet, but it should run on an Intel mac as well since it’s a Universal app. It opens and works just like the Python code. My sample app opens the Flet default size window momentarily then resizes as specified – I suppose there’s a better way to code.
Do I like it?
I love it! I used to use tkinter and pysimplegui to build desktop apps, but Flet is much easier with better looking/modern interface. Building process is straight forward, and app works great. Just like 3D printer changed productivity of nonprofessional DIYers in the real world, Flet lets you make your ideas real on your computer and share with your family, friends, colleagues and others. Hope you find it useful and enjoy as well!
Image by Stable Diffusion
Date:
2024-Jan-15 23:05:04
Model:
realisticVision-v20_split-einsum
Size:
512 x 512
Include in Image:
masterpiece, best quality, retro future, cyber, disco computer, password generator
Exclude from Image:
Seed:
3224310018
Steps:
20
Guidance Scale:
20.0
Scheduler:
DPM-Solver++
ML Compute Unit:
CPU & Neural Engine