Host Flet web app behind Apache web server by Reverse Proxy

Flet, desktop and web app framework is really useful for Python developers. With only little modifications, your standalone desktop app can be hosted on a web server. In this post you can find how to self-host your Flet app on an Apache web server. This is not covered in the Flet official website.

Quick introduction of Flet.

Flet is a Python framework to build desktop or web application without having knowledges of GUI or web frontend. Flet is developed based on Flutter mobile app framework developed by Google for the Dart language. You’ll find word “Flutter” when you writing codes and getting errors with Flet. I’m not going to provide more information around Flet or Flutter in this post.

What I’m going to demonstrate in this post

The goal is publish a Flet app on an Apache web server using TCP port based reverse proxy. In my case the web app is only accessible within the LAN. Should you have a publicly accessible Apache server (and admin privileges), you can publish your app to the public. The Flet official webpage Self Hosting introduces the process to publish on an NGINX web server. You can do pretty much the same thing on an Apache web server by following this post.

Environment

  • Ubuntu 20.04 LTS
  • Apache 2.4.41

High-level steps

  1. Install requirements on Ubuntu server.
  2. Build a Python virtual environment and install Flet.
  3. Prepare a Flet app code.
  4. Enable Apache modules required for reverse proxy.
  5. Write an Apache configuration file.
  6. Write an auto-start configuration file.

Detailed steps

Install requirements on Ubuntu server.

As introduced in the official website, you need to install GStreamer to execute Flet app on a Linux server. Simply follow the steps and install requirements.

sudo apt-get update
sudo apt-get install libgstreamer1.0-dev libgstreamer-plugins-base1.0-dev libgstreamer-plugins-bad1.0-dev gstreamer1.0-plugins-base gstreamer1.0-plugins-good gstreamer1.0-plugins-bad gstreamer1.0-plugins-ugly gstreamer1.0-libav gstreamer1.0-doc gstreamer1.0-tools gstreamer1.0-x gstreamer1.0-alsa gstreamer1.0-gl gstreamer1.0-gtk3 gstreamer1.0-qt5 gstreamer1.0-pulseaudio

Build a Python virtual environment and install Flet.

I use pipenv as below. Use your preferred virtual env and install Flet. Flet supports Python 3.8 and above.

pipenv --python 3.11
pipenv shell
pip install flet

Prepare a Flet app code.

Just for testing, let’s use a code posted on the official website. To check simple interaction, I copied Counter app and saved as counter.py. Change the last line as below.

ft.app(target=main, view=None, port=8501)

Quick explanation: view=None won’t open GUI or web browser window, and port=8501 sets the TCP port to listen to. As long as it does not conflict on your server, any port number works fine. By executing python3 counter.py, you can see the app on web browser if installed on your web server by opening http://localhost:8501. Next step is publishing to external access.

Enable Apache modules required for reverse proxy.

At least following 4 modules are required to configure Apache as a reverse proxy. As Flet uses web socket, wstunnel is also required. Following commands enable modules, load modules and check Apache status respectively.

sudo a2enmod proxy proxy_http proxy_wstunnel headers
sudo systemctl restart apache2
sudo systemctl status apache2

Write an Apache configuration file.

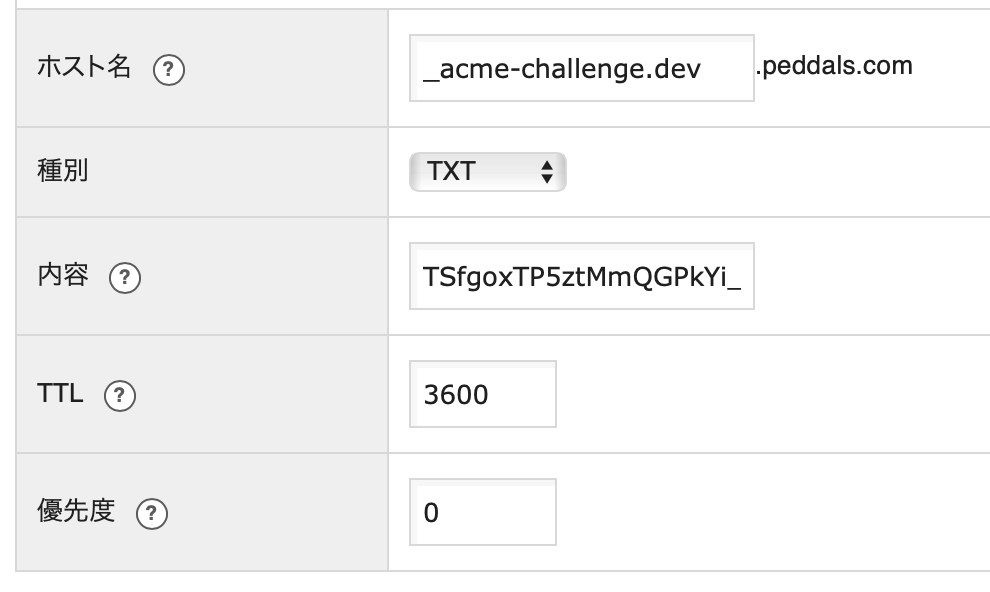
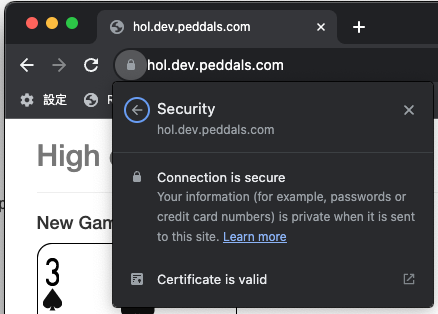
In this example, accessing flet.dev.peddals.com will open the Flet web app. In my environment, access to the subdomain uses always HTTPS as posted separately. So, listening port is 443, and reverse proxy port is 8501 that the Flet app is listening to. Please edit these based on your environment.

Line 13-14 for wss:// may not be required.

<VirtualHost *:443>
	ServerName flet.dev.peddals.com

	SSLEngine on
	SSLCertificateFile /etc/letsencrypt/live/dev.peddals.com/fullchain.pem	
	SSLCertificateKeyFile /etc/letsencrypt/live/dev.peddals.com/privkey.pem

	ProxyRequests Off
	ProxyPreserveHost On

	ProxyPass /ws ws://localhost:8501/ws
	ProxyPassReverse /ws ws://localhost:8501/ws
	ProxyPass /ws wss://localhost:8501/ws
	ProxyPassReverse /ws wss://localhost:8501/ws
	ProxyPass / http://localhost:8501/
	ProxyPassReverse / http://localhost:8501/

	ErrorLog ${APACHE_LOG_DIR}/flet.error.log
	CustomLog ${APACHE_LOG_DIR}/flet.log combined

</VirtualHost>

Load Apache configuration (check syntax, load config, and check status).

sudo apachectl configtest
sudo systemctl reload apache2
sudo systemctl status apache2

Now, let’s execute python3 counter.py and check if the web app opens from a client PC. If you removed the lines for wss:// and the app kept loading, add them, reload, and try again.

Write an auto-start configuration file.

Let’s follow the Flet official page and write an auto-start configuration file. Below is an example in my server. Save this as fletcounter.service.

[Unit]
Description=Flet Counter Service
After=network.target

[Service]
User=handsome
Group=handsome
WorkingDirectory=/home/handsome/codes/flet
Environment="PATH=/home/handsome/.local/share/virtualenvs/flet-xuR7EMBP/bin/"
ExecStart=/home/handsome/.local/share/virtualenvs/flet-xuR7EMBP/bin/python3 /home/handsome/codes/flet/counter.py

[Install]
WantedBy=multi-user.target

Modifications:

  • Description= as you like
  • User= and Group= your own username (whoami)
  • WorkingDirectory= is the full path to the directory of counter.py.
  • Environment="PATH= is the full path to the directory of python3 (output of which python3 up to bin/)
  • ExecStart= first arg is full path to Python3 (output of which python3), and the second arg is the full path to the Flet app.

Lastly, start and enable it as a service by following the official page. The target of the symbolic link (#2) is the file created in the previous step.

cd /etc/systemd/system
sudo ln -s /home/handsome/codes/flet/fletcounter.service
sudo systemctl start fletcounter
sudo systemctl enable fletcounter
sudo systemctl status fletcounter

That’s all. Access your app from a client PC and confirm the counter opens. When possible, reboot your server and confirm the service starts automatically.

Trouble that I encountered.

In my environment, loading of the app kept forever initially. I finally figured out that the reverse proxy settings needed wss:// as well as ws:// (the NGINX config on the official page does not have wss:// either). It took me some time to figure out that wss stood for Web Socket Secured, just like https stood for http Secured. However, another Apache server doesn’t require wss — my SSD for the web server (Raspberry Pi) died after reverse proxy setup, and needed to build another. I’m still not sure why wss was required…

Image by Stable Diffusion

Date:
2023-Nov-25 23:02:10

Model:
realisticVision-v20_split-einsum

Size:
512 x 512

Include in Image:
cartoon, clolorful,
modern ladies working at post office classifying letters

Exclude from Image:

Seed:
4084494267

Steps:
23

Guidance Scale:
11.0

Scheduler:
DPM-Solver++

ML Compute Unit:
CPU & Neural Engine

Install Let’s Encrypt certificate in a Ubuntu development web server in the closed LAN

Once HSTS preload was approved, my dev sites became HTTPS enforced.

I was happy with the results of HSTS preload submitted and approved for websites that I manage for business at HSTS preload. So, I submitted the same request for my personal domain, peddals.com. Once it was approved, my dev-sites/services running in my home office LAN became inaccessible as they did not hire secured http (HTTPS). In this article I’m going to share how I installed Let’s Encrypt certificate in a web server running on Apache/Ubuntu inside closed LAN.

My environment and requirements

  • Raspberry Pi 3 model B
  • Ubuntu 20.04 LTS
  • Apache 2.4.41
  • Domain name
  • Access rights to manage DNS records (TXT)

High level step

  1. Install certbot.
  2. Run certbot command (with DNS challenge option).
  3. Add TXT record to DNS as requested.
  4. Let Let’s Encrypt complete certificate installation.
  5. Enable SSL in Apache.
  6. Change TCP port in Apache config file to 443 and add other settings for SSL.

Detailed step

Obtain certificate (CLI + DNS record)

First, you need to install certbot to install a certificate. In the first line below you execute elevated bash so you don’t need to add sudo every time. $ is normal user shell prompt and # is administrator level shell prompt. Others are output examples.

$ sudo bash
# apt-get update
# apt-get install certbot

In my case, I submitted requests for *.dev.peddals.com for all dev sites and the top level domain — I may post another article, but on my mac DNSmasq is running as a local DNS server, and access to *.dev.peddals.com is diverted to my Raspberry Pi Apache server.

# certbot certonly --manual --preferred-challenges dns-01 -m mail@example.com -d '*.dev.peddals.com' -d peddals.com
Saving debug log to /var/log/letsencrypt/letsencrypt.log
Plugins selected: Authenticator manual, Installer None

- - - - - - - - - - - - - - - - - - - - - - - - - - - - - - - - - - - - - - - -
Please read the Terms of Service at
https://letsencrypt.org/documents/LE-SA-v1.3-September-21-2022.pdf. You must
agree in order to register with the ACME server at
https://acme-v02.api.letsencrypt.org/directory
- - - - - - - - - - - - - - - - - - - - - - - - - - - - - - - - - - - - - - - -
(A)gree/(C)ancel: A

- - - - - - - - - - - - - - - - - - - - - - - - - - - - - - - - - - - - - - - -
Would you be willing to share your email address with the Electronic Frontier
Foundation, a founding partner of the Let's Encrypt project and the non-profit
organization that develops Certbot? We'd like to send you email about our work
encrypting the web, EFF news, campaigns, and ways to support digital freedom.
- - - - - - - - - - - - - - - - - - - - - - - - - - - - - - - - - - - - - - - -
(Y)es/(N)o: Y

After the above the command froze for some reason. Aborted by ctrl + C and rerunthe certbot to proceed the process.

I think sharing email address (above) is NOT required however, sharing IP address IS required, so answer Y(es) to the below question.

Saving debug log to /var/log/letsencrypt/letsencrypt.log
Plugins selected: Authenticator manual, Installer None
Obtaining a new certificate
Performing the following challenges:
dns-01 challenge for dev.peddals.com
dns-01 challenge for peddals.com

- - - - - - - - - - - - - - - - - - - - - - - - - - - - - - - - - - - - - - - -
NOTE: The IP of this machine will be publicly logged as having requested this
certificate. If you're running certbot in manual mode on a machine that is not
your server, please ensure you're okay with that.

Are you OK with your IP being logged?
- - - - - - - - - - - - - - - - - - - - - - - - - - - - - - - - - - - - - - - -
(Y)es/(N)o: Y

- - - - - - - - - - - - - - - - - - - - - - - - - - - - - - - - - - - - - - - -
Please deploy a DNS TXT record under the name
_acme-challenge.dev.peddals.com with the following value:

(your value here)

Before continuing, verify the record is deployed.
- - - - - - - - - - - - - - - - - - - - - - - - - - - - - - - - - - - - - - - -
Press Enter to Continue

Add the hostname and value as a TXT record in your DNS server. Sorry for the Japanese characters but the below reads from the top to the bottom: Host name, Type, Value, TTL, Priority.

When you copy-paste, don’t include the TLD if it’s pre-populated.

Once added, go back to the CLI and hit the enter key. In my case I added the top level domain well, so there’s another challenge.

- - - - - - - - - - - - - - - - - - - - - - - - - - - - - - - - - - - - - - - -
Please deploy a DNS TXT record under the name
_acme-challenge.peddals.com with the following value:

(your value here)

Before continuing, verify the record is deployed.
(This must be set up in addition to the previous challenges; do not remove,
replace, or undo the previous challenge tasks yet. Note that you might be
asked to create multiple distinct TXT records with the same name. This is
permitted by DNS standards.)

- - - - - - - - - - - - - - - - - - - - - - - - - - - - - - - - - - - - - - - -
Press Enter to Continue

Do the similar thing on your DNS server then hit the enter key to complete the process as below.

Waiting for verification...
Cleaning up challenges

IMPORTANT NOTES:
 - Congratulations! Your certificate and chain have been saved at:
   /etc/letsencrypt/live/dev.peddals.com/fullchain.pem
   Your key file has been saved at:
   /etc/letsencrypt/live/dev.peddals.com/privkey.pem
   Your cert will expire on 2024-02-10. To obtain a new or tweaked
   version of this certificate in the future, simply run certbot
   again. To non-interactively renew *all* of your certificates, run
   "certbot renew"
 - If you like Certbot, please consider supporting our work by:

   Donating to ISRG / Let's Encrypt:   https://letsencrypt.org/donate
   Donating to EFF:                    https://eff.org/donate-le

Path to your certs and key are written under IMPORTANT NOTES (if you forget the paths, search them in /etc/letsencrypt/live/). Let’s encrypt certs expire every 90 days, and you have to renew. Files are symbolic link to actual certs and key to avoid tasks to update Apache config file.

# ll /etc/letsencrypt/live/dev.peddals.com/
total 12
drwxr-xr-x 2 root root 4096 Nov 12 19:00 ./
drwx------ 3 root root 4096 Nov 12 19:00 ../
-rw-r--r-- 1 root root  692 Nov 12 19:00 README
lrwxrwxrwx 1 root root   39 Nov 12 19:00 cert.pem -> ../../archive/dev.peddals.com/cert1.pem
lrwxrwxrwx 1 root root   40 Nov 12 19:00 chain.pem -> ../../archive/dev.peddals.com/chain1.pem
lrwxrwxrwx 1 root root   44 Nov 12 19:00 fullchain.pem -> ../../archive/dev.peddals.com/fullchain1.pem
lrwxrwxrwx 1 root root   42 Nov 12 19:00 privkey.pem -> ../../archive/dev.peddals.com/privkey1.pem

Enable SSL in Apache and edit site config file

Enable SSL in Apache by the following command Apache. The last 2 commands are to restart and check the status of Apache.

# a2enmod ssl
Considering dependency setenvif for ssl:
Module setenvif already enabled
Considering dependency mime for ssl:
Module mime already enabled
Considering dependency socache_shmcb for ssl:
Enabling module socache_shmcb.
Enabling module ssl.
See /usr/share/doc/apache2/README.Debian.gz on how to configure SSL and create self-signed certificates.
To activate the new configuration, you need to run:
  systemctl restart apache2
# systemctl restart apache2
# systemctl status apache2

A change and additions to a http (port: 80) site config file are as below. Change the port from 80 to 443 and add SSL related settings. As this (my case) is only for dev sites in a closed environment, no other security settings such as http headers are added. Since HTTPS preload and includeSubDomains are included in my HSTS policy, there’s no need to have redirection from port 80.

<VirtualHost *:443>
	SSLEngine on
	SSLCertificateFile /etc/letsencrypt/live/dev.peddals.com/fullchain.pem	
	SSLCertificateKeyFile /etc/letsencrypt/live/dev.peddals.com/privkey.pem

Get the config syntax checked and reload the apache configurations.

# apachectl configtest
Syntax OK
# systemctl reload apache2

Test in web browser

Now you can open your site in web browsers. You don’t need to add https://.

Google Chrome

Let’s Encrypt certs expire in 90 days.

You should, even for your dev env., renew the cert before expired. You can renew in 30 days until the expiration. As this case is for test sites manual renewal is fine for now. Run the command with the --dry-run option then without it if no error reported.

# certbot renew --dry-run
# certbot renew

When you run the command when renewal is not needed, you can see the expiration date.

# certbot renew
Saving debug log to /var/log/letsencrypt/letsencrypt.log

- - - - - - - - - - - - - - - - - - - - - - - - - - - - - - - - - - - - - - - -
Processing /etc/letsencrypt/renewal/dev.peddals.com.conf
- - - - - - - - - - - - - - - - - - - - - - - - - - - - - - - - - - - - - - - -
Cert not yet due for renewal

- - - - - - - - - - - - - - - - - - - - - - - - - - - - - - - - - - - - - - - -

The following certs are not due for renewal yet:
  /etc/letsencrypt/live/dev.peddals.com/fullchain.pem expires on 2024-02-10 (skipped)
No renewals were attempted.
- - - - - - - - - - - - - - - - - - - - - - - - - - - - - - - - - - - - - - - -

Use the crontab command to automate the renewal process. It’s not covered in this post.

HSTS policy and where to add

As this website is on hosting servce, I have the .htaccess file which has the below line in the document root directory. includeSubDomains to apply the configuration to all sub-domains and preload to force access over HTTPS.

Header set Strict-Transport-Security "max-age=31536000; includeSubDomains; preload"

Conclusion

There are multiple reasons why you want/need to install certificate in a closed environment. The steps above let you install commercial level certificate.

Image by Stable Diffusion

Date:
2023-Nov-12 17:59:44

Model:
realisticVision-v20_split-einsum

Size:
512 x 512

Include in Image:
cartoon, let’s encrypt, apache, success

Exclude from Image:

Seed:
356871963

Steps:
30

Guidance Scale:
11.0

Scheduler:
DPM-Solver++

ML Compute Unit:
CPU & Neural Engine

© Peddals.com