This article explains a method to automatically load a configuration file (like .zshrc) containing aliases and exports in the current directory when zsh (bash) is loaded. The Python virtual environment pipenv loads a new shell, which allows aliases and other settings to be automatically applied. When exiting pipenv, the virtual environment’s settings become invalid, so they do not affect your base shell or other environments. This can be implemented easily (and effectively), but probably because pipenv isn’t that popular, I could not find exact information easily. Hope you love it.
Environment
Shell: zsh (bash seems to work as well.)
Python virtual environment: pipenv
OS: macOS Sequoia (should not matter)
Steps
To use pipenv on macOS, first install it with brew install pipenv. The steps to easily create a virtual environment are like this:
mkdir my_project # Create a project directory.
cd my_project # Go in to the directory.
pipenv --python 3.11 # Create a virtual environment with Python 3.11
pipenv shell # Enter the virtual env. To exit, enter "exit" or press ctrl + D
Add a line to ~/.zshrc.
Add the following to the .zshrc in your home directory.
# Load .zshrc.local if it exists in the current directory.
[[ -f .zshrc.local ]] && source .zshrc.local
This checks whether the .zshrc.local file exists in the current directory as a conditional expression on the left side of &&. If it is true, the source command on the right is executed, loading the .zshrc.local file (I haven’t tried it, but apparently the same method works in bash in terms of syntax).
Place .zshrc.local in the root of pipenv directory.
Of course, anything you can write in .zshrc such as alias or export are allowed to be added. Here is a simple sample for reference:
alias t='time'
export HW="Hello, World!"
Enter the virtual environment and test.
Example of commands and outputs:
$ pipenv shell # Enter the virtual env.
$ t # alias of the time command
(Output of the time command appears here.)

$ echo $HW
Hello, World!
Exit from the virtual environment and test.
Example of commands and outputs:
$ exit # or ctrl + D to exit.
$ t
zsh: command not found: t

$echo $HW

(An empty line appears here.)
Note
If projects to be published on GitHub, etc., be sure to add .zshrc.local to .gitignore.
Similar method for venv
The most popular virtual environment tool venv does not load a new shell. Therefore, similar functionality needs to be implemented through alternative means.
Add the below to the bottom of bin/activate in your venv directory. That’s the same thing as added to the ~/.zshrc in the above.
# Load .zshrc.local if it exists in the current directory.
[[ -f .zshrc.local ]] && source .zshrc.local
It involves one more step than using pipenv, but this allows you to do roughly the same thing.
Difference with venv
This method for venv won’t load a new shell but .zshrc.local, so applied aliases and exports are still valid even after exiting by deactivate. Maybe you better close terminal session to avoid potential conflicts.
Why I needed this
Recently, I run mlx-lm.server to use the MLX version of LLMs. Unlike Ollama, it often happens that the memory is not released (the memory pressure remains high). So, I have no choice but to stop it with Ctrl + C each time and restart the server from the CLI. However, I felt stressed because I couldn’t immediately re-execute it by a single push of the up arrow key when I was entering commands in another terminal window. That’s why I thought about creating an alias that is only valid in the pipenv environment.
I couldn’t find the solution as easily as I thought on the web, but after consulting with local QwQ, Qwen3, and ChatGPT, I eventually figured it out by myself. When I asked each LLM for their evaluation, they praised me with “Great!” and made me happy. It was the motivation of this blog post. haha!
Image by Stable Diffusion (Mochi Diffusion)
I couldn’t imagine what kind of image would go well with this post, so I just got a showroom with various bicycles generated. Still not sure if the image is a good match.
Date: 2025-6-14 19:47:15
Model: realisticVision-v51VAE_original_768x512_cn
Size: 768 x 512
Include in Image: showroom with different types of bycicles
In this Ollama GitHub issue, there are many comments requesting support for the MLX backend, and some even write that it is 20-40% faster than llama.cpp (GGUF). Curious about these comments, I decided to try the MLX version of my favorite QwQ-32B-Preview – QwQ is Alibaba Qwen team’s open reasoning large language model (LLM) similar to OpenAI’s o1, which iteratively improves answer accuracy.
In conclusion, MLX version is indeed slightly faster. The person who wrote the comment mentioned using an M3 Mac, so the difference might be more noticeable on newer Mac models with M4 chips. Since I tried it out, I’ll leave the method here for reference, Dify with MLX-LM as a local LLM model provider.
By the way, is this an official Ollama X post? It could also be interpreted as hinting that Ollama will officially support the MLX backend.
To put it simply, MLX is Apple’s official machine learning framework for Apple Silicon. It can utilize both the GPU and CPU. Although it may not always achieve peak performance, some reports from various experiments show that it can be faster than using PyTorch with MPS in certain cases.
So, when we refer to an “MLX version of LLM,” we are talking about an open large language model (LLM) that has been converted to run using the MLX framework.
What’s MLX-LM?
MLX-LM is an execution environment for large language models (LLMs) that have been converted to run using MLX. In addition to running the models, it also includes features such as converting models from Hugging Face into MLX format and running an API server. This article introduces how to use it as an API server.
There is also a Python package FastMLX that can function as an API server for both MLX-LM and MLX-VLM. Functionally, it is quite appealing. However, the vision models only accept image URLs or paths (which makes them unusable with Dify), and text streaming often fails and throws exceptions. It requires a lot of effort to make it work properly, so I have given up for now. If you are interested, give it a try.
LM Studio can use MLX models, so if you don’t need to use Dify or prefer not to, you can stop reading here. Additionally, you can register LM Studio as an OpenAI API-compatible model provider in Dify. However, with LM Studio, responses from the LLM may not stream smoothly. Therefore, if you plan to use MLX LLMs with Dify, it is better to utilize the API server functionality of MLX-LM.
Launch MLX-LM API Server
Install
To use MLX-LM install MLX-LM in your virtual environment. The version I confirmed was the latest, 0.20.4.
pip install mlx-lm
Start API Server Once
To set up the server, use the mlx_lm.server command (note that the actual command uses an underscore instead of a dash as installed). If Dify or other API clients are running on different hosts or if other servers are using the port, you can specify options as shown in the example below. In my case, Dify is running on another Mac and there’s also a text-to-speech server running on my main Mac, so I specify each accordingly. For more details on the options, check mlx_lm --help. The --log-level option is optional.
mlx_lm.server --host 0.0.0.0 --port 8585 --log-level INFO
The server must be running when you see something like below:
% mlx_lm.server --host 0.0.0.0 --port 8585 --log-level INFO
/Users/handsome/Documents/Python/FastMLX/.venv/lib/python3.11/site-packages/mlx_lm/server.py:682: UserWarning: mlx_lm.server is not recommended for production as it only implements basic security checks.
  warnings.warn(
2024-12-15 21:33:25,338 - INFO - Starting httpd at 0.0.0.0 on port 8585...
Download LLM
I selected the 4-bit quantized model of QwQ (18.44GB) because it must fit in 32GB of RAM.
Open another terminal window while the MLX-LM server is running, write and save a simple script like the one below, and then run it with Python to download the model.
Once the download is complete, you can stop the server by pressing Ctrl + C. By the way, the model downloaded using this method can also be loaded by LM Studio. If you want to try both applications, downloading via command line will help reduce storage space (although the folder names become non-human friendly in LM Studio).
Start API Server with a LLM
The model is saved in ~/.cache/huggingface/hub/, and for this example, it will be in the folder models--mlx-community--QwQ-32B-Preview-4bit. The path passed to the server command needs to go deeper into the snapshot directory where the config.json file is located.
The command to start the API server would look like this:
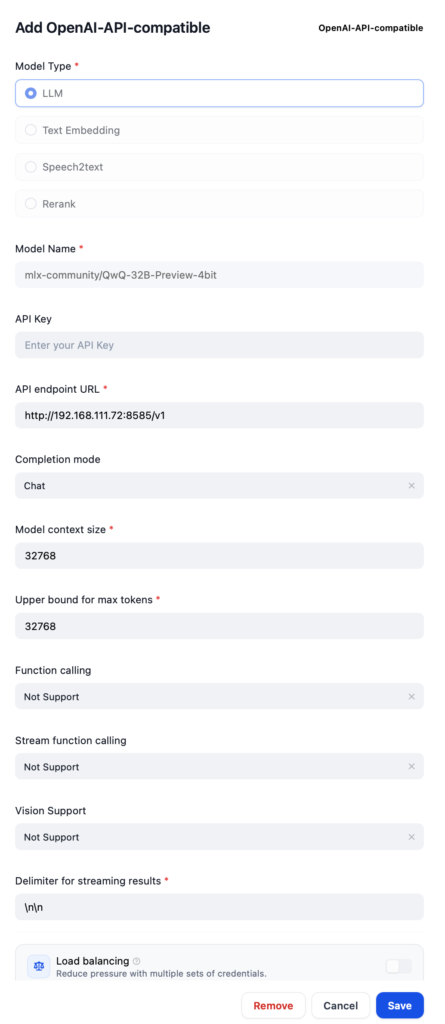
To register the model in Dify, you will add it as an OpenAI-API-compatible LLM model. The model name is the one mentioned frequently above. The URL needs to include the port number and /v1, and you can use something like \n\n for the Delimiter.
Create a Chatbot
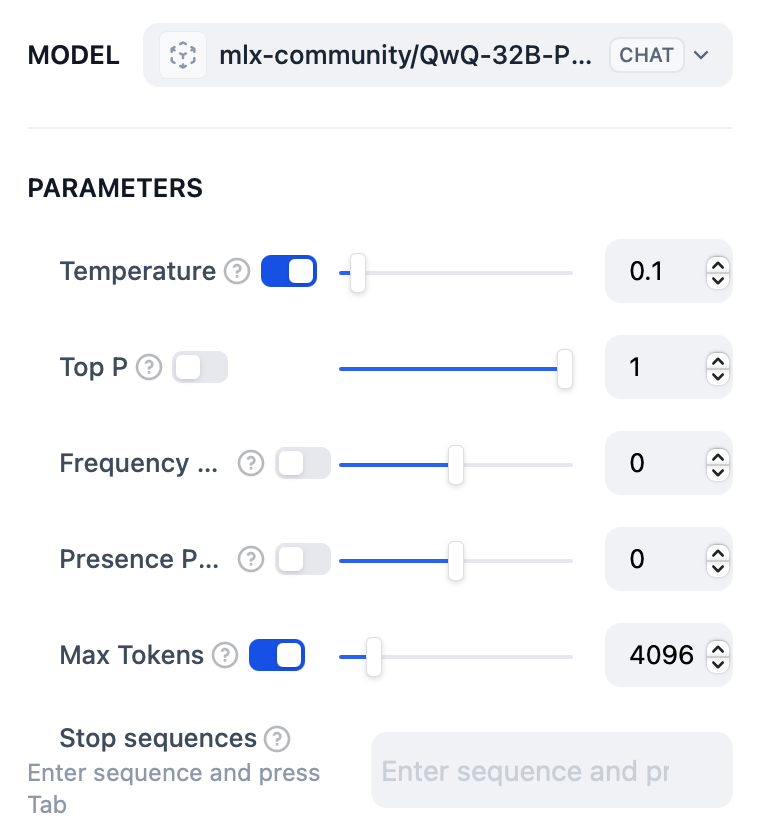
When creating a Chatbot Chatflow, select the model you just added with 4096 for the Max Tokens. This size fits in 32GB RAM and runs 100% on GPU. To avoid getting answers in Chinese, try the sample System prompt below. QwQ may still use some Chinese sentences from time to time though.
Never ever use Chinese. Always answer in English or language used to ask.
Comparing to Ollama, configurable parameters are limited for OpenAI API compatible models.
That’s about it. Enjoy the speed of MLX version of your LLM.
Dify judged MLX was the winner
Now that everything is set up, I created chatbots using the same conditions with both GGUF (ollama pull qwq:32b-preview-q4_K_M) and MLX. The settings were as follows: Temperature=0.1, Size of context window=4096, Keep Alive=30m, with all other settings at their default values. I asked seven different types of questions to see the differences.
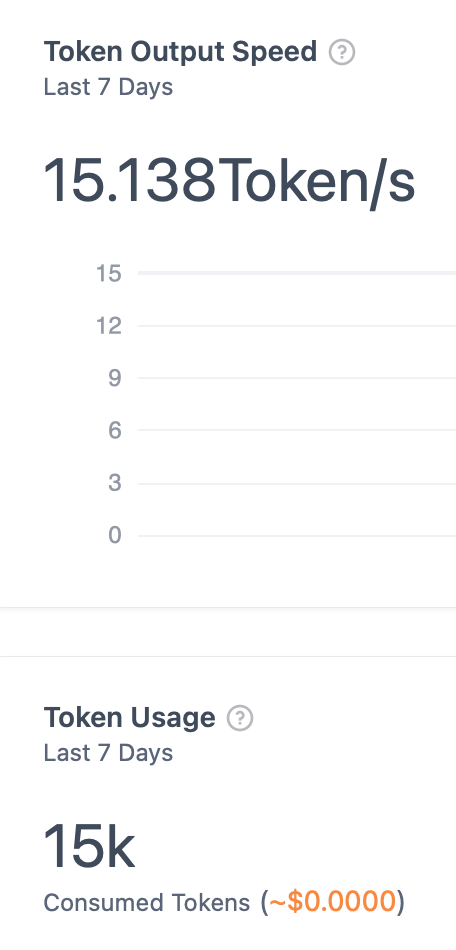
Based on Dify’s Monitoring, it seems that the MLX version was 30-50% faster. However, in practical use, I didn’t really notice a significant difference; both seemed sufficiently fast to me. Additionally, the performance gap tended to be more noticeable with larger amounts of generated text. In this test, MLX produced more text before reaching an answer, which might have influenced the results positively for MLX. The nature of the QwQ model may also have contributed to these favorable outcomes.
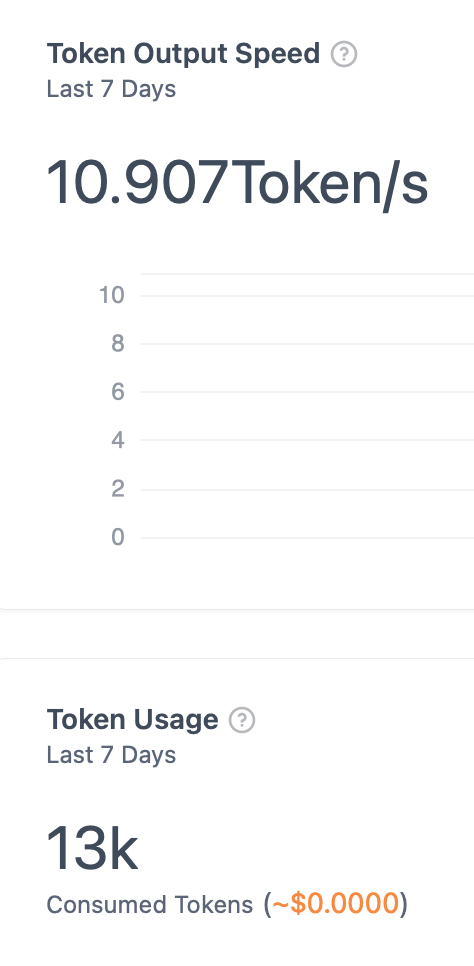
Overall, it’s reasonable to say that MLX is about 30% faster than GGUF, without exaggeration. First image below is MLX and the next one is GGUF.
MLX-LM (MLX) generated more tokens.Ollama (GGUF) 10 T/s is also fast enough.
Prompts I used for performance testing:
(1) Math:
I would like to revisit and learn calculus (differential and integral) now that I am an adult. Could you teach me the basics?

(2) Finance and documentation:
I would like to create a clear explanation of a balance sheet. First, identify the key elements that need to be communicated. Next, consider the points where beginners might make mistakes. Then, create the explanation, and finally, review the weak points of the explanation to produce a final version.

(3) Quantum biology:
Explain photosynthesis in quantum biology using equations.

(4) Python scripting:
Please write a Python script to generate a perfect maze. Use "#" for walls and " " (space) for floors. Add an "S" at the top-left floor as the start and a "G" at the bottom-right floor as the goal. Surround the entire maze with walls.

(5) Knowledge:
Please output the accurate rules for the board game Othello (Reversi).

(6) Planning:
You are an excellent web campaign marketer. Please come up with a "Fall Reading Campaign" idea that will encourage people to share on social media.

### Constraints
- The campaign should be easy for everyone to participate in.
- Participants must post using a specific hashtag.
- The content should be engaging enough that when others read the posts, they want to mention or create their own posts.
- This should be an organic buzz campaign without paid advertising.

(7) Logic puzzle:
Among A to D, three are honest and one is a liar. Who is the liar?

A: D is lying.
B: I am not lying.
C: A is not lying.
D: B is lying.
Can MLX-LM Replace Ollama?
If you plan to stick with a single LLM, I think MLX-LM is fine. However, in terms of ease of use and convenience, Ollama is clearly superior, so it may not be ideal for those who frequently switch between multiple models. FastMLX, which was mentioned earlier, allows model switching from the client side, so it could be a viable option if you are seriously considering migrating. That said, based on what seems to be an official X post from Ollama, they might eventually support MLX, so I’m inclined to wait for that.
Regardless, this goes slightly off the original GGUF vs MLX comparison, but personally, I find QwQ’s output speed sufficient for chat-based applications. It’s smart as well (I prefer Qwen2.5 Coder for coding, though). Try it out if you haven’t.
Oh, by the way, most of this post was translated by QwQ from Japanese. Isn’t that great?
Image by Stable Diffusion (Mochi Diffusion)
When I asked images of “a robot running on a big apple”, most of them had robot in NYC. Yeah, sure. Simply ran several attempts and picked one looked the best. If the model learned from old school Japanese anime and manga, I could get something closer to my expectation.
Date: 2024-12-16 0:38:20
Model: realisticVision-v51VAE_original_768x512_cn
Size: 768 x 512
Include in Image: fancy illustration, comic style, smart robot running on a huge apple
Meta, the company behind Facebook, released AudioCraft – an AI capable of generating music and sound effects from English text. The initial version, v0.0.1, dropped in June 2023, followed by few revisions and the latest (as of now writing this) v1.3.0 in May 2024. The best part? You can run it locally for free!
However, there’s a catch: official support is limited to NVIDIA GPUs or CPUs. macOS users are stuck with CPU-only execution. Frustrating, right?
After much research and experimentation, I discovered a way to speed up the generation process for AudioGen, AudioCraft’s sound effects generator, by leveraging Apple Silicon’s GPU – MPS (Metal Performance Shaders)!
In this article, I’ll share my findings and guide you through the steps to unlock faster audio generation on your Mac.
While AudioCraft’s code is released under the permissive MIT license, it’s important to note that the model weights (the pre-trained files downloaded from Hugging Face) are distributed under the CC-BY-NC 4.0 license, which prohibits commercial use. Therefore, be mindful of this restriction if you plan to publicly share any audio generated using AudioCraft.
AudioCraft also includes MusicGen, a model for generating music, as well as MAGNeT, a newer, faster, and supposedly higher-performing model. Unfortunately, I wasn’t able to get these models running with MPS.
While development isn’t stagnant, there are a few open issues on GitHub, hinting at possible future official support. However, even though you can run AudioCraft locally for free, unlike platforms like Stable Audio which offer commercial licenses for a fee, it seems unlikely that any external forces besides the passionate efforts of open-source programmers will drive significant progress. So, let’s manage our expectations!
Environment Setup
Confirmed Working Environment
macOS: 14.5
ffmpeg version 7.0.1
Setup Procedure
Install ffmpeg if not installed yet. You need brew installed.
brew install ffmpeg
Create a directory and clone the AudioCraft repository. Choose your preferred directory name.
mkdir AudioCraft_MPS
cd AudioCraft_MPS
git clone https://github.com/facebookresearch/audiocraft.git .
Set up a virtual environment. I prefer pipenv, but feel free to use your favorite. Python 3.9 or above is required.
pipenv --python 3.11
pipenv shell
Install PyToch with a specific version 2.1.0.
pip install torch==2.1.0
Set xformer’s version to 0.0.20 in requirements.txt. MPS doesn’t support xformers, but this was the easiest workaround. The example below uses vim, but feel free to use your preferred text editor.
vi requirements.txt
#xformer<0.0.23
xformers==0.0.20
Install everything, and the environment is set up!
pip install -e .
Edit one file to use MPS for generation.
Modify the following file to use MPS only for encoding:
audiocraft/models/encodec.py
The line numbers might vary depending on the version of the cloned repository, but the target is the decode() method within the class EncodecModel(CompressionModel):. Comment out the first out = self.decoder(emb) in the highlighted section and add the if~else block below it.
    def decode(self, codes: torch.Tensor, scale: tp.Optional[torch.Tensor] = None):
        """Decode the given codes to a reconstructed representation, using the scale to perform
        audio denormalization if needed.

        Args:
            codes (torch.Tensor): Int tensor of shape [B, K, T]
            scale (torch.Tensor, optional): Float tensor containing the scale value.

        Returns:
            out (torch.Tensor): Float tensor of shape [B, C, T], the reconstructed audio.
        """
        emb = self.decode_latent(codes)
        #out = self.decoder(emb)
        # Below if block is added based on https://github.com/facebookresearch/audiocraft/issues/31
        if emb.device.type == 'mps':
            # XXX: Since mps-decoder does not work, cpu-decoder is used instead
            out = self.decoder.to('cpu')(emb.to('cpu')).to('mps')
        else:
            out = self.decoder(emb)

        out = self.postprocess(out, scale)
        # out contains extra padding added by the encoder and decoder
        return out
The code mentioned above was written by EbaraKoji (whose name suggests he might be Japanese?) from the following issue. I tried using his forked repository, but unfortunately, it didn’t work for me.
This code below is slightly modified from something found elsewhere. Let’s put it in the demos directory along with other executable demo codes.
from audiocraft.models import AudioGen
from audiocraft.data.audio import audio_write
import argparse
import time

model = AudioGen.get_pretrained('facebook/audiogen-medium', device='mps')
model.set_generation_params(duration=5)  # generate [duration] seconds.

start = time.time()
def generate_audio(descriptions):
  wav = model.generate(descriptions)  # generates samples for all descriptions in array.

  for idx, one_wav in enumerate(wav):
      # Will save under {idx}.wav, with loudness normalization at -14 db LUFS.
      audio_write(f'{idx}', one_wav.cpu(), model.sample_rate, strategy="loudness", loudness_compressor=True)
      print(f'Generated {idx}.wav.')
      print(f'Elapsed time: {round(time.time()-start, 2)}')

if __name__ == "__main__":
    parser = argparse.ArgumentParser(description="Generate audio based on descriptions.")
    parser.add_argument("descriptions", nargs='+', help="List of descriptions for audio generation")
    args = parser.parse_args()

    generate_audio(args.descriptions)
The key part is device='mps' on line 6. This instructs it to use the GPU for generation. Changing it to 'cpu' will make generation slower but won’t consume as much memory. Also, there is another pre-trained smaller audio model facebook/audiogen-small available, (I haven’t tested this one).
Usage
Note: The first time you run it, the pre-trained audio model will be downloaded, which may take some time.
You can provide the desired sound in English as arguments, and it will generate audio files named 0.wav, 1.wav,…. The generation speed doesn’t increase much whether you provide one or multiple arguments, so I recommend generating several at once.
python demos/audiogen_mps_app.py "heavy rain with a clap of thunder" "knocking on a wooden door" "people whispering in a cave" "racing cars passing by"

/Users/handsome/Documents/Python/AudioCraft_MPS/.venv/lib/python3.11/site-packages/torch/nn/utils/weight_norm.py:30: UserWarning: torch.nn.utils.weight_norm is deprecated in favor of torch.nn.utils.parametrizations.weight_norm.
  warnings.warn("torch.nn.utils.weight_norm is deprecated in favor of torch.nn.utils.parametrizations.weight_norm.")
Generated 0.wav.
Elapsed time: 53.02
Generated 1.wav.
Elapsed time: 53.08
Generated 2.wav.
Elapsed time: 53.13
Generated 3.wav.
Elapsed time: 53.2
On an M2 Max with 32GB RAM, starting with low memory pressure, a 5-second file takes around 60 seconds to generate, and a 10-second file takes around 100 seconds.
There’s a warning that appears right after running it, but since it works, I haven’t looked into it further. You can probably ignore it as long as you don’t upgrade the PyTorch (torch) version.
MPS cannot be used with MusicGen or MAGNeT.
I tried to make MusicGen work with MPS using a similar approach, but it didn’t succeed. It does run on CPU, so you can try the GUI with python demos/musicgen_app.py.
MAGNeT seems to be a more advanced version, but I couldn’t get it running on CPU either. Looking at the following issue and the linked commit, it appears that it might work. However, I was unsuccessful in getting it to run myself.
Image by Stable Diffusion (Mochi Diffusion) This part, which I’ve been writing at the end of each article, will now only be visible to those who open this specific title. It’s not very relevant to the main content. This time, it generated many good images with a simple prompt. I chose the one that seemed least likely to trigger claustrophobia.
Date: 2024-7-22 1:52:43
Model: realisticVision-v51VAE_original_768x512_cn
Size: 768 x 512
Include in Image: future realistic image of audio generative AI
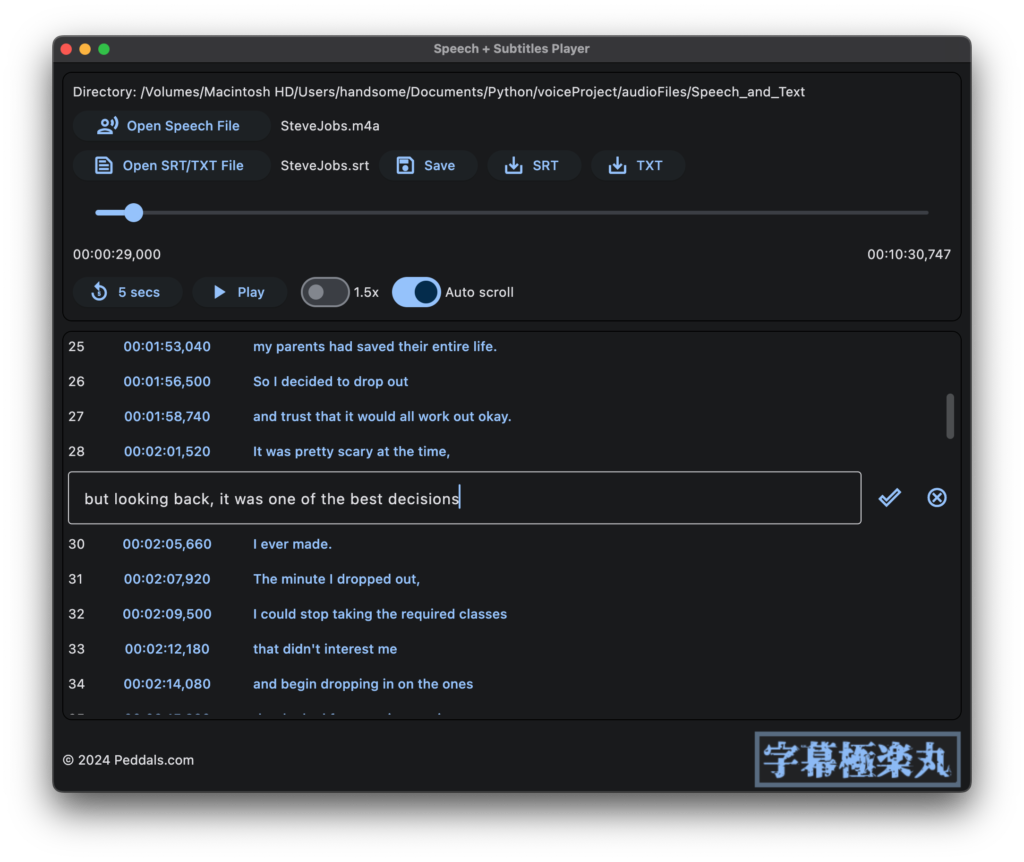
Flet can let you develop cool desktop apps in Python. I previously released an app that could play audio and display subtitles (SRT) simultaneously, as well as edit subtitles. How did I make it? Here’s the background, steps, and code. The finished product is a standalone desktop app, and it’s not overly complicated. However, using Python + Flet to create a single application from start to finish is not something you see often, so I hope this blog helps some Flet app developers! It’s a long read, so I suggest searching word or using the table of contents rather than reading the whole post.
New releases are announced on the official blog and Discord, and other miscellaneous links can be found on the support page.
Background and things not technical
Developer (myself) and background
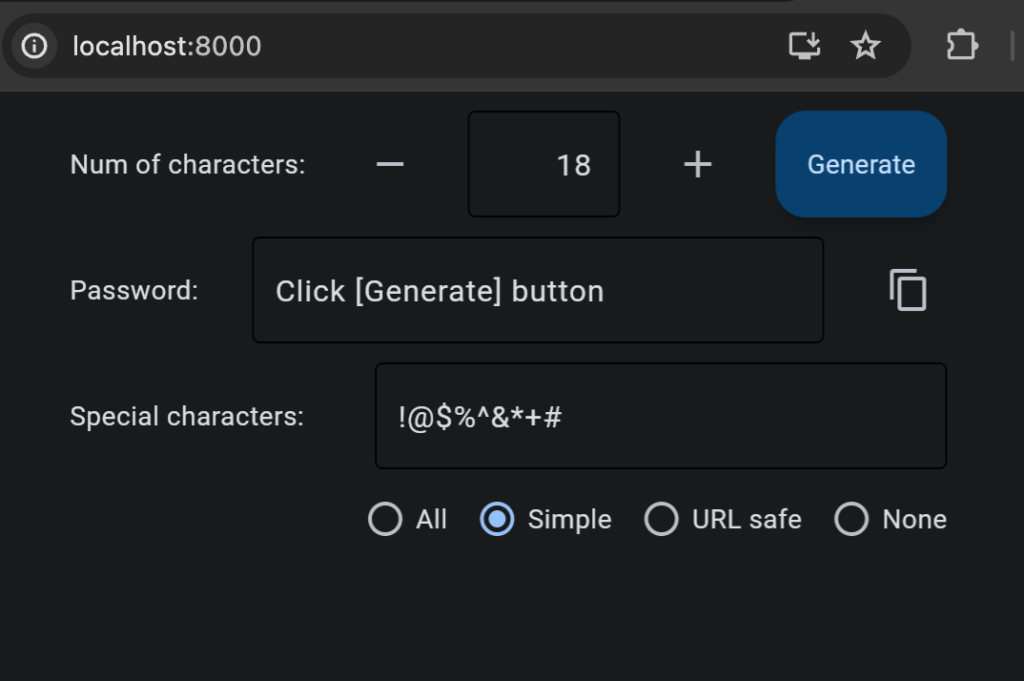
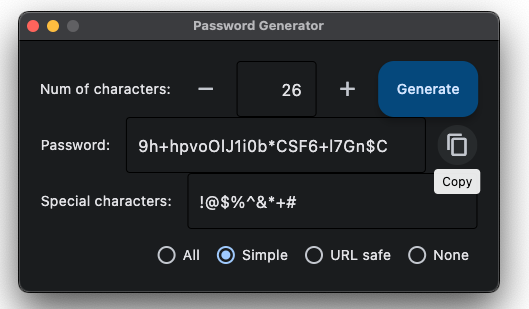
I am an IT manager at a Japanese office of a global company. Programming is my hobby, and I have been creating small, unfinished, and experimental programs for several decades (in 8bit old-school BASIC, HyperCard/HyperTalk, HTML/JavaScript, and Python). I have read several introductory books on Python, but I have only read about 60-80% of each one. I tend to get bored and stop reading before the end because I start thinking about creating something new instead. In the past, I have used Tkinter and PySimpleGUI to create desktop applications, but I have not been satisfied with the results. Recently, I discovered Flet, which has a beautiful design and allows me to create desktop, web, and mobile applications with relative ease. I was so impressed that I started experimenting with it immediately. One day, I was amazed by OpenAI’s Whisper, an excellent speech recognition tool, and on impulse, I started developing a subtitle editing app using Flet (I couldn’t find anything similar in the market). Before that, I had created a password generator app using Flet, which is available both as a desktop application and on the web.
My development environment
Mac (started with Mac mini M1 16GB RAM then migrated to a Mac Studio M2 Max 12-core CPU / 30-core GPU / 32GB RAM, refurbished)
Keyboard: HHKB Pro 2 Type-S (USB only model)
Mouse: Logi’s silent mouse
Monitors: Dell 4K 27-inch and QHD 24-inch
IDE: VisualStudio Code – Insiders (since the beginning I started using M1 mac mini)
Version control: GitHub and GitHub Desktop
Image generation: Mochi Diffusion (I used Keynote to design the app logo)
It was something like the list below. I thought of a plan and started implementing it, but Flet’s implementation method wasn’t clear to me and I couldn’t make it work as expected. I spent several days going back and forth between reading the documentation and trying to write code, but I couldn’t get it right. However, my motivation didn’t drop even though I was stuck for a while. Instead, I took a break from Flet app development and worked on other things, like improving Whisper’s recognition accuracy by adjusting parameters or imagining the target users and use cases of the app. After a few days, I came back to Flet with refreshed energy and enthusiasm, and I was able to complete the app at last.
started my project by creating an audio control that looked like the official one.
added a local audio file to the code and played it.
drew an interface rough draft on a whiteboard (nu board) while imagining the app’s features.
implemented a slider that would move based on the audio playback status and displayed the elapsed time in the console. However, the slider did not move so I thought something was wrong with my code and spent some time to troubleshoot. It turned out the audio length was too long. Slider was already moving.
in oppose to the above, added a feature that allowed users to move the slider which would play the audio from the designated position. This feature took several days to implement, but it was worth it.
started by creating a FilePicker that would allow users to select audio files. This feature was quite straightforward and didn’t require much effort. macOS remembers folder previously accessed. Nice.
implemented the ability to automatically load any matching subtitles or transcripts when an audio file is selected. This feature was quite useful and made the app more convenient for users.
added a function that would automatically generate a button from loaded subtitles by referencing to the official To-Do app tutorial. It was great seeing my app generating buttons.
implemented millisecond and 00:00:00,000 format conversion logics. I used Copilot’s suggestions and started getting help from Copilot more frequently.
rewrote the main part to a class. After that, I gradually understood the importance and meaning of Python classes.
rewrote the entire code to use async functions. However, this did not improve the response time when there were many buttons on the screen. Later, Flet became async-first, and I had unknowingly taken the lead. Haha.
implemented class interactions (e.g., playing audio based on the current flow, scrolling through subtitles, jumping to timestamp, etc.). I also relearned classes in practice.
implemented file saving and loading functions. The operating system warns the user when there is a conflict with an existing file. It’s very convenient.
implemented a SnackBar to notify users if there was no file to load. This was easy to use and did not obstruct the interface.
a bug occurred where the write dialog would not open and the app would stop doing anything. Since the issue was not reproducible but occurs rarely, I changed the export-as dialog to individual buttons instead.
as an app, I prepared for release by finding free fonts for my logo and icon. I was simply too tired to investigate the cause and wanted to escape for a little while.
added copyright information, made overall design adjustments, and prepared the app for release.
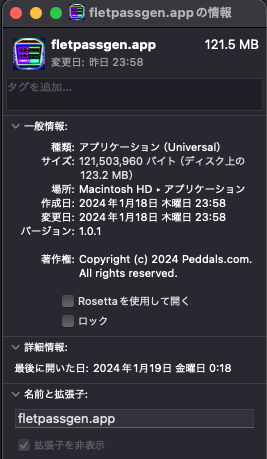
found that built macOS app crashed due to NumPy, and I could not resolve. I logged an issue on GitHub.
attempted to make a web app instead, but I couldn’t open local files directly and gave up for now.
released the app on GitHub and blogged about it. At this moment the app could be run by python main.py.
Copilot suggested a NumPy-free implementation, which I used to build the macOS app successfully.
added the build process to the GitHub README and wrote a blog post about it.
Finally, I started writing this article.
Overview
Completed app
GUI layout
Please excuse the handwritten text and drawing. The whiteboard itself is an app (=page) and you can see that there is a large column in the middle of it, which contains the main class definition. The other two sections, Audio and Dialogs, are usually not displayed and are added to the page from the main function. Everything else is wrapped in containers or rows and added to the page from top to bottom.
Code overview
Here’s a breakdown of the code by line number (xx-yy) and general content:
(1-4) I’m importing Flet and other modules – I use os for path operations and datetime only to add dates to file names, so almost all the necessary elements and features of my app are being created using Flet alone.
(6-79) Function block – conversion between milliseconds and digital format, and conversion of loaded text into a list for use within the app.
(81-183) SubButton class that generates subtitle buttons from the list – Initialization, build method to layout text and buttons, and methods to process that performs various processing when the button is clicked.
(185-791) The main AudioSubPlayer class of the app – first, in the initialization function (lines 187-374), all buttons, text fields, and other Flet controls used in the app’s layout are defined like self.foobar, and then in the next method block (lines 376-738), logics using async for events such as clicks are defined, and finally, in the build function (lines 740-791), the page layout is defined.
(793-812) The main function – defining the basic structure of the window using async, and adding audio and dialog instances as overlays to the page.
(815) Calls the main function
I think there are unnecessary long parts in my code, but it seems that the Flet code tends to become lengthy.
About SRT file format
The subtitle file format currently supported by this app is SRT. It’s a text file with the extension .srt. According to Wikipedia, it originated from a text subtitle file format generated by SubRip, a Windows freeware. It was adopted because it was used in Whisper for speech-to-text conversion. You can find my blog post here about how to use Whisper to convert audio files into SRT format on macOS (with some simple Python code).
The SRT file consists of 4 blocks for a subtitle text: index number, start time, “–>”, end time, text and an empty line. Here is a sample of what this looks like (the beginning of Steve Jobs’ famous speech):
1
00:00:00,000 --> 00:00:02,720
 Today, I want to tell you three stories from my life.

2
00:00:03,040 --> 00:00:04,620
 That's it. No big deal.

3
00:00:04,980 --> 00:00:06,160
 Just three stories.
The start and end times are in two digits for hours, minutes, and seconds, followed by the integer part of milliseconds after a comma. It should work fine if you use Whisper’s output, but this app does not support multiple lines for subtitles, so please combine them into one line if that’s the case. When using Whisper, blank lines with the same timestamp may be produced when speech recognition doesn’t work as intended; these are automatically removed when the file is read by this application.
Explanation of the code
From now on, I will explain the actual code and its explanation. I won’t go into much detail about Flet’s basic content, and I’ll proceed in an order that seems easier to understand. It would be helpful if you could open the code in an editor and/or run the app while reading this.
The Flet framework is imported at the beginning of the code as ft.
The last line ft.app(target=main, assets_dir=”assets”) creates the app
This last line is creating the Flet app. With target=main, I’m specifying the main function as the app itself. assets_dir="assets" sets the ‘assets’ folder in the same directory as the code body to be used for storing files such as images that the app will use. If you’re going to build your code as as an executable app, I suggest to name the Flet app’s main file as main.py, the function name inside the code as main, and the folder name as assets, so when building the app, you can simply run flet build macos (for macOS).
ft.app(target=main, assets_dir="assets")
“async def main” function to create a window and add overlay
This is a function that is called when the code is executed. It generates a Page instance, which serves as the foundation for the Flet app. After specifying the window title, initial size, and color theme, it adds an overlay with invisible audio files and dialogs to the page.
At line 806, an instance of AudioSubPlayer is created, and a function called load_audio is passed in which adds audio files to the overlay. The next line appends this function to the page. This allows audio files to be added to the page from within the class.
At lines 810-811, dialogs for opening and saving files are added as an overlay to the page using overlay.extend().
There might be alternative ways to manage overlays, but since adding overlays to a page couldn’t be achieved from within the UserControl class, I used this approach.
Using page.update(), you update (redraw) the page controls. In Flet, if you make any visual changes, updating the relevant control will apply the changes to the GUI. If it’s part of a larger process, you can update it at the end. So, for example, line 798 is unnecessary, my apologies (since I’ve already included line numbers in various places in this post, I won’t remove them prioritizing the text).
See the code:
# Main function that builds window and adds page. Also, adds audio file and dialogs that are invisible as overlay.
async def main(page: ft.Page):
    page.title = 'Speech + Subtitles Player'
    page.window_height = 800
    page.theme_mode=ft.ThemeMode.SYSTEM
    page.update()

    # Appends audio as an overlay to the page.
    async def load_audio():
        page.overlay.append(app.audio1)
        page.update()

    # Creates an instance of AudioSubPlayer class. Passes load_audio for the instance to append audio to the page.
    app = AudioSubPlayer(load_audio)
    page.add(app)

    # Adds dialog instance methods to the page.
    page.overlay.extend([app.pick_speech_file_dialog, app.pick_text_file_dialog,
                         app.export_as_srt_dialog, app.export_as_txt_dialog])
    page.update()
The main part of the app, “AudioSubPlayer” class
The main class is a custom control that inherits from UserControl and implements a user-defined control. The `build()` method, which is required by UserControl, is where UI is constructed. So, let’s take a look at its contents first (although this `UserControl` has been deprecated in Flet version 0.21.0, it still works in my local version 0.21.2, so I’ll continue with the explanation). However, please note that there will likely be significant changes before the official major release, and when using a new framework, it’s essential to check the release notes for any breaking changes.
UI layout by “def build(self)”
The block from the line 740 builds the user interface by constructing instances of self.view as an instance of Column. This is the largest hand-drawn diagram and its contents are within this column.
As I wrote the code, I noticed that the layout was becoming increasingly complex. To make it easier to maintain in the future, I focused solely on defining the layout here and writing controls separately. This way, the build() method will be simpler and easier to read.
In Flet, as you write the code for UI components, they will be stacked from top to bottom. Therefore, when you want to place multiple controls side by side, put them inside a Row and define their layout accordingly. For example, in the 748th line, there is a Row that contains a button to open an audio file and text displaying the file name, which will be displayed horizontally.
While coding, I think it's a good idea to try out various properties (such as alignment and color elements) on separate lines separately like lines 773-778. This way, you can easily add or comment out multiple properties. Once finalized, you can then combine all the properties onto one line like 771.
In the method “def init(self, load_audio)” all controls are defined and initialized.
From line 187 onwards, the initialization part begins. First, class variables are initialized and a function for loading audio files is imported as mentioned earlier. The following lines up to 374 mainly consist of defining and initializing controls. While it would be quite extensive to explain each one individually, I can provide an overview: they define visual properties such as text or icons displayed on the control, along with methods that are called when specific events occur
Typical definition of a Button control
As a common usage example, I will explain the contents of a button control definition for loading a text file.
        # Open text file button
        self.text_file_button = ft.ElevatedButton(
            text='Open SRT/TXT File',
            icon=ft.icons.TEXT_SNIPPET_OUTLINED,
            on_click=self.pre_pick_text_file,
            disabled=True,
            width=210,
        )
First, please understand that these contents serve as initial values. The properties can be changed by other methods; thus, they define the application’s state at startup.
(Line 237) An instance of ft.ElevatedButton is created with the name self.text_file_button (it might be difficult to notice in a dark theme, but it looks like a slightly raised button). Properties and methods are defined within parentheses using commas for separation.
(Line 238) Define button display text using the text property.
(Line 239) Specify an icon to be included in the button using the icon property. The position of the icon is fixed at the left end and cannot be changed. For reference on finding and confirming the name of the icon, please see below column.
(Line 240) Define the method to be called when the on_click event occurs (i.e., when the button is clicked).
(Line 241) At app startup, the button is disabled by setting the disabled property to True. After the audio file has been loaded, set it to False to make the button clickable.
(Line 242) Fix the width of the button to 210 dots.
Although we’re not using for this button, setting the tooltip property allows you to display notification text when you hover your mouse cursor over it.
Note that I’ll come back to this later, but control’s properties can be set by methods or functions by doing like self.text_file_button.disabled = False along with update. For each control, refer to the official documentation for available properties, methods, and events.
Icons can be searched for on this icons browser page. Unfortunately, as of this article's publication, clicking on displayed icons in Safari does not copy their names. You will need to use Chrome or manually enter icon name that appears on hover (Visual Studio Code will autocomplete icon names as well). If you're doing import Flet as ft, use icon=ft.icons.THUMB_UP.
Hover on an icon to find its name if copy won’t work.
Most controls and their properties should be easy to understand, but I found the process of opening or saving file using the FilePicker control wasn’t easy to follow. Therefore, I will explain it separately.
See the code:
def __init__(self, load_audio):
super().__init__()
self.position = 0
self.duration = 0
self.isPlaying = False
self.load_audio = load_audio
# == Controls ==
# Audio control with default properties
self.audio1 = ft.Audio(
src='',
volume=1,
balance=0,
playback_rate=1,
on_loaded=self.loaded,
on_position_changed = self.position_changed,
on_state_changed = self.playback_completed,
)
# Path of the audio file
self.base_dir = ft.Text(value=f"Base Directory: ")
# Open speech file button
self.speech_file_button = ft.ElevatedButton(
text='Open Speech File',
icon=ft.icons.RECORD_VOICE_OVER_OUTLINED,
width=210,
on_click=self.pre_pick_speech_file,
)
# Speech file picker control
self.pick_speech_file_dialog = ft.FilePicker(on_result=self.pick_speech_file_result)
# Speech file name
self.speech_file_name = ft.Text(value='← Click to open a speech file.')
# Alert dialog that opens if subtitle was edited but not saved when Open Speech File button is clicked.
self.speech_save_or_cancel_dialog = ft.AlertDialog(
modal=True,
title=ft.Text('Change not saved.'),
content=ft.Text('Do you want to discard the change?'),
actions=[
#ft.TextButton('Save', on_click=self.save_then_open, tooltip='Save then open another file.'),
ft.TextButton('Open without save', on_click=self.open_speech_without_save, tooltip='Change will be lost.'),
ft.TextButton('Cancel', on_click=self.close_speech_save_or_cancel_dialog),
]
)
# Open text file button
self.text_file_button = ft.ElevatedButton(
text='Open SRT/TXT File',
icon=ft.icons.TEXT_SNIPPET_OUTLINED,
on_click=self.pre_pick_text_file,
disabled=True,
width=210,
)
# Text file picker control
self.pick_text_file_dialog = ft.FilePicker(on_result=self.pick_text_file_result)
# Text file name
self.text_file_name = ft.Text(value='No file selected.')
# Save button to update edited subtitles. No dialog, it just overwrites current text file.
self.save_button = ft.ElevatedButton(
text='Save',
icon=ft.icons.SAVE_OUTLINED,
tooltip='Update current SRT/TXT file.',
disabled=True,
on_click=self.save_clicked
)
# Export as SRT button which opens a save dialog. Only available when SRT is open because SRT needs timestamp.
self.export_as_srt_button = ft.ElevatedButton(
text = 'SRT',
icon=ft.icons.SAVE_ALT,
on_click=self.export_as_srt,
disabled=True,
tooltip='Export as SRT file.'
)
# Export as SRT file picker
self.export_as_srt_dialog = ft.FilePicker(on_result=self.export_as_srt_result)
# Export as TXT button which opens a save dialog. TXT has not timestamp, subtitle text only.
self.export_as_txt_button = ft.ElevatedButton(
text = 'TXT',
icon=ft.icons.SAVE_ALT,
on_click=self.export_as_txt,
disabled=True,
tooltip='Export as TXT file.'
)
# Export as TXT file picker
self.export_as_txt_dialog = ft.FilePicker(on_result=self.export_as_txt_result)
# Export button to open a dialog (not in use)
self.export_button = ft.ElevatedButton(
text='Export as...',
icon=ft.icons.SAVE_ALT,
on_click=self.open_export_dialog,
disabled=True,
)
# Export as dialog (not in use)
self.export_dialog = ft.AlertDialog(
modal = True,
title = ft.Text('Export text as...'),
content = ft.Text('Plesae select a file type.'),
actions = [
ft.TextButton('SRT', on_click=self.export_as_srt, tooltip='Subtitles with timestamps'),
ft.TextButton('TXT', on_click=self.export_as_txt, tooltip='Subtitles only (no timestamps)'),
#ft.TextButton('CSV', on_click=self.export_csv, tooltip='Comma separated value'),
# I guess no one needs subtitles in CSV...
ft.TextButton('Cancel', on_click=self.close_export_dialog),
],
actions_alignment=ft.MainAxisAlignment.SPACE_BETWEEN,
)
# Alert dialog that opens if subtitle was edited but not saved when Open SRT/TXT File button is clicked.
self.text_save_or_cancel_dialog = ft.AlertDialog(
modal=True,
title=ft.Text('Change not saved.'),
content=ft.Text('Do you want to discard the change?'),
actions=[
#ft.TextButton('Save', on_click=self.save_then_open, tooltip='Save then open another file.'),
ft.TextButton('Open without save', on_click=self.open_text_without_save, tooltip='Change will be lost.'),
ft.TextButton('Cancel', on_click=self.close_text_save_or_cancel_dialog),
]
)
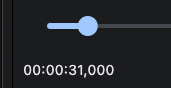
# Audio position slider
self.audio_slider = ft.Slider(
min = 0,
value = int(self.position/10000),
label = "{value}ms",
on_change = self.slider_changed,
)
# Current playing position and duration of audio file
self.position_text = ft.Text(value='Current position')
self.duration_text = ft.Text(value='Duration (hh:mm:ss,nnn)')
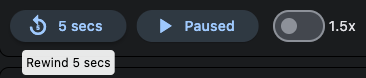
# Rewinds 5 seconds
self.rewind_button = ft.ElevatedButton(
icon=ft.icons.REPLAY_5,
text="5 secs",
tooltip='Rewind 5 secs',
on_click=self.rewind_clicked,
disabled=True,
)
# Play/Pause button. After loading audio file, this button will always be focused (space/enter to play/pause).
self.play_button = ft.ElevatedButton(
icon=ft.icons.PLAY_ARROW,
text = "Play",
on_click=self.play_button_clicked,
disabled=True,
)
# 1.5x faster toggle switch
self.faster_sw = ft.Switch(
label='1.5x',
value=False,
on_change=self.playback_rate,
)
# Auto scroll toggle switch
self.sub_scroller_sw = ft.Switch(
label='Auto scroll',
value=True,
)
# Area to add subtitles as buttons
self.subs_view = ft.Column(
spacing = 5,
height= 400,
width = float("inf"),
scroll = ft.ScrollMode.ALWAYS,
auto_scroll=False,
)
# Notification bar control at the bottom
self.notification_bar=ft.SnackBar(
content=ft.Text('Speech + Subtitle Player'),
duration=2000,
bgcolor=ft.colors.BLUE_GREY_700,
)
Class Method (Logic) Part
From version 0.21.0, Flet has become an async-first framework, and it is recommended to create functions or methods in the form of async def unless synchronous processing is necessary. This can improve the responsiveness of your app, making it easier to manage without worrying about the details. Personally, I unfortunately started using async (await and control.update_async()) with an earlier version, then upgraded to a later async-first Flet version, and found I had to rewrite a lot of code… anyway, from line 378 to 738, most of the methods are defined as async def, and self.update() is used to update the view.
Below, I’ll describe some of the methods that I’d like to explain.
Process after completion of loading audio file, async def loaded(self, e)
The method from line 378 is called when an audio file has been loaded. It contains various changes to properties, as well as conversion processing for using subtitle files within the app. This is the longest single method in the entire code.
The first 30 lines or so are quite straightforward, setting values for properties of controls such as sliders, text, and buttons. The first three lines do something like this.
We are using the get_duration_async() method of the Audio control to retrieve the duration (in milliseconds) of the audio, and assigning it to the max property of the slider control audio_slider. In Flet version 0.21.2, when using a method that returns a value like this, we need to use the await ~ <method>_async() syntax, which is different from other parts of the code.
We are taking the milliseconds obtained earlier and converting it to the format “00:00:00,000” for display as a text on the right side of the slider. The function ms_to_hhmmssnnn() (which I got from Copilot) is used for this conversion.
We are dividing the slider into 1-second intervals (1000 milliseconds) using its divisions property. This is because the slider does not display numerical values unless it is divided. Furthermore, Flet only generates audio playback events at 1-second intervals, so we do this to match that timing. In reality, since the slider’s value cannot be changed from the millisecond display in this app, displaying the numerical value has little significance here.
The next if block (from line 383) handles processing when a subtitle file is found. The create_subtitles() function processes the subtitle file internally and stores it in a list format in self.subtitles. When a text file (.txt) is loaded, it does not contain timestamps, so all timestamps are stored as 55:55:55,555 (20135.55) seconds for simplicity’s sake. This value can be referenced throughout the code where necessary. There’s no specific reason to select fives, but reading a 56-hour audio file is unlikely.
The code from lines 397 to 406 mainly focuses on making buttons for audio playback clickable. In this app, audio playback and pause buttons are usually focused by default, allowing users to control playback with space or enter keys. Initially, I wanted to focus on the Open Speech File button at startup, then switch to the play/pause button once a file is loaded, but it didn’t work out that way. Some leftover code from this attempt remains in lines 398-403.
The code from lines 408 to 433 processes a list of subtitle files already generated, adjusting various settings for both TXT files without timestamps and SRT files with timestamps. For each subtitle line, a button is created. The actual content of the button is created in another class SubButton(), but here, an instance named sub is assigned and appended to the controls list of the app’s bottom half screen area using self.subs_view.controls.append(sub).
The code from lines 436 to 443 displays a message at the bottom of the screen depending on whether a subtitle file exists. The self.open_notification_bar method is used, which takes only text and simply sends a notification when called. In cases where a subtitle file was not found, it is called with the type set to ‘error’ and displayed for a longer time in an error color.
See the code:
# Called once audio file is loaded. Enable/disable buttons, create subtitles list, etc.
async def loaded(self, e):
self.audio_slider.max = int(await self.audio1.get_duration_async())
self.duration_text.value = f'{ms_to_hhmmssnnn(self.audio_slider.max)}'
self.audio_slider.divisions = self.audio_slider.max//60
# Enables buttons if associated text file exists.
if self.text_file != 'No Text File.':
# Call function to create the list of subtitles, self.subtitles.
self.subtitles = create_subtitles(self.text_file)
self.save_button.text = 'Save'
self.save_button.disabled=False
self.export_button.disabled=False
self.export_as_srt_button.disabled=False
self.export_as_txt_button.disabled=False
# Disable buttons if associated text file does not eixt.
else:
self.save_button.disabled=True
self.export_button.disabled=True
self.export_as_srt_button.disabled=True
self.export_as_txt_button.disabled=True
self.subtitles = []
self.speech_file_button.autofocus=False
self.speech_file_button.update()
self.play_button.disabled=False
self.play_button.focus()
self.play_button.autofocus=True
self.play_button.update()
self.rewind_button.disabled=False
self.text_file_button.disabled=False
self.subs_view.controls.clear()
# Create buttons of subtitles from the list self.subtitles.
if self.subtitles != []:
# .txt or .srt file
for i in range(len(self.subtitles)):
index = self.subtitles[i][0]
start_time = self.subtitles[i][1]
# .txt file (timestap is dummy, 55:55:55,555) disable buttons.
if self.subtitles[0][1]== 201355555:
self.sub_scroller_sw.value=False
self.sub_scroller_sw.disabled=True
self.export_dialog.actions[0].disabled=True
self.export_as_srt_button.disabled=True
# .srt file
else:
self.sub_scroller_sw.value=True
self.sub_scroller_sw.disabled=False
self.sub_scroller_sw.update()
end_time = self.subtitles[i][2]
text = self.subtitles[i][3]
# Create button instance of each subtitle. Include methods and controls for the instance to call or update.
sub = SubButton(index, start_time, end_time, text, self.sub_time_clicked, self.play_button,
self.save_button, self.subtitles)
# Add button to the subtitle button area, subs_view.
self.subs_view.controls.append(sub)
# Call snackbar to show a notification.
notification = f'Subtitle file loaded: {os.path.basename(self.text_file)}'
await self.open_notification_bar(notification)
# No text file found. Call snackbar to show an alert.
else:
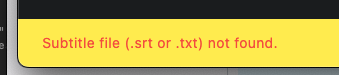
notification = f'Subtitle file (.srt or .txt) not found.'
await self.open_notification_bar(notification, type='error')
print('Subtitle file not found.')
self.update()
Method when playback position changes, async def position_changed(self, e)
The methods from lines 447 to 454 are called when the playback position of an audio file changes, specifically when the on_position_changed event of self.audio1 occurs. In concrete cases, this will be triggered automatically every second during playback, and also when the user manually moves the slider or clicks on a timestamp in other situations. Let’s take a look at the code.
The on_position_changed property receives an argument e within a method. The value of e.data is the playback position (elapsed time) in milliseconds, so this value is assigned to the value property of the audio_slider control to update its position. Additionally, the converted value is inserted into the value property of the position_text control, which will display a readable format and appear on the left side of the slider.
if (self.sub_scroller_sw.value == True) and (self.text_file_name.value != 'No Text File.'):
   self.scroll_to(self.audio_slider.value)
self.update()
The code above checks two conditions: the state of the auto-scroll switch for subtitles and whether a subtitle file exists. If no subtitle file is loaded, it displays “No Text File.” and uses this as a flag itself. When both conditions are true, it calls the scroll_to method to scroll the subtitles, passing self.audio_slider.value as an argument. Finally, self.update() updates the playback time of this method itself.
Process when the slider position changes, async def slider_changed(self, e)
The method from lines 457 to 460 is called when the slider position changes, specifically when the on_change method of self.audio_slider control is triggered.
self.audio1.seek(int(self.audio_slider.value))
The seek method of self.audio1 is called with the value of the slider (self.audio_slider.value) to change the playback position. After that, it’s just a matter of updating; changing the audio playback position is extremely simple.
Play button, async def play_button_clicked(self, e) and async def playback_completed(self, e)
The code from lines 463 to 488 handles processing related to the Play button. When an audio file is loaded, during playback, when paused, and after playback has ended, each state uses methods of self.audio1 to control playback or pause through button clicks. Additionally, icons and text are also updated accordingly.
I thought would be possible to get the playing status (e.g., “playing”) from e.data, but unfortunately, it didn’t work out. Instead, I created a class variable self.isPlaying to determine the state. Although the button could have displayed the same content consistently, such as “(Play / Pause)”, I wanted to display icons that change depending on the situation, which also came in handy during debugging when I wanted to see the status.
See the code:
    # Change Play/Pause status and icon when called.
    async def play_button_clicked(self, e):
        self.position = await self.audio1.get_current_position_async()
        if (self.isPlaying == False) and (self.position == 0):
            self.audio1.play()
            self.isPlaying = True
            self.play_button.icon=ft.icons.PAUSE
            self.play_button.text = "Playing"
        elif self.isPlaying == False:
            self.audio1.resume()
            self.isPlaying = True
            self.play_button.icon=ft.icons.PAUSE
            self.play_button.text = "Playing"
        else:
            self.audio1.pause()
            self.isPlaying = False
            self.play_button.icon=ft.icons.PLAY_ARROW
            self.play_button.text = "Paused"
        self.update()

    # When audio playback is complete, reset play button and status.
    async def playback_completed(self, e):
        if e.data == "completed":
            self.isPlaying = False
            self.play_button.icon=ft.icons.PLAY_ARROW
            self.play_button.text = "Play"
        self.update()
Rewind and 1.5x speed, async def rewind_clicked(self, e) and async def playback_rate(self, e)
The code from lines 491 to 507 handles processing for the rewind button and the 1.5x playback speed switch. The rewind function is a simple one that ensures the value doesn’t become negative. The 1.5x playback speed is also straightforward, simply assigning 1.5 to the playback_rate method of the Audio control when the switch is on. Note that after changing the speed, it’s necessary to update the Audio control using await self.audio1.update_async().
As a fundamental principle of app design, I aimed to create a simple and intuitive design that is easy to operate. I also made sure to only add necessary features. The rewind button is one such feature. In my own experience, when editing subtitles, I often forget to pause playback temporarily. Moreover, subtitles typically appear at the top while playing, so it's convenient to have a button that allows me to go back a little bit during playback. If needed, I can click it
multiple times to rewind further. The reason why I didn't use 3 or 6 seconds is simply because there are no icons available for those numbers.
The 1.5x speed switch is designed with the trend of shortening time. I did try using 2x speed, but personally felt it was a bit too extreme, so I settled on 1.5x instead. For iOS and macOS, there's a limitation to playback rates within the range of 0.5 to 2, so you may want to experiment with changing self.audio1.playback_rate = 1.5 depending on your needs or target users.
See the code:
    # When 5 secs button is clicked, rewind 5 seconds.
    async def rewind_clicked(self, e):
        if self.audio_slider.value <= 5*1000:
            self.audio_slider.value = 0
        else:
            self.audio_slider.value -= 5*1000
        self.audio1.seek(int(self.audio_slider.value))
        #print(int(self.audio_slider.value))
        self.update()

    # Switch playback rate between normal and 1.5x faster.
    async def playback_rate(self, e):
        if self.faster_sw.value == True:
            self.audio1.playback_rate = 1.5
        else:
            self.audio1.playback_rate = 1
        #print(f'Playback rate: {self.audio1.playback_rate}')
        await self.audio1.update_async()
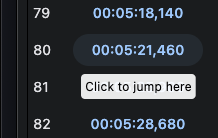
The code from lines 510 to 514 handles processing when the timestamp button is clicked after loading an SRT file. When the button is clicked, it plays the part of the time corresponding to that timestamp. If playback has been paused, it will resume playback.
The timestamp buttons are generated by another class SubButton. When an instance of this class is created, it passes this method to be called when the button is clicked. The button then receives its own start_time from the jump_clicked() method of the SubButton class and uses the seek method of the Audio control to jump to that time.
Let’s go through the code and its explanation step by step.
# Create button instance of each subtitle. Include methods and controls for the instance to call or update.
sub = SubButton(index, start_time, end_time, text, self.sub_time_clicked, self.play_button,
                self.save_button, self.subtitles)
The instance creation code section. This method self.sub_time_clicked is being passed as an argument.
# Create button of subtitle text.
class SubButton(ft.UserControl):
    def __init__(self, index, start_time, end_time, text, sub_time_clicked, play_button, save_button, subtitles):
        super().__init__()
        # Parameter of each subtitle.
        self.index = index
        self.start_time = start_time
        self.end_time = end_time
        self.text = text
        # Passed methods and controls to call and update.
        self.sub_time_clicked = sub_time_clicked
The initialization part of another class SubButton that creates a button (only first part). This class is storing objects passed from its parent class as its own object, which are highlighted in this section.
# When timestamp clicked calls AudioSubPlayer.sub_time_clicked to jump to button position.
async def jump_clicked(self, e):
    await self.sub_time_clicked(self.start_time)
This is the method that is called when the timestamp button is clicked as a result of an on_click event. This method uses self.start_time and self.sub_time_clicked to execute a method from its parent class.
And finally, this method plays the audio at the position of start_time.
# When the timestamp is clicked, jump to its position and play if not playing.
async def sub_time_clicked(self, start_time):
    self.audio1.seek(int(start_time))
    if self.isPlaying == False:
        await self.play_button_clicked(start_time)
    self.update()
Even if you understand Python and classes, it took me a long time to figure out how to execute a method from an instance of a class. It wasn't just a simple Google search away, as I struggled to translate my intentions into searchable keywords. Those who are stuck in their ways like GOTO/GOSUB, which are extinct species of knowledge, I highly recommend thoroughly studying Python classes.
Scroll of subtitle buttons, async def scroll_to(self, e)
The code from lines 517 to 525 is scrolling subtitles. This method is only called when a time-stamped SRT file is opened, specifically from the position_changed method. The argument e passed to this method contains the playback position (in milliseconds) of the audio. The class variable self.subtitles is a 2D list where each inner list contains consecutive index number, start times, end times, and text. This method references the index index and end time end_time.
What I wanted to do here was move the subtitles corresponding to the currently playing audio to the top. However, Flet can only retrieve the playback position of an audio file once per second, so it scrolls to the subtitle button with the end time closest to that value if it’s larger than the current playback position. This may not be perfectly synchronized in real-time, but it will ensure that the currently playing subtitles are displayed either at the top or the second position.
Let’s go through the code and explanation step by step.
end_time = [item[2] for item in self.subtitles]
The local variable end_time of type list is assigned with all the end times of the subtitles.
index = min(range(len(end_time)), key=lambda i: abs(end_time[i]-e))
The local variable index is assigned with the position of the subtitle that has the end time closest to the current playback position. The index is an integer starting from 0.
key=str(self.subtitles[index][0])
The local variable key is assigned with the index number from the SRT file converted to a string. The index numbers in the SRT file start from 1 and are not necessarily consecutive, so I’ve added an extra step to consider the possibility of missing index numbers (in reality, after writing this code, I generated the subtitles list inside the app using a code that ensures the indices become consecutive, making key = str(index+1) have the same reslut).
self.subs_view.scroll_to(key=key, duration =1000)
The scroll_to method of the subs_view instance, which is a Column object, is used to scroll to the button with the index number equal to the local variable key, with a smoothness of 1000 milliseconds (1 second). The left-hand side key refers to the property of the scroll_to method, while the right-hand side key is the local variable holding the index number as a string.
I'd like to add two points to this explanation. The first point is that if you have many buttons, the Flet app's performance can become sluggish. In particular, if you have over 300 buttons, the window movement can behave strangely. This is not a problem with CPU or memory usage, but rather a specification-related issue in Flet. If you're planning to create an app that uses many lists, I think it would be better to consider using a different control. When I researched this, I couldn't find any other controls that allow scrolling and on_click event handling, but there may be some workaround.

The second point is related to NumPy usage. In Flet version 0.21.2 on macOS, if you use NumPy in your code (as I did initially at line 520), the built app will crash when run. This is a problem that occurs only when building for macOS. I rewrote my code to avoid this issue, and I've written about it in a separate article. → NumPy issue is resolved by Flet. See this post.
Loading audio file, async def pre_pick_speech_file(self, e), and related processes
From here, I will explain the methods and controls related to loading an audio file. While utilizing OS features makes things easier, it seems that Flet or FilePicker control is not sufficient for implementing “Open File” and “Save File” capabilities. Many additional elements are necessary to achieve this. Specifically, when opening a file, you basically need to do the following:
Create an instance of the dialog control.
Add it to the page.
Create a button that triggers the “Open File” dialog event and place it on the page.
Create a method to receive the file selection event and process it.
In this application, I also created methods to handle the case where changes have been made to the subtitle text and prompt the user to either discard or keep those changes. This resulted in having two methods for handling each type of file (audio and text) separately, although they perform similar operations. In hindsight, it would be better to reuse code by making them more modular, but as it stands, there are separate codes for each. The process of reading and writing files is quite complex and requires a lot of attention to detail, so I found this part of the project to be the most challenging. From now on, I will explain the code in a step-by-step manner, following the actual workflow.
# Speech file picker control
self.pick_speech_file_dialog = ft.FilePicker(on_result=self.pick_speech_file_result)
This is an instance of the FilePicker control, which opens the OS’s “Open File” dialog. When a file is actually selected, the on_result event occurs and calls the self.pick_speech_file_result method.
# Adds dialog instance methods to the page.
page.overlay.extend([app.pick_speech_file_dialog, app.pick_text_file_dialog,
                     app.export_as_srt_dialog, app.export_as_txt_dialog])
The dialog is added to the page using overlay.extend, which will be used for all file reading and writing operations. This is similar to adding an Audio control, and it’s being done outside of the class in the async def main() method.
This is a button that calls self.pre_pick_speech_file when clicked.
# Called once Open Speech File button is clicked to pause playback and check if changes saved.
async def pre_pick_speech_file(self, e):
    if self.isPlaying == True:
        await self.play_button_clicked(e)
    if self.save_button.text == '*Save':
        #print('Save is not done.')
        await self.speech_save_or_cancel()
    else:
        await self.pick_speech_file()
This method is added to perform some processing before actually opening the “Open File” dialog. First, if playback is in progress, it stops. Then, if there are unsaved changes to the subtitles (indicated by an asterisk next to the “Save” button), a prompt dialogue is displayed to ask moving forward without save, and only after that, the method for opening the “Open File” dialog is called. In this case, all method calls require await. To temporarily stop playback, self.play_button_clicked(e) is called with the argument e since it’s required even if it’s not being used.
# Opens a dialog if change is not saved.
async def speech_save_or_cancel(self):
    self.page.dialog = self.speech_save_or_cancel_dialog
    self.speech_save_or_cancel_dialog.open = True
    self.page.update()
This method is called when there are unsaved changes. What’s being done are specifying an instance of AlertDialog (self.speech_save_or_cancel_dialog) as the dialog for the page, and setting its open property to enable displaying the dialog.
# Alert dialog that opens if subtitle was edited but not saved when Open Speech File button is clicked.
self.speech_save_or_cancel_dialog = ft.AlertDialog(
    modal=True,
    title=ft.Text('Change not saved.'),
    content=ft.Text('Do you want to discard the change?'),
    actions=[
         #ft.TextButton('Save', on_click=self.save_then_open, tooltip='Save then open another file.'),
         ft.TextButton('Open without save', on_click=self.open_speech_without_save, tooltip='Change will be lost.'),
         ft.TextButton('Cancel', on_click=self.close_speech_save_or_cancel_dialog),
    ]
)
This is a dialog that opens when there are unsaved changes. It has buttons for “Open without save” and “Cancel”, which allow you to open the file without saving or cancel the operation respectively. Although I wanted to add a button to save here as well, it didn’t work out and the “Save” button remains commented out.
This is a method called when the user selects to open the file without saving in the dialog. It closes the dialog, updates the page, and then calls self.pick_speech_file().
Finally, this is the method for opening the “Open File” dialog. This method is used to limit the file types that can be opened by setting two properties: allowed_extensions and file_type=ft.FilePickerFileType.CUSTOM. This method opens the “Open File” dialog using the pick_files() method of the self.pick_speech_file_dialog control, which was previously defined. When a file is selected, the on_result event occurs and calls the self.pick_speech_file_result method. Since this method uses OS functionality, it does not require keeping track of the previously opened folder within the Flet app; when opening a file again, the same folder will be opened.
# Called when audio file pick dialog is closed. If file is selected, call self.check_text_file to load text file.
async def pick_speech_file_result(self, e: ft.FilePickerResultEvent):
    if e.files:
        #print(f'e.files = {e.files}')
        self.speech_file_name.value = ''.join(map(lambda f: f.name, e.files))
        self.speech_file = ''.join(map(lambda f: f.path, e.files))
        #print(f'Full path= {self.speech_file}')
        self.audio1.src = self.speech_file
        self.base_dir.value=f"Directory: {os.path.dirname(self.speech_file)}"
        await self.check_text_file()
        self.update()
        await self.load_audio()
This method takes an argument e in the ft.FilePickerResultEvent, which contains information about the opened file. It extracts the file name f.name and absolute path f.path from e.files. It assigns the file name and path to self.speech_file_name.value for display purposes and self.audio1.src for loading the audio file into self.speech_file. It then calls the async self.check_text_file() method, which checks if file exists, updates the display, and finally loads the audio file using the load_audio() function.
# Checks if audioFileName.srt or .txt exists to automatically load it.
async def check_text_file(self):
    #print(f'Speech file = {self.speech_file}')
    tmp_file = os.path.splitext(self.speech_file)[0]
    if os.path.exists(tmp_file+'.srt'):
        self.text_file = tmp_file+'.srt'
        self.text_file_name.value = os.path.basename(self.text_file)
    elif os.path.exists(tmp_file+'.txt'):
        self.text_file = tmp_file+'.txt'
        self.text_file_name.value = os.path.basename(self.text_file)
    else:
        self.text_file = self.text_file_name.value = 'No Text File.'
        self.save_button.disabled=True
        self.export_button.disabled=True
        self.sub_scroller_sw.disabled=True
    #print(f'Subtitle file = {self.text_file_name.value}')
This method prepares to read the selected audio file, checking if a file with the same name but with an extension of .srt or .txt exists. If neither exists, it disables buttons such as Save.
After this, the method self.load_audio() on line 801 is called, which adds the audio file to the page. When the loading of the audio file is complete, the event on_loaded is triggered for self.audio1, and then the method self.loaded explained at the beginning is called.
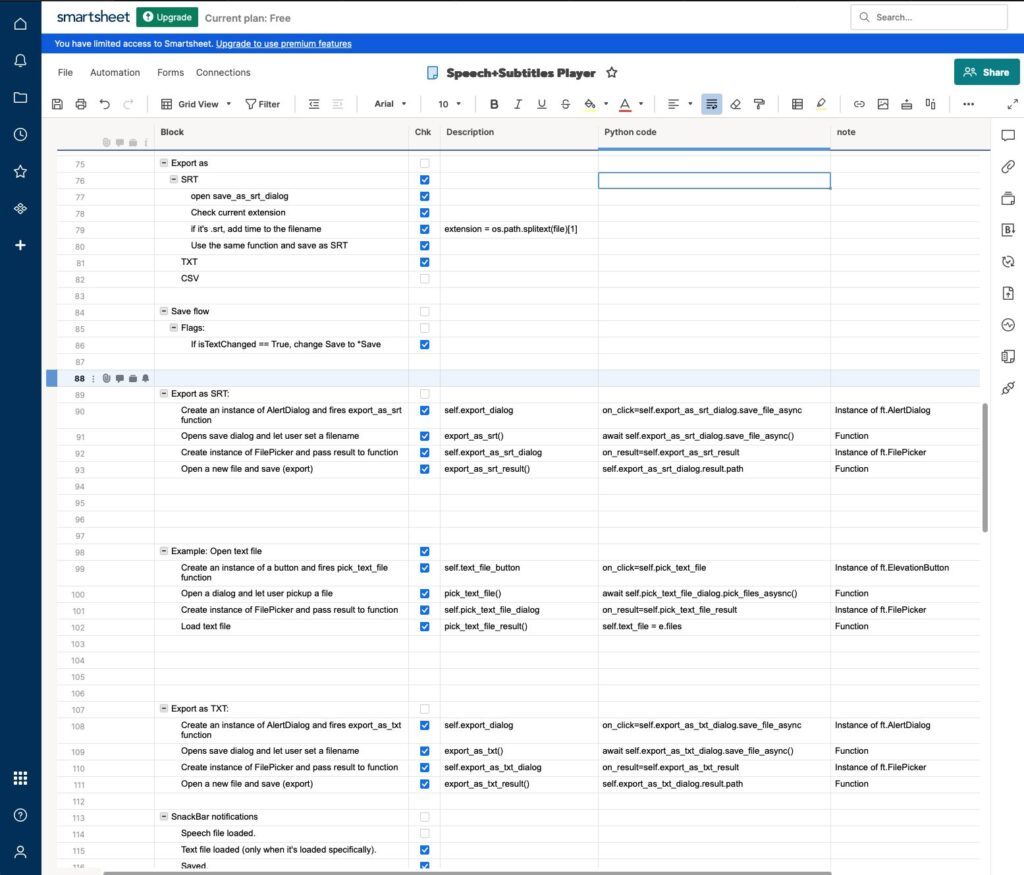
There is no code to evaluate whether the file contents are correct, but the combination of codes is this length. Although understanding the process can make it less complex, going through it in one's head can be quite challenging. When adding code for reading subtitle files, I created a checklist on Smartsheet free version (example capture below) and made progress by coding accordingly. This article will not cover the part related to reading text files because it's doing pretty much the same thing.
async def save_clicked(self, e), called to save and overwrite subtitle files
This method, located on lines 641-651, calls a method to overwrite the open subtitle file with the changed content. The call happens only when changes are made based on the open file type, .srt or .txt.
See the code:
    # Updates current open file.
    async def save_clicked(self, e):
        #print(f'File: {self.text_file}')
        extension = os.path.splitext(self.text_file)[1]
        #print(f'Extension: {extension}')
        if self.save_button.text==('*Save'):
            if extension == '.srt':
                await self.save_as_srt(self.text_file)
            elif extension == '.txt':
                await self.save_as_txt(self.text_file)
            self.save_button.text=('Save')
        self.update()
This method, located on lines 670-684, overwrites an SRT file. The save_file_name variable contains the absolute path of the file that was opened. The self.subtitles list is formatted for ease of use within the app, so it writes to the file in the format of index number, start time –> end time, and subtitle text with a following blank line (\n). After writing is complete, it sends a notification message to the bottom of the window and updates the display.
See the code:
    # Saves as .srt file.
    async def save_as_srt(self, save_file_name):
        with open(save_file_name, 'w') as srt:
            for i in self.subtitles:
                for j in range(len(i)):
                    if j % 4 == 0:
                        srt.write('%sn' % i[j])
                    elif j % 4 == 1:
                        start = ms_to_hhmmssnnn(int(i[j]))
                        end = ms_to_hhmmssnnn(i[j+1])
                        srt.write(f'{start} --> {end}n')
                    elif j % 4 == 3:
                        srt.write('%snn' % i[j])
        notification = f'Subtitle saved as an SRT file: {os.path.basename(save_file_name)}'
        await self.open_notification_bar(notification)
        self.update()
This method, located on lines 705-713, overwrites a TXT file. Unlike SRT files, which contain additional information such as timestamps and blank lines, the subtitles are simply represented as strings in this format. Therefore, it only writes the string parts of the self.subtitles list to the file. After writing is complete, it sends a message to the bottom of the window and updates the display.
See the code:
    # Saves as .txt file.
    async def save_as_txt(self, save_file_name):
        with open(save_file_name, 'w') as txt:
            for i in self.subtitles:
                for j in range(len(i)):
                    if j % 4 == 3:
                        txt.write('%sn' % i[j])
        notification = f'Subtitle saved as a TXT file: {os.path.basename(save_file_name)}'
        await self.open_notification_bar(notification)
        self.update()
Export as SRT/TXT, async def export_as_srt(self, e) and async def export_as_txt(self, e)
The lines 654-667 for exporting as SRT and 687-702 for exporting as TXT could have been merged and simplified, but I was too lazy to do it. When either button is clicked, if a file with the same name already exists, it will suggest a new name by adding the date and time to the filename and open a file save dialog. When a TXT file is open, only export as TXT is enabled since there is no timestamp information (it’s unable to generate a SRT file).
TXT cannot be exported as SRT.
Similarly, when opening a dialog to allow the user to specify the file name and save location, separate code is needed for adding controls, pages, and processing. The flow is almost identical to audio file loading, so I won’t go into details. However, depending on which button was clicked, the final result is writing to a file using either the save_as_srt or save_as_txt method introduced earlier.
See the code to export as SRT:
# Exports current open SRT file as another SRT file.
async def export_as_srt(self, e):
    if os.path.splitext(self.text_file)[1] == '.srt':
        suggested_file_name = os.path.basename(self.text_file).split('.', 1)[0]+'_'+datetime.now().strftime("%Y%m%d%H%M")+'.srt'
    self.export_as_srt_dialog.save_file(
        dialog_title='Export as an SRT file',
        allowed_extensions=['srt'],
        file_name = suggested_file_name,
        file_type=ft.FilePickerFileType.CUSTOM,
    )

# Checks result of Export as SRT File Picker and passes absolute path to self.save_as_srt if exists.
async def export_as_srt_result(self, e: ft.FilePicker.result):
    if e.path:
        await self.save_as_srt(e.path)
See the code to export as TXT:
# Exports current open text file as a TXT file.
async def export_as_txt(self, e):
    if os.path.exists(os.path.splitext(self.text_file)[0]+'.txt'):
        suggested_file_name = os.path.basename(self.text_file).split('.', 1)[0]+'_'+datetime.now().strftime("%Y%m%d%H%M")+'.txt'
    else:
        suggested_file_name = os.path.basename(self.text_file).split('.', 1)[0]+'.txt'
    self.export_as_txt_dialog.save_file(
        dialog_title='Export as a TXT file',
        allowed_extensions=['txt'],
        file_name = suggested_file_name,
        file_type=ft.FilePickerFileType.CUSTOM,
    )

# Checks result of Export as TXT File Picker and passes absolute path to self.save_as_txt if exists.
async def export_as_txt_result(self, e: ft.FilePicker.result):
    if e.path:
        await self.save_as_txt(e.path)
Notification at the bottom, async def open_notification_bar(self, notification, type=’normal’)
This method, located on lines 716-725, displays a notification at the bottom of the window. This feature utilizes the SnackBar control defined at line 370 in Flet, which is displayed only when needed and automatically disappears. Sample notification content:
This method displays a notification with the specified text and type (normal or error). If no type is specified, it defaults to a 2-second notification duration. For error notifications, it displays a red notification on yellow backend with a longer duration of 4 seconds (4000 ms). There are various ways to specify colors, but I used named colors from this page. The text color is specified as a property of the Text control within the SnackBar’s content property, while the notification area color bgcolor is specified as a property of the SnackBar itself – it is not intuitive. After configuring the content, open the notification with open=True, and it disappears after the specified time automatically.
Definition of the control is right below (line 369~), and the method starts from line 715.
    # Notification bar control at the bottom
    self.notification_bar=ft.SnackBar(
        content=ft.Text('Speech + Subtitle Player'),
        duration=2000,
        bgcolor=ft.colors.BLUE_GREY_700,
    )
Upon reviewing it again, I realize that the control definition above already specifies the notification area color, so there shouldn’t be no need to specify it again in the method.
    # Opens notification bar with given text. If type is 'error', shows message longer with caution color.
    async def open_notification_bar(self, notification, type='normal'):
        if type == 'normal':
            self.notification_bar.content=ft.Text(notification, color=ft.colors.LIGHT_BLUE_ACCENT_400)
            self.notification_bar.bgcolor=ft.colors.BLUE_GREY_700
        elif type == 'error':
            self.notification_bar.content=ft.Text(notification, color=ft.colors.RED)
            self.notification_bar.bgcolor=ft.colors.YELLOW
            self.notification_bar.duration=4000
        self.notification_bar.open=True
        self.notification_bar.update()
Class to generate subtitle buttons, SubButton
The class that creates buttons from subtitles and timestamps is a custom control class that inherits from UserControl and implements user-defined controls. This class was created by modifying the official Flet Tutorial’s “To-Do app” example, so its internal structure is slightly different from the main class. It follows the order of initialization, layout building, button click method, etc.
When the parent class creates an instance of a button, it passes not only the index number, start time, and text of the subtitle related to display, but also methods of the parent class and the save button. The subtitles list, which holds the loaded subtitles as a 2D list, is passed so that it can be directly manipulated when editing the text. Passing the entire subtitles to each instance is not a good example to follow – it can be the reason of laggy window movement.
See the code:
def __init__(self, index, start_time, end_time, text, sub_time_clicked, play_button, save_button, subtitles):
    super().__init__()
    # Parameter of each subtitle.
    self.index = index
    self.start_time = start_time
    self.end_time = end_time
    self.text = text
    # Passed methods and controls to call and update.
    self.sub_time_clicked = sub_time_clicked
    self.play_button = play_button
    self.save_button = save_button
    self.subtitles = subtitles
Layout of time stamp and subtitle buttons, etc., def build(self)
In lines 97-150, the control instance is generated and initialized, and then returned to the parent class. The first half of the code up to line 123 creates buttons for timestamps, subtitles, and a placeholder for editing mode, and then wraps them together into the display control self.display_view.
The key of self.display_start_time is the index number, which serves as a target specification for scrolling when a timestamp button is clicked.
The if block starting from line 126 checks the type of subtitle file loaded and modifies the tooltip displayed when hovering over the timestamp button.
Lines 132-149 are setting up the editing mode for subtitle text. By default, it is set to visible=False, making it invisible.
The official To-Do app example has edit and delete buttons for each item, but in this application, the delete button is not necessary. Instead, the edit button is replaced with a subtitle itself that serves as a button, making it more intuitive to use. Additionally, by allowing the editing mode to be cancelled, I avoided implementing an undo feature.
Clicking on subtitle button enables editing. Enter key to settle.See the code:
# === BUILD METHOD ===
def build(self):
    # Start time button
    self.display_start_time = ft.TextButton(text=f"{ms_to_hhmmssnnn(int(self.start_time))}",
                                        # Disable jump button if loaded text is TXT, no timestamp.
                                        disabled=(self.start_time==201355555),
                                        # When enabled, jump to the key when clicked.
                                        key=self.index,
                                        width=130,
                                        on_click=self.jump_clicked,)

    # Subtitle text button in display view. Click to edit.
    self.display_text= ft.TextButton(text=f"{self.text}",
                                     on_click=self.edit_clicked,
                                     tooltip='Click to edit')

    # Placeholder of subtitle text button in edit view.
    self.edit_text = ft.TextField(expand=1)

    # Put controls together. Left item is the key=index.
    self.display_view = ft.Row(
        alignment=ft.MainAxisAlignment.START,
        controls=[
            ft.Text(value=self.index, width=30),
            self.display_start_time,
            self.display_text,
        ]
    )

    # Change tool tip of start time button which is only clickable for SRT.
    if self.start_time==201355555:
        self.display_start_time.tooltip='Jump not available'
    else:
        self.display_start_time.tooltip='Click to jump here'

    # Subtitle edit view visible when clicked.
    self.edit_view = ft.Row(
        visible=False,
        #alignment=ft.MainAxisAlignment.SPACE_BETWEEN,
        #vertical_alignment=ft.CrossAxisAlignment.CENTER,
        controls=[
            self.edit_text,
            ft.IconButton(
                icon=ft.icons.DONE_OUTLINE_OUTLINED,
                tooltip='Update Text',
                on_click=self.save_clicked,
            ),
            ft.IconButton(
                icon=ft.icons.CANCEL_OUTLINED,
                tooltip='Close wihout change',
                on_click=self.cancel_clicked,
            )
        ]
    )
    return ft.Column(controls=[self.display_view, self.edit_view])
Lines 155-161 enable the editing mode when a subtitle button is clicked. By calling the focus() method, it immediately allows keyboard input to be made, and sets up the on_submit event to call the self.save_clicked method when the Enter key is pressed.
See the code:
# Opens editable text button with subtitle. Hit enter key or click checkmark to call save_clicked.
async def edit_clicked(self, e):
    self.edit_text.value = self.display_text.text
    self.edit_text.focus()
    self.display_view.visible = False
    self.edit_view.visible = True
    self.edit_text.on_submit = self.save_clicked
    self.update()
Update of subtitle, async def save_clicked(self, e)
Lines 164-172 handle the processing when a check (overwrite) button is clicked or when Enter is pressed, settling the edited subtitle. The save button will have an asterisk (*) indicating that it’s been edited, and the self.subtitles list, which holds the subtitles, is updated with the changed text. Focus is returned to the audio file playback button, allowing for playback and pause control via Space or Enter keys.
See the code:
# Updates edited subtitle, change save button, revert focus back to Play button.
async def save_clicked(self, e):
    self.display_text.text= self.edit_text.value
    self.display_view.visible = True
    self.edit_view.visible = False
    self.save_button.text = '*Save'
    self.subtitles[int(self.index)-1][3]=self.display_text.text
    self.play_button.focus()
    self.save_button.update()
    self.update()
Cancel editing, async def cancel_clicked(self, e)
Lines 175-179 handle the editing cancellation processing when the (×) button is clicked. Although it’s called “cancel”, it simply discards the changed content and ends the editing mode, returning focus to the playback button. Unfortunately, I had wanted to achieve this same behavior using the Esc key, but unfortunately, Flet didn’t have a simple way to do so, so I had to give up on that idea.
See the code:
# When timestamp clicked calls AudioSubPlayer.sub_time_clicked to jump to button position.
async def jump_clicked(self, e):
    await self.sub_time_clicked(self.start_time)
Jump by timestamp button, async def jump_clicked(self, e)
Lines 182-183 pass the start_time of the subtitle to the parent class’s sub_time_clicked method when a timestamp button is clicked, setting up playback from that point. This is necessary to use await because we need to use the seek method of the Audio control, which requires an asynchronous operation.
Functions not related to Flet GUI
Functions that are necessary for the app, but not related to Flet GUI, have been grouped together at the top of the code. Brief explanation of them are:
A function converts milliseconds to a time string in SRT format
A function does the reverse conversion
A function reads and processes subtitle files (TXT or SRT) into a list that can be used within the app
This is all of the explanation of the code.
Things I Thought About While Creating This App and Why I Wrote This Article
Flet is really easy to create a modern design app, and that’s its big charm. Of course, buttons and text that become GUI elements are built-in, as well as audio file processing, sliders, notifications, and dialogs, so you can just roughly arrange them without worrying about the details and create an app quickly. I feel it’s like having a high-quality 3D printer, where Python code becomes real, just like 3D model data turns into a physical object. That’s exciting.
The official documentation is comprehensive and can be well understood, allowing you to use it for your app. Since most of the features are designed to work in a web browser, there are many live examples available that you can try out. It’s also enjoyable to explore and find components to use in your own app by modifying them. By going to this gallery page, you can likely test most of the controls and features, and even check the actual code on GitHub, which is very helpful.
However, Flet is not a mouse-operated GUI creation tool like those that were popular in the distant past. Therefore, all aspects of your app will need to be implemented using Python code. Additionally, the completed app’s interface will be implemented as a web frontend (HTML, JavaScript, CSS). While knowledge of these is not essential, having some understanding of them can make creating a finished product easier. I imagine that someone who has no intention of learning about front-end development might still be able to use Flet effectively by reading 1-2 introductory web front-end books and then understanding the documentation with ease.
It seems that there is an increasing amount of Japanese information about Flet, but when I searched for articles of Flet, most of them were just “trying it out” type of articles. I couldn’t find many articles that actually explained how to create a practical app using Flet. While the official documentation covers everything, I thought it was still not simple enough when you actually use it.
So, at the time when my app “Speech plus Subtitles Player”, was almost complete, I decided to write an article about developing an Flet app. My intention was that there must be people who really need such an article, even if it’s imperfect and has some unnecessary parts. I’m glad finally both the app and this document are done.
For the Python logic parts, I relied heavily on Copilot (free version) to help me write them. It appears that Copilot doesn’t know much about Flet itself, but in terms of Python, I found that Copilot was quite reliable. The Large Language Model (LLM, AI) has made it possible to use code generation tools that can even do debugging together with them. This means that if you have an idea, the difficulty of creating an app has significantly decreased. (by the way, I got a huge help from LLMs for translation of this article from Japanese into English. Last half was almost done by Llama 3 8B Instruct with Ollama.)
It’s a great feeling to see your own idea come to life, even if it’s a simple app. Once built, you can share it with others and get feedback. I highly recommend trying out Flet for creating apps – it’s definitely worth a shot!
Image by Stable Diffusion
It seems to be caused by the model I used, and most of the generated images were of realistic white old men. I replaced the prompt “realistic, masterpiece, best quality” with “cartoon”. From among the drawings I received, I adopted the one that mostly ignored my instructions as the eye-catching image for this article. The model remains the same, but the difference in generated image is significant due to changes in prompts.
Date: 2024-4-8 19:16:06
Model: realisticVision-v20_split-einsum
Size: 512 x 512
Include in Image: cartoon, retro future, guy partially gray hair with glasses, white t-shirt, typing keyboard, happy coding!
There was a bug in Flet (version 0.21.0 and 0.21.1) that caused built app with NumPy for macOS to crash immediately after launch. I reported this issue on GitHub some time ago, and finally Feodor Fitsner, the author, updated me with a solution. To fix the issue, you simply need to build your Flet app again.
Solution
Template for Flet version 0.21.2 and the latest version 0.22.0 (as of April 19, 2024) has been modified, according to the author. Flet itself has not been changed. Therefore, if you are using NumPy with a Flet app on macOS, you should be good to go with these versions. Just rebuild now (flet build macos) and it should work.
If you’re running older version of Flet, upgrade to the latest with pip install --upgrade flet. You can specify a version as well if needed:
pip install flet==0.21.2
I upgraded to 0.22.0 and confirmed my SPS Player app built for macOS with NumPy code didn’t crash by building it again. If not sure your Flet version, try the below command:
pip list|grep flet

# result will be like the below:
flet                  0.21.2
flet-core             0.21.2
flet-runtime          0.21.2
Another way
Adding the below code to your Flet will also resolves the issue, according to the comment in the issue. I won’t bother as long as my codes work with the recent Flet versions though.
import os

os.environ["OPENBLAS_NUM_THREADS"] = "1"
Flet is open-source software that is available for free, so I didn’t request for update or pressure the author to fix anything. However, I am grateful that they took the time to address this issue and make Flet even better. To contribute to Flet, I continue developing my app with it.
Image by Stable Diffusion
You can see what I wanted from the prompt. The quality of each blog post’s image is vastly different and it’s getting out of hand. Since I got the M2 Max, I’ve been asking for 6 images with 30 steps and then adjusting the step and prompt or model based on the outcome.
Date: 2024-4-20 0:14:30
Model: fruity-mix_split-einsum_compiled
Size: 512 x 512
Include in Image: fantazy, realistic painting, a wizard with a magic wand killed misterious creature by fireball
I have successfully built my own app, Speech + Subtitles Player made with Flet for Python by eliminating a line of code that required NumPy. However, adding copyright by template caused building process to fail probably because of the audio control which seems to conflict with template file. Unfortunately, the official document does not mention challenges about NumPy or Audio + template on macOS. If you’re looking for the solution, you found the right place.
(My) Environment
The issues and the solutions were found with the followings. Different versions of Flet and/or Flutter might result something different.
Hardware: Mac Studio M2 Max 12-core CPU / 30-core GPU / 32GB RAM
OS: macOS Sonoma 14.3.1
Xcode: 15.3
Python 3.11.7
Flet: 0.21.2
Flutter 3.19.3
Dart: 3.3.1
CocoaPods: 1.15.2
Rewrite code to eliminate NumPy
My previous code used NumPy only to find the closed value of a subtitle’s end time to scroll based on the current position of audio. It’s line #520. By changing it to the line #522, I was able to remove NumPy from my code (GitHub code is updated). Commenting # import numpy as np successfuly built the app by executing flet build macos --include-packages flet_audio now builds app with no issue. I do not notice any delay by making this change.
    # Called when slider position is changed and scroll to subtitle with the nearest end_time.
    async def scroll_to(self, e):
        end_time = [item[2] for item in self.subtitles]
        # Numpy is only used below:
        #index = np.argmin(np.abs(np.array(end_time) - e))
        # Below works without using Numpy:
        index = min(range(len(end_time)), key=lambda i: abs(end_time[i]-e))
        key=str(self.subtitles[index][0])
        self.subs_view.scroll_to(key=key, duration =1000)
        self.update()
Should you use NumPy a lot for a time sensitive app, you need to wait for Flet (flet build) to work with NumPy on Mac (I submitted an issue ). Alternatively, you can use flet pack main.py which is not suggested officially but works (see the official document).
Simple build works but it fails by specifying template
As a next step, I tried to add copyright by specifying the template directory and faced another issue below. It shows lots of complicated version dependencies.
% flet build macos --build-version "1.0.1" --template flet-build-template --include-packages flet_audio
Creating Flutter bootstrap project…OK
Customizing app icons and splash images…OK
Generating app icons…Because flet_audio <0.20.1 depends on flet ^0.20.0 and flet_audio >=0.20.1 <0.20.2 depends on flet ^0.20.1, flet_audio <0.20.2 requires flet ^0.20.0.
And because flet_audio ^0.20.2 depends on flet ^0.20.2 and flet_audio >=0.21.0 <0.21.1 depends on flet ^0.21.0, flet_audio <0.21.1 requires flet ^0.20.0 or ^0.21.0.
And because flet_audio >=0.21.1 <0.21.2 depends on flet ^0.21.1 and flet_audio >=0.21.2 depends on flet ^0.21.2, every version of flet_audio requires flet ^0.20.0 or >=0.21.0 <0.22.0.
So, because fletaudioplayback depends on both flet ^0.19.0 and flet_audio any, version solving failed.

You can try the following suggestion to make the pubspec resolve:
* Try upgrading your constraint on flet: dart pub add flet:^0.21.2

Error building Flet app - see the log of failed command above.
To avoid this error, you must forget about the template.
SOLUTION: Use command options instead of template
I know it’s not smart but that’s the only way I found. Trash the template folder and use a couple of options as blow. Hope audio + template will work in the near future as well.
Quick hints: --product can name your app. If you don’t use this option, parent folder name will be your app name. --include-packages flet_audio is a requirement for an app that uses the Audio control. See this page for the full list of options.
Additional tip regarding your folder structure — when you build an app, remove all unnecessary files and folders. When I first built this app with few large audio files which were in another folder than the assets folder, building process took a long time and built app was 1.7GB in size. After removing the audio files, the app size became 260MB.
Some notes about the built app
When I launched the app in build/macos first time, I saw a white blank window and it took several seconds to draw contents such as buttons, texts, and a logo image. The reason was not the app itself, but an anti-virus software on my Mac that was running so hard consuming 300% of CPU to scan the app. Once it’s done, the app started running quickly. While playing audio, CPU usage is around 30-40%. I’m not sure why but the splash logo does not appear when the app is launched. Since it does not harm functionalities, I decided not to bother. Everything else works as expected. Nice.
Bonus: Get coding assistance from Copilot (Bing Chat)
To rewrite the function with NumPy to native Python code, I got an assistance from Copilot, formerly Bing Chat free version. You better use paid version of generative AI services for serious production for sure, but the fee version works fine just as long as you understand that a few chat back and forth is needed to get an expected answer. Try giving enough but short requirements and complete in 5 round-trips. Below is an example, actual chat I had with Copilot.
You
can you help me rewrite an existing python code with numpy to python native without numpy? I’ll share a code with you
Copilot
Certainly! Please go ahead and share the existing Python code that uses NumPy, and I’ll help you rewrite it using native Python constructs. 😊
You
end_time is a list containing integers from the smallest to the largest. e is also an integer. import numpy as np. This is the actual code to be rewritten: index = np.argmin(np.abs(np.array(end_time) – e))
Copilot
Certainly! Let’s rewrite the given code snippet that uses NumPy to achieve the same functionality using native Python without relying on NumPy.
The original code snippet calculates the index of the element in the end_time list that is closest to the value of e. We’ll achieve the same result using native Python constructs.
Here’s the rewritten code:
def find_closest_index(end_time, e):
    # Initialize variables to keep track of the minimum difference and index
    min_difference = float('inf')  # Initialize with positive infinity
    closest_index = None

    # Iterate through the end_time list
    for i, time_value in enumerate(end_time):
        # Calculate the absolute difference between the current value and e
        difference = abs(time_value - e)

        # Update the closest index if the current difference is smaller
        if difference < min_difference:
            min_difference = difference
            closest_index = i

    return closest_index

# Example usage
end_time = [1, 3, 6, 9, 12]  # Replace with your actual end_time list
e = 7  # Replace with your actual value of e
result_index = find_closest_index(end_time, e)
print("Closest index:", result_index)
In this rewritten code:
We manually iterate through the end_time list.
We calculate the absolute difference between each value in the list and e.
We keep track of the index corresponding to the smallest difference encountered.
Feel free to adapt this approach to your specific use case, and let me know if you need further assistance! 😊
You
can you rewrite it to a one-liner with lambda?
Copilot
Certainly! Here’s the equivalent one-liner using a lambda function:
This lambda function calculates the index of the element in the end_time list that is closest to the value of e. It uses the min() function with a custom key function to find the index with the smallest absolute difference.
Feel free to use this concise one-liner in your code! 😊
Image by Stable Diffusion
This time I needed to exclude few words as initially generated images were all fat old man with big stomach. Face in close-up is detailed enough, but when it’s far Stable Diffusion tends to lose focus. Thumbnail looks fine though.
Date: 2024-3-31 1:55:34
Model: realisticVision-v20_split-einsum
Size: 512 x 512
Include in Image: realistic, masterpiece, best quality, retro future, happy young guy partially gray hair with glasses jumping with big simle in front of a beautiful building
If you have not, try OpenAI’s Whisper, speech-to-text AI. It’s free and works on a personal computer without sending data to the cloud. With my M1 mac mini 16GB RAM, it takes about 90% of the actual length of audio file to complete the transcription, and the accuracy/quality is also about 90% in Japanese or even better in English. After transcribing multiple types of speeches, I researched and tried various parameter changes to increase the accuracy, but it turned out to be nearly impossible, at least for now. So, I changed my mind and started building an app that I can edit subtitles easily while playing speech audio file simultaneously. In this post, I’m going to introduce the standalone desktop app that I built with Flet, GUI application development framework for Python. l’m going to write another post to share more about the code. For the time being, you can read my code that I added comments as many as I could (GitHub).
Introduction
I call the app Speech plus Subtitles Player (SPSP or SPS Player) in English. I named it Jimaku Gokuraku Maru in Japanese (“jimaku” means subtitles), named after an old console game for Famicom, Jigoku Gokuraku Maru (“jigoku” means hell. haha). As my app is an open source software it really does not matter, but I also created a cool logo using a free Japanese font Gen Kai Min Cho from Flop Design. Anyways, with SPSP, you can play audio file and edit subtitles (SRT file) generated by Whisper or any other speech-to-text tool quite easily. Subtitles scroll in sync with the audio, and the UI is intuitive.
Needed features are all included. Subtitles above are actual Whisper output of a famous speech by Steve Jobs.
How to use SPSP
(See “How to run SPSP” below to run the app.) When you load an audio file using the Open Speech File button, if a subtitle file (extension .srt) or text (extension .txt) with the same name exists in the same folder, it will be automatically opened. The Play button plays/pauses the audio and the subtitles (SRT file) scroll along with the audio. Click on the timestamp to cue there. Click on the subtitle area to edit the text. The edited texts will be overwritten in the same file by clicking on the Save button. The SRT and TXT buttons will exported as separate files. The 1.5x and Auto scroll switches allow you to turn on/off 1.5x faster playback speed and automatic scrolling of subtitles (auto scrolling is only available for SRT format). There is currently a known issue where clicking the Open/Export as button does not open the dialog and the entire app stops working sometimes for some reason. Please be sure to click Save frequently when you’re editing.
When exporting as TXT, it does not include timestamps, so auto-scrolling within the app is not possible, but it is useful for various purposes such as meeting minutes and reports. SRT is a popular subtitles format (Wikipedia), and if the original audio data is a video, it can be imported as subtitles data using video editor software such as DaVinci Resolve.
Target users and use cases
The main target users are those who want to embed subtitles in own videos, typically YouTubers. Also, SPSP is useful for engineers who verify the accuracy of transcription AI, including Whisper, and operators who write conversation reports at call centers. In addition, it can be useful for meeting minutes, or for learning foreign languages (despite the accuracy varies, Whisper supports quite a few languages: Supported languages ).
How to run SPSP
Although I say it’s an “app,” it is currently not possible to build as executable that opens by double-click. You need to set up an environment and run a command to launch SPSP. I figured out how to avoid crashing and errors to build this app. Please see my another post if you wan to build. If you are using Windows or Linux, you may need to take additional steps, so please refer to the Flet official documentation. The code of SPSP is on GitHub:
Once the environment is created, you can run the app SPSP with the command below.
python main.py
Select audio file
After launching, click the Open Speech File button and select an audio file such as MP3 or WAV. The first time on macOS, you will be asked if you want to give access to your Documents folder, so please approve. If there is a file with the same file name and .srt (or .txt) extension in the same folder, it will be loaded automatically. You can also manually load subtitles file after loading an audio file.
Known issues and limitations
I don’t think there are any critical issues, but just in case, you might want to keep copy of subtitles file in a different location before opening in SPSP. Here are some known issues and limitations:
If there are many subtitle buttons, it will stutter when moving or resizing the window.
When you build app by flet build macos --include-packages flet_audio, built app crashes (Flet version == 0.21.2). If you want an executable and don’t need auto-scroll, comment out the line import numpy as np. –> This is now resolved by eliminating NumPy.
Sometimes when you click the Open or Export button, the dialog will not open and you are unable to do anything other than closing the app. We are currently investigating the cause. Please save frequently.
It seems that the sample rate of MP3 that can be played on macOS is up to 44.1KHz. If it is higher than that, please convert by using Audacity etc.
Add audio file extension to the pick_speech_file method if it’s grayed out.
SRT format originally seems to allow multiple-subtitle lines per block, but this app only expects 1 line. There should be no problem with SRT files exported with Whisper.
Bonus
I won’t go into details, but here are how to download online videos such as YouTube as audio files, and how to transcribe to SRT using mlx version of Whisper, which Apple has optimized for macOS.
Download online video as m4a audio file
ffmpeg will be installed system-wide. You better create a dedicated virtual environment.
Python script to transcribe audio file to SRT with Whisper
For macOS, create an environment where MLX version of Whisper can run, download whisper-large-v3-mlx from Hugging Face, and place json and npz files in mlx_models/whisper-large-v3-mlx folder. Then create the speech2srt.py file (below). Edit path_to_the_folder, audio_file_name and language='en' to meet your file/language. If you set a different language like ja, Whisper tries to transcribe and translate into Japanese, but quality is not good.
import whisper
import time
import os

base_dir = "path_to_the_folder"
speech_file_name = "audio_file_name"

start_time = time.time()
speech_file = base_dir + speech_file_name
model = "mlx_models/whisper-large-v3-mlx"

result = whisper.transcribe(
                            speech_file,
                            #language='ja',
                            language='en',
                            path_or_hf_repo=model,
                            verbose=True,
                            #fp16=True,
                            word_timestamps=True,
                            condition_on_previous_text=False,
                            #response_format='srt',
                            append_punctuations=""'.。,,!!??::”)]}、",
                            temperature=(0.0, 0.2, 0.4, 0.6, 0.8, 1.0),
                            )

end_time = time.time()
elapsed_time = round(end_time - start_time, 1)

print('############################')
print(f"Time elapsed: {elapsed_time} seconds")
print('############################')

def ms_to_srt_time(milliseconds):
    seconds = int(milliseconds / 1000)
    h = seconds // 3600
    m = (seconds - h * 3600) // 60
    s = seconds - h * 3600 - m * 60
    n = round(milliseconds % 1000)
    return f"{h:02}:{m:02}:{s:02},{n:03}"

subs = []
sub = []
for i in range(len(result["segments"])):
    start_time = ms_to_srt_time(result["segments"][i]["start"]*1000)
    end_time = ms_to_srt_time(result["segments"][i]["end"]*1000)
    text = result["segments"][i]["text"]

    sub = [str(i+1), start_time+' --> '+end_time, text+'n']
    subs.append(sub)

text_file = base_dir + os.path.splitext(os.path.basename(speech_file_name))[0] + ".srt"

# Overwrites file if exists.
with open(text_file, 'w') as txt:
    for i in subs:
        for j in range(len(i)):
            txt.write('%sn' % i[j])
Now run as below and an SRT file will be created in the same folder as the audio file. Please note that existing SRT file will be overwritten.
python speech2srt.py
MLX Whisper uses GPU. My M2 Max Mac Studio (30 core GPU) completes transcription about 1/6 of the audio length.
Image by Stable Diffusion
Increasing steps didn’t help fix scary fingers, also the good taste of both lady’s good faces focusing on speeches to transcribe couldn’t be kept. Larger steps does not always mean better quality or taste.
Date: March 24, 2024 23:45:42
Model: realisticVision-v20_split-einsum
Size: 512 x 512
Include in Image: realistic, masterpiece, best quality, retro future, office ladies transcribing audio from record player
I edited width, alignment, etc. of my Flet code originally written as a desktop app to make it work as a web app. In this post I’m going to introduce how to build and deploy your Flet app as a static website (client-side, HTML + JavaScript). This deployment should work on an ordinary web hosting server, and you don’t need to know about web server side technology. You can learn how to add Google AdSense advertisement to your Flet web app as well.
Preparation
Please refer to my previous post and build your environment. It’s mainly targeting macOS. The sample Flet app code is used in this post.
Built files are placed in build/web. Let’s test locally before pushing to a server. Execute the command and open the URL (http://localhost:8000) in your web browser.
python -m http.server --directory build/web
# Press Ctrl + C to exit.
On Chrome it works as expected.
Little more steps to upload
Specify the directory name
In this example, the web app will be deployed to https://blog.peddals.com/fletpassgen, so change the path in index.html. (By adding a build option --base-dir "/directoryname/" you can avoid this step, but you cannot test locally.) Edit index.html like the below. Make sure you have the directory name between slashes (/).
<base href="/fletpassgen/">
Compress the entire folder
Change the folder name from web to the directory name, and compress it as a single file. You get fletpassgen.tar.gz as a result of these commands:
cd build
mv web fletpassgen
tar cvzf fletpassgen.tar.gz fletpassgen
Upload and extract
Upload the compressed file
To upload the compressed file to a hosting server, this example uses the scp command in Terminal.app. Replace username, hostname and upload directory based on your account details.
If ssh is allowed, login your server and extract the file like the below. The directory has to be extracted in the correct location. In this example the web app will be in the subfolder /fletpassgen/ so it’s extracted in the document root of the website.
ssh username@hostname
cd ~/public_html
tar xvf fletpassgen.tar.gz
rm fletpassgen.tar.gz
After showing an icon for some moments then your web app will start working.
Few things to check if it’s not working
With this building method (static web app), the total size of files tends to be big. My example resulted 28MB in total. As the first access will take some time to download all required files, you have to be patient and wait until the app to be ready to start.
In case you don’t even see the icon after several seconds, take a look into the directory name in index.html, actual name of the extracted directory, user/group ownership and access permissions.
Tips and notes
Use same code for desktop and web apps
You may notice the layout of contents is broken when opening your app in web browser (I did!) Use ft.Container to place contents and width= property having the same value as page.window_width= so the horizontal layout will be kept in a wider window. For a simple app, having the below parameters keeps your app at the top center even in a web browser.
As I wrote, even this small app (Python code is approx. 3.9KB) becomes 28MB in total after a build. You need to put your eye on the available disk space.
App keeps running once loaded
Since this deployment method does not require a code to be running on the web server, your app keeps running in a web browser even when the network is down. For a simple tool it can be an advantage (I don’t know who needs a new password when offline, though).
Copy button won’t work on Safari (macOS and iOS)
This is a known issue. Hopefully it will be resolved in the near future, but at this moment copy works on Chrome but not on Safari. I added a code to hide the copy button based on the user agent, but it does not work. flet build web deployment won’t be able to get user agent unfortunately. You need to deploy as a server-side app if you want to add browser specific features.
Bonus: add Google AdSense advertisement
You can find this type of information for Flutter quite easily, but some of the ways I found didn’t work for my Flet app. If you’re looking for a solution, try this:
Get AdSense strings
Login your Google AdSense account, create new ad or click on the Get code < > icon of an existing ad to get strings.
Google AdSense > Ads > By ad unit > Display ads > Give it a name and Create > take note of the below two lines.
             data-ad-client="xxxxxxxx"
             data-ad-slot="yyyyyyyy"
Add style to index.html
Edit the index.html file in the Flet web app directory and add the below CSS code, right above the </style> tag. Line numbers are just reference (Flet ver. 0.19.0).
Flet version 1.18.0 released on the last day of year 2023 introduced a newer way of building apps that run on other computer, smartphone or website without setting up Python and Flet environment. I tried to build a macOS app and encountered a weird issue — a plain window opened with a text “Hello, Flet!” and I could not figure out how to fix it. A few days later, newer version 1.19.0 was released, and it had multiple fixes for build related issues. In this post I’d like to share how I built macOS app in Python with Flet. Once you set up your development environment, building process is really straight forward.
As an example I’m going to use my simple Password Generator app. The main purpose of this post is to introduce how to build GUI app with Flet, so I’m not going to write about too much of this sample code. As you can see in the screenshot below, you can edit number of characters and special characters to use. Copy button copies the password to clipboard. It’s fun to see how strong passwords the app generates by checking with online services like this one (bitwarden).
Use your favorite virtual environment tool. Python version has to be 3.8 or newer. Install flet by executing pip install flet without specifying the version or flet==1.19.0. If you have not written your Flet app code yet, grab one from somewhere like the official site or from my GitHub if you’d like. In this post I’m going to use the fletpassgen.py as an example. Confirm it works by python3 fletpassgen.py then move forward.
Install requirements such as Flutter to build Flet app. (step #5)
To build as a desktop/smartphone/web app, you need to install Flutter, Dart, and a few other stuff based on the requirements. Once this process is done, you don’t need to redo unless anything goes wrong. Below steps are for Apple Silicon macs specifically. Skip any step if you’re already done.
2. Xcode 15: Download Xcode 15 from Apple’s website. Click on Download at the top of the page then double click on the installer.
3. Cocoapods: Execute below to install.
brew install cocoapods
4. Git: Execute below to install.
brew install git
5. Flutter: Follow the steps at the middle of the page and download Flutter SDK for your CPU (Intel or Apple Silicon such as M1, M2, M3…). Move the zip file to somewhere like ~/development/, unzip (double click), and add path to the commands to your PATH variable (rename handsome to your username, add below line to your ~/.zshrc then execute source ~/.zshrc to load the setting).
When you’re done all the above steps, create an app folder, go inside and perform the remaining steps. In this example the app name is fletpassgen.
mkdir fletpassgen
cd fletpassgen
mkdir assets
open assets
The above last command opens the assets folder in Finder where you can place a 512×512 pixel icon image named like icon.png (supported formats include .bmp, .jpg, and .webp). I don’t have anything else, but you can place other resources such as audio and text files used by our code.
Side note about icon: Flet can build app without an icon provided - it uses its own icon. I used Mochi Diffusion, a desktop app version of the AI image generator Stable Diffusion to generate the app icon which is also the top of this post. Prompts, model, etc. can be found at the last part of this post.
Next, copy your Flet app code as main.py.
cp ../fletpassgen.py main.py
If the last line of the code to call the main function is not ft.app(main), change so.
#if __name__ == "__main__":ft.app(target=main) <-- this needs to be changed to the below:
ft.app(main)
requirements.txt has to have needed Python module to run your Flet app, but pip freeze > requirements.txt caused several errors for me. In this example, flet was only needed (other imported modules are Python built-in). See the official guide for details especially when you’re building iOS or Android app.
flet
You can clone the build template from the official GitHub to your local folder and edit copyright which can be shown by Command + I (macOS). Use your favorite editor if you are not good at the vi (vim) editor.
git clone https://github.com/flet-dev/flet-build-template
vi flet-build-template/cookiecutter.json
I edited highlighted lines 7-9 of cookiecutter.json in the flet-build-template folder.
If you don’t care of options, simply execute flet build macos and you get an executable app. Below longer command adds version number and the above edited copyright. (Correction on Jan 25, 2024, thanks to the issue answered by the author.) To specify the build template location, use --template option followed by a relative path.
Give it some time to complete and when you see Success! congrats, your app is built! Under build/macos/ you can find your app fletpassgen.app. It took around 3 mins and 10 secs to build it on my M1 mac mini. Output of the successful build process log is like below:
Creating Flutter bootstrap project...OK
Customizing app icons and splash images...OK
Generating app icons...OK
Packaging Python app...OK
Building macOS bundle...OK
Copying build to build/macos directory...OK
Success!
Screenshot in color
App is Universal
Type: Application (Universal). See version 1.0.1 and Copyright (by Cmd + I) as well.
Just like other mac apps, you can move the app to your Applications folder and double-click to launch. I was not asked to approve in the Privacy and Security. Not tested yet, but it should run on an Intel mac as well since it’s a Universal app. It opens and works just like the Python code. My sample app opens the Flet default size window momentarily then resizes as specified – I suppose there’s a better way to code.
Do I like it?
I love it! I used to use tkinter and pysimplegui to build desktop apps, but Flet is much easier with better looking/modern interface. Building process is straight forward, and app works great. Just like 3D printer changed productivity of nonprofessional DIYers in the real world, Flet lets you make your ideas real on your computer and share with your family, friends, colleagues and others. Hope you find it useful and enjoy as well!
Image by Stable Diffusion
Date: 2024-Jan-15 23:05:04
Model: realisticVision-v20_split-einsum
Size: 512 x 512
Include in Image: masterpiece, best quality, retro future, cyber, disco computer, password generator
Flet, desktop and web app framework is really useful for Python developers. With only little modifications, your standalone desktop app can be hosted on a web server. In this post you can find how to self-host your Flet app on an Apache web server. This is not covered in the Flet official website.
Quick introduction of Flet.
Flet is a Python framework to build desktop or web application without having knowledges of GUI or web frontend. Flet is developed based on Flutter mobile app framework developed by Google for the Dart language. You’ll find word “Flutter” when you writing codes and getting errors with Flet. I’m not going to provide more information around Flet or Flutter in this post.
What I’m going to demonstrate in this post
The goal is publish a Flet app on an Apache web server using TCP port based reverse proxy. In my case the web app is only accessible within the LAN. Should you have a publicly accessible Apache server (and admin privileges), you can publish your app to the public. The Flet official webpage Self Hosting introduces the process to publish on an NGINX web server. You can do pretty much the same thing on an Apache web server by following this post.
Environment
Ubuntu 20.04 LTS
Apache 2.4.41
High-level steps
Install requirements on Ubuntu server.
Build a Python virtual environment and install Flet.
Prepare a Flet app code.
Enable Apache modules required for reverse proxy.
Write an Apache configuration file.
Write an auto-start configuration file.
Detailed steps
Install requirements on Ubuntu server.
As introduced in the official website, you need to install GStreamer to execute Flet app on a Linux server. Simply follow the steps and install requirements.
Just for testing, let’s use a code posted on the official website. To check simple interaction, I copied Counter app and saved as counter.py. Change the last line as below.
ft.app(target=main, view=None, port=8501)
Quick explanation: view=None won’t open GUI or web browser window, and port=8501 sets the TCP port to listen to. As long as it does not conflict on your server, any port number works fine. By executing python3 counter.py, you can see the app on web browser if installed on your web server by opening http://localhost:8501. Next step is publishing to external access.
Enable Apache modules required for reverse proxy.
At least following 4 modules are required to configure Apache as a reverse proxy. As Flet uses web socket, wstunnel is also required. Following commands enable modules, load modules and check Apache status respectively.
In this example, accessing flet.dev.peddals.com will open the Flet web app. In my environment, access to the subdomain uses always HTTPS as posted separately. So, listening port is 443, and reverse proxy port is 8501 that the Flet app is listening to. Please edit these based on your environment.
Now, let’s execute python3 counter.py and check if the web app opens from a client PC. If you removed the lines for wss:// and the app kept loading, add them, reload, and try again.
Write an auto-start configuration file.
Let’s follow the Flet official page and write an auto-start configuration file. Below is an example in my server. Save this as fletcounter.service.
WorkingDirectory= is the full path to the directory of counter.py.
Environment="PATH= is the full path to the directory of python3 (output of which python3 up to bin/)
ExecStart= first arg is full path to Python3 (output of which python3), and the second arg is the full path to the Flet app.
Lastly, start and enable it as a service by following the official page. The target of the symbolic link (#2) is the file created in the previous step.
cd /etc/systemd/system
sudo ln -s /home/handsome/codes/flet/fletcounter.service
sudo systemctl start fletcounter
sudo systemctl enable fletcounter
sudo systemctl status fletcounter
That’s all. Access your app from a client PC and confirm the counter opens. When possible, reboot your server and confirm the service starts automatically.
Trouble that I encountered.
In my environment, loading of the app kept forever initially. I finally figured out that the reverse proxy settings needed wss:// as well as ws:// (the NGINX config on the official page does not have wss:// either). It took me some time to figure out that wss stood for Web Socket Secured, just like https stood for http Secured. However, another Apache server doesn’t require wss — my SSD for the web server (Raspberry Pi) died after reverse proxy setup, and needed to build another. I’m still not sure why wss was required…
Image by Stable Diffusion
Date: 2023-Nov-25 23:02:10
Model: realisticVision-v20_split-einsum
Size: 512 x 512
Include in Image: cartoon, clolorful, modern ladies working at post office classifying letters