
Flet can let you develop cool desktop apps in Python. I previously released an app that could play audio and display subtitles (SRT) simultaneously, as well as edit subtitles. How did I make it? Here’s the background, steps, and code. The finished product is a standalone desktop app, and it’s not overly complicated. However, using Python + Flet to create a single application from start to finish is not something you see often, so I hope this blog helps some Flet app developers! It’s a long read, so I suggest searching word or using the table of contents rather than reading the whole post.
Code and assets
The code, along with the Python code, logos for execution, and images for building are all stored on GitHub.
Flet official documentations
If you’re using Flet for the first time, please read the official documentation first.
New releases are announced on the official blog and Discord, and other miscellaneous links can be found on the support page.
Background and things not technical
Developer (myself) and background
I am an IT manager at a Japanese office of a global company. Programming is my hobby, and I have been creating small, unfinished, and experimental programs for several decades (in 8bit old-school BASIC, HyperCard/HyperTalk, HTML/JavaScript, and Python). I have read several introductory books on Python, but I have only read about 60-80% of each one. I tend to get bored and stop reading before the end because I start thinking about creating something new instead. In the past, I have used Tkinter and PySimpleGUI to create desktop applications, but I have not been satisfied with the results. Recently, I discovered Flet, which has a beautiful design and allows me to create desktop, web, and mobile applications with relative ease. I was so impressed that I started experimenting with it immediately. One day, I was amazed by OpenAI’s Whisper, an excellent speech recognition tool, and on impulse, I started developing a subtitle editing app using Flet (I couldn’t find anything similar in the market). Before that, I had created a password generator app using Flet, which is available both as a desktop application and on the web.
My development environment
- Mac (started with Mac mini M1 16GB RAM then migrated to a Mac Studio M2 Max 12-core CPU / 30-core GPU / 32GB RAM, refurbished)
- Keyboard: HHKB Pro 2 Type-S (USB only model)
- Mouse: Logi’s silent mouse
- Monitors: Dell 4K 27-inch and QHD 24-inch
- IDE: VisualStudio Code – Insiders (since the beginning I started using M1 mac mini)
- Version control: GitHub and GitHub Desktop
- Image generation: Mochi Diffusion (I used Keynote to design the app logo)
- Speech recognition/text generation: MLX Whisper and a simple SRT generation code
- Files for test: m4a audio file generated by yt_dlp and SRT text file as mentioned above.
- Memo, task management: Smartsheet (free account) and Apple default Memo app
- Hand writing/drawing: Whiteboard notebook nu board and PILOT Board Master S (links are amazon Japan pages)
- Well visited websites: Flet official website, Discord server, and Copilot free version
- Python: 3.11.7
- Flet: 0.21.2 (
pip install flet==0.21.2) - In my other blog posts you can find additional info around how to build Flet app
My development process
It was something like the list below. I thought of a plan and started implementing it, but Flet’s implementation method wasn’t clear to me and I couldn’t make it work as expected. I spent several days going back and forth between reading the documentation and trying to write code, but I couldn’t get it right. However, my motivation didn’t drop even though I was stuck for a while. Instead, I took a break from Flet app development and worked on other things, like improving Whisper’s recognition accuracy by adjusting parameters or imagining the target users and use cases of the app. After a few days, I came back to Flet with refreshed energy and enthusiasm, and I was able to complete the app at last.
- started my project by creating an audio control that looked like the official one.
- added a local audio file to the code and played it.
- drew an interface rough draft on a whiteboard (nu board) while imagining the app’s features.
- implemented a slider that would move based on the audio playback status and displayed the elapsed time in the console. However, the slider did not move so I thought something was wrong with my code and spent some time to troubleshoot. It turned out the audio length was too long. Slider was already moving.
- in oppose to the above, added a feature that allowed users to move the slider which would play the audio from the designated position. This feature took several days to implement, but it was worth it.
- started by creating a
FilePickerthat would allow users to select audio files. This feature was quite straightforward and didn’t require much effort. macOS remembers folder previously accessed. Nice. - implemented the ability to automatically load any matching subtitles or transcripts when an audio file is selected. This feature was quite useful and made the app more convenient for users.
- added a function that would automatically generate a button from loaded subtitles by referencing to the official To-Do app tutorial. It was great seeing my app generating buttons.
- implemented millisecond and 00:00:00,000 format conversion logics. I used Copilot’s suggestions and started getting help from Copilot more frequently.
- rewrote the main part to a class. After that, I gradually understood the importance and meaning of Python classes.
- rewrote the entire code to use
asyncfunctions. However, this did not improve the response time when there were many buttons on the screen. Later, Flet became async-first, and I had unknowingly taken the lead. Haha. - implemented class interactions (e.g., playing audio based on the current flow, scrolling through subtitles, jumping to timestamp, etc.). I also relearned classes in practice.
- implemented file saving and loading functions. The operating system warns the user when there is a conflict with an existing file. It’s very convenient.
- implemented a
SnackBarto notify users if there was no file to load. This was easy to use and did not obstruct the interface. - a bug occurred where the write dialog would not open and the app would stop doing anything. Since the issue was not reproducible but occurs rarely, I changed the export-as dialog to individual buttons instead.
- as an app, I prepared for release by finding free fonts for my logo and icon. I was simply too tired to investigate the cause and wanted to escape for a little while.
- added copyright information, made overall design adjustments, and prepared the app for release.
- found that built macOS app crashed due to NumPy, and I could not resolve. I logged an issue on GitHub.
- attempted to make a web app instead, but I couldn’t open local files directly and gave up for now.
- released the app on GitHub and blogged about it. At this moment the app could be run by
python main.py. - Copilot suggested a NumPy-free implementation, which I used to build the macOS app successfully.
- added the build process to the GitHub README and wrote a blog post about it.
- Finally, I started writing this article.
Overview
GUI layout
Please excuse the handwritten text and drawing. The whiteboard itself is an app (=page) and you can see that there is a large column in the middle of it, which contains the main class definition. The other two sections, Audio and Dialogs, are usually not displayed and are added to the page from the main function. Everything else is wrapped in containers or rows and added to the page from top to bottom.

Code overview
Here’s a breakdown of the code by line number (xx-yy) and general content:
- (1-4) I’m importing Flet and other modules – I use
osfor path operations anddatetimeonly to add dates to file names, so almost all the necessary elements and features of my app are being created using Flet alone. - (6-79) Function block – conversion between milliseconds and digital format, and conversion of loaded text into a list for use within the app.
- (81-183) SubButton class that generates subtitle buttons from the list – Initialization,
buildmethod to layout text and buttons, and methods to process that performs various processing when the button is clicked. - (185-791) The main
AudioSubPlayerclass of the app – first, in the initialization function (lines 187-374), all buttons, text fields, and other Flet controls used in the app’s layout are defined likeself.foobar, and then in the next method block (lines 376-738), logics usingasyncfor events such as clicks are defined, and finally, in thebuildfunction (lines 740-791), the page layout is defined. - (793-812) The
mainfunction – defining the basic structure of the window usingasync, and addingaudioanddialoginstances as overlays to the page. - (815) Calls the
mainfunction
I think there are unnecessary long parts in my code, but it seems that the Flet code tends to become lengthy.
About SRT file format
The subtitle file format currently supported by this app is SRT. It’s a text file with the extension .srt. According to Wikipedia, it originated from a text subtitle file format generated by SubRip, a Windows freeware. It was adopted because it was used in Whisper for speech-to-text conversion. You can find my blog post here about how to use Whisper to convert audio files into SRT format on macOS (with some simple Python code).
The SRT file consists of 4 blocks for a subtitle text: index number, start time, “–>”, end time, text and an empty line. Here is a sample of what this looks like (the beginning of Steve Jobs’ famous speech):
1
00:00:00,000 --> 00:00:02,720
 Today, I want to tell you three stories from my life.

2
00:00:03,040 --> 00:00:04,620
 That's it. No big deal.

3
00:00:04,980 --> 00:00:06,160
 Just three stories.
The start and end times are in two digits for hours, minutes, and seconds, followed by the integer part of milliseconds after a comma. It should work fine if you use Whisper’s output, but this app does not support multiple lines for subtitles, so please combine them into one line if that’s the case. When using Whisper, blank lines with the same timestamp may be produced when speech recognition doesn’t work as intended; these are automatically removed when the file is read by this application.
Explanation of the code
From now on, I will explain the actual code and its explanation. I won’t go into much detail about Flet’s basic content, and I’ll proceed in an order that seems easier to understand. It would be helpful if you could open the code in an editor and/or run the app while reading this.
The Flet framework is imported at the beginning of the code as ft.
The last line ft.app(target=main, assets_dir=”assets”) creates the app
This last line is creating the Flet app. With target=main, I’m specifying the main function as the app itself. assets_dir="assets" sets the ‘assets’ folder in the same directory as the code body to be used for storing files such as images that the app will use. If you’re going to build your code as as an executable app, I suggest to name the Flet app’s main file as main.py, the function name inside the code as main, and the folder name as assets, so when building the app, you can simply run flet build macos (for macOS).
ft.app(target=main, assets_dir="assets")“async def main” function to create a window and add overlay
This is a function that is called when the code is executed. It generates a Page instance, which serves as the foundation for the Flet app. After specifying the window title, initial size, and color theme, it adds an overlay with invisible audio files and dialogs to the page.
At line 806, an instance of AudioSubPlayer is created, and a function called load_audio is passed in which adds audio files to the overlay. The next line appends this function to the page. This allows audio files to be added to the page from within the class.
At lines 810-811, dialogs for opening and saving files are added as an overlay to the page using overlay.extend().
There might be alternative ways to manage overlays, but since adding overlays to a page couldn’t be achieved from within the UserControl class, I used this approach.
Using page.update(), you update (redraw) the page controls. In Flet, if you make any visual changes, updating the relevant control will apply the changes to the GUI. If it’s part of a larger process, you can update it at the end. So, for example, line 798 is unnecessary, my apologies (since I’ve already included line numbers in various places in this post, I won’t remove them prioritizing the text).
See the code:
# Main function that builds window and adds page. Also, adds audio file and dialogs that are invisible as overlay.
async def main(page: ft.Page):
    page.title = 'Speech + Subtitles Player'
    page.window_height = 800
    page.theme_mode=ft.ThemeMode.SYSTEM
    page.update()

    # Appends audio as an overlay to the page.
    async def load_audio():
        page.overlay.append(app.audio1)
        page.update()

    # Creates an instance of AudioSubPlayer class. Passes load_audio for the instance to append audio to the page.
    app = AudioSubPlayer(load_audio)
    page.add(app)

    # Adds dialog instance methods to the page.
    page.overlay.extend([app.pick_speech_file_dialog, app.pick_text_file_dialog,
                         app.export_as_srt_dialog, app.export_as_txt_dialog])
    page.update()
The main part of the app, “AudioSubPlayer” class
The main class is a custom control that inherits from UserControl and implements a user-defined control. The `build()` method, which is required by UserControl, is where UI is constructed. So, let’s take a look at its contents first (although this `UserControl` has been deprecated in Flet version 0.21.0, it still works in my local version 0.21.2, so I’ll continue with the explanation). However, please note that there will likely be significant changes before the official major release, and when using a new framework, it’s essential to check the release notes for any breaking changes.
UI layout by “def build(self)”
The block from the line 740 builds the user interface by constructing instances of self.view as an instance of Column. This is the largest hand-drawn diagram and its contents are within this column.
As I wrote the code, I noticed that the layout was becoming increasingly complex. To make it easier to maintain in the future, I focused solely on defining the layout here and writing controls separately. This way, the build() method will be simpler and easier to read.
In Flet, as you write the code for UI components, they will be stacked from top to bottom. Therefore, when you want to place multiple controls side by side, put them inside a Row and define their layout accordingly. For example, in the 748th line, there is a Row that contains a button to open an audio file and text displaying the file name, which will be displayed horizontally.
While coding, I think it's a good idea to try out various properties (such as alignment and color elements) on separate lines separately like lines 773-778. This way, you can easily add or comment out multiple properties. Once finalized, you can then combine all the properties onto one line like 771.
See the code:
# === BUILD METHOD ===
def build(self):
    self.view = ft.Column(expand=True, controls=[
        ft.Container(content=
            ft.Column(controls=[
                ft.Row(controls=[
                    self.base_dir,
                ]),
                ft.Row(controls=[
                    self.speech_file_button,
                    self.speech_file_name,
                ]),
                ft.Row(controls=[
                    self.text_file_button,
                    self.text_file_name,
                    self.save_button,
                    #self.export_button,
                    self.export_as_srt_button,
                    self.export_as_txt_button,
                ]),
                self.audio_slider,
                ft.Row([
                    self.position_text,
                    self.duration_text,
                ], alignment=ft.MainAxisAlignment.SPACE_BETWEEN),
                ft.Row(controls=[
                    self.rewind_button,
                    self.play_button,
                    self.faster_sw,
                    self.sub_scroller_sw,
                ]),
            ]), expand=False, border_radius=10, border=ft.border.all(1), padding=10,
        ),
        ft.Container(content=
            self.subs_view,
            border_radius=10,
            border=ft.border.all(1),
            padding=5,
        ),
        ft.Row(controls=[
            ft.Text(text_align=ft.CrossAxisAlignment.START,
                    spans=[ft.TextSpan('© 2024 Peddals.com', url="https://blog.peddals.com")],
                    ),
            ft.Image(src='in_app_logo_small.png'),
        ],alignment=ft.MainAxisAlignment.SPACE_BETWEEN,
        ),
        ft.Container(content=
            self.notification_bar)
        ],
        )

    return self.view
In the method “def init(self, load_audio)” all controls are defined and initialized.
From line 187 onwards, the initialization part begins. First, class variables are initialized and a function for loading audio files is imported as mentioned earlier. The following lines up to 374 mainly consist of defining and initializing controls. While it would be quite extensive to explain each one individually, I can provide an overview: they define visual properties such as text or icons displayed on the control, along with methods that are called when specific events occur
Typical definition of a Button control
As a common usage example, I will explain the contents of a button control definition for loading a text file.
        # Open text file button
        self.text_file_button = ft.ElevatedButton(
            text='Open SRT/TXT File',
            icon=ft.icons.TEXT_SNIPPET_OUTLINED,
            on_click=self.pre_pick_text_file,
            disabled=True,
            width=210,
        )
First, please understand that these contents serve as initial values. The properties can be changed by other methods; thus, they define the application’s state at startup.
(Line 237) An instance of ft.ElevatedButton is created with the name self.text_file_button (it might be difficult to notice in a dark theme, but it looks like a slightly raised button). Properties and methods are defined within parentheses using commas for separation.
(Line 238) Define button display text using the text property.
(Line 239) Specify an icon to be included in the button using the icon property. The position of the icon is fixed at the left end and cannot be changed. For reference on finding and confirming the name of the icon, please see below column.
(Line 240) Define the method to be called when the on_click event occurs (i.e., when the button is clicked).
(Line 241) At app startup, the button is disabled by setting the disabled property to True. After the audio file has been loaded, set it to False to make the button clickable.
(Line 242) Fix the width of the button to 210 dots.
Although we’re not using for this button, setting the tooltip property allows you to display notification text when you hover your mouse cursor over it.
Note that I’ll come back to this later, but control’s properties can be set by methods or functions by doing like self.text_file_button.disabled = False along with update. For each control, refer to the official documentation for available properties, methods, and events.
Icons can be searched for on this icons browser page. Unfortunately, as of this article's publication, clicking on displayed icons in Safari does not copy their names. You will need to use Chrome or manually enter icon name that appears on hover (Visual Studio Code will autocomplete icon names as well). If you're doingimport Flet as ft, useicon=ft.icons.THUMB_UP.
Most controls and their properties should be easy to understand, but I found the process of opening or saving file using the FilePicker control wasn’t easy to follow. Therefore, I will explain it separately.
See the code:
    def __init__(self, load_audio):
        super().__init__()
        self.position = 0
        self.duration = 0
        self.isPlaying = False
        self.load_audio = load_audio

        # == Controls ==

        # Audio control with default properties
        self.audio1 = ft.Audio(
            src='',
            volume=1,
            balance=0,
            playback_rate=1,
            on_loaded=self.loaded,
            on_position_changed = self.position_changed,
            on_state_changed = self.playback_completed,
        )

        # Path of the audio file
        self.base_dir = ft.Text(value=f"Base Directory: ")

        # Open speech file button
        self.speech_file_button = ft.ElevatedButton(
            text='Open Speech File',
            icon=ft.icons.RECORD_VOICE_OVER_OUTLINED,
            width=210,
            on_click=self.pre_pick_speech_file,
        )

        # Speech file picker control
        self.pick_speech_file_dialog = ft.FilePicker(on_result=self.pick_speech_file_result)

        # Speech file name
        self.speech_file_name = ft.Text(value='← Click to open a speech file.')

        # Alert dialog that opens if subtitle was edited but not saved when Open Speech File button is clicked.
        self.speech_save_or_cancel_dialog = ft.AlertDialog(
            modal=True,
            title=ft.Text('Change not saved.'),
            content=ft.Text('Do you want to discard the change?'),
            actions=[
                #ft.TextButton('Save', on_click=self.save_then_open, tooltip='Save then open another file.'),
                ft.TextButton('Open without save', on_click=self.open_speech_without_save, tooltip='Change will be lost.'),
                ft.TextButton('Cancel', on_click=self.close_speech_save_or_cancel_dialog),
            ]
        )

        # Open text file button
        self.text_file_button = ft.ElevatedButton(
            text='Open SRT/TXT File',
            icon=ft.icons.TEXT_SNIPPET_OUTLINED,
            on_click=self.pre_pick_text_file,
            disabled=True,
            width=210,
        )

        # Text file picker control
        self.pick_text_file_dialog = ft.FilePicker(on_result=self.pick_text_file_result)

        # Text file name
        self.text_file_name = ft.Text(value='No file selected.')

        # Save button to update edited subtitles. No dialog, it just overwrites current text file.
        self.save_button = ft.ElevatedButton(
            text='Save',
            icon=ft.icons.SAVE_OUTLINED,
            tooltip='Update current SRT/TXT file.',
            disabled=True,
            on_click=self.save_clicked
            )

        # Export as SRT button which opens a save dialog. Only available when SRT is open because SRT needs timestamp.
        self.export_as_srt_button = ft.ElevatedButton(
            text = 'SRT',
            icon=ft.icons.SAVE_ALT,
            on_click=self.export_as_srt,
            disabled=True,
            tooltip='Export as SRT file.'
        )

        # Export as SRT file picker
        self.export_as_srt_dialog = ft.FilePicker(on_result=self.export_as_srt_result)

        # Export as TXT button which opens a save dialog. TXT has not timestamp, subtitle text only.
        self.export_as_txt_button = ft.ElevatedButton(
            text = 'TXT',
            icon=ft.icons.SAVE_ALT,
            on_click=self.export_as_txt,
            disabled=True,
            tooltip='Export as TXT file.'
        )

        # Export as TXT file picker
        self.export_as_txt_dialog = ft.FilePicker(on_result=self.export_as_txt_result)

        # Export button to open a dialog (not in use)
        self.export_button = ft.ElevatedButton(
            text='Export as...',
            icon=ft.icons.SAVE_ALT,
            on_click=self.open_export_dialog,
            disabled=True,
            )

        # Export as dialog (not in use)
        self.export_dialog = ft.AlertDialog(
            modal = True,
            title = ft.Text('Export text as...'),
            content = ft.Text('Plesae select a file type.'),
            actions = [
                ft.TextButton('SRT', on_click=self.export_as_srt, tooltip='Subtitles with timestamps'),
                ft.TextButton('TXT', on_click=self.export_as_txt, tooltip='Subtitles only (no timestamps)'),
                #ft.TextButton('CSV', on_click=self.export_csv, tooltip='Comma separated value'),
                # I guess no one needs subtitles in CSV...
                ft.TextButton('Cancel', on_click=self.close_export_dialog),
            ],
            actions_alignment=ft.MainAxisAlignment.SPACE_BETWEEN,
        )

        # Alert dialog that opens if subtitle was edited but not saved when Open SRT/TXT File button is clicked.
        self.text_save_or_cancel_dialog = ft.AlertDialog(
            modal=True,
            title=ft.Text('Change not saved.'),
            content=ft.Text('Do you want to discard the change?'),
            actions=[
                #ft.TextButton('Save', on_click=self.save_then_open, tooltip='Save then open another file.'),
                ft.TextButton('Open without save', on_click=self.open_text_without_save, tooltip='Change will be lost.'),
                ft.TextButton('Cancel', on_click=self.close_text_save_or_cancel_dialog),
            ]
        )
        # Audio position slider
        self.audio_slider = ft.Slider(
            min = 0,
            value = int(self.position/10000),
            label = "{value}ms",
            on_change = self.slider_changed,
        )

        # Current playing position and duration of audio file
        self.position_text = ft.Text(value='Current position')
        self.duration_text = ft.Text(value='Duration (hh:mm:ss,nnn)')

        # Rewinds 5 seconds
        self.rewind_button = ft.ElevatedButton(
            icon=ft.icons.REPLAY_5,
            text="5 secs",
            tooltip='Rewind 5 secs',
            on_click=self.rewind_clicked,
            disabled=True,
        )

        # Play/Pause button. After loading audio file, this button will always be focused (space/enter to play/pause).
        self.play_button = ft.ElevatedButton(
            icon=ft.icons.PLAY_ARROW,
            text = "Play",
            on_click=self.play_button_clicked,
            disabled=True,
        )

        # 1.5x faster toggle switch
        self.faster_sw = ft.Switch(
            label='1.5x',
            value=False,
            on_change=self.playback_rate,
        )

        # Auto scroll toggle switch
        self.sub_scroller_sw = ft.Switch(
            label='Auto scroll',
            value=True,
        )

        # Area to add subtitles as buttons
        self.subs_view = ft.Column(
            spacing = 5,
            height= 400,
            width = float("inf"),
            scroll = ft.ScrollMode.ALWAYS,
            auto_scroll=False,
        )

        # Notification bar control at the bottom
        self.notification_bar=ft.SnackBar(
            content=ft.Text('Speech + Subtitle Player'),
            duration=2000,
            bgcolor=ft.colors.BLUE_GREY_700,
        )
Class Method (Logic) Part
From version 0.21.0, Flet has become an async-first framework, and it is recommended to create functions or methods in the form of async def unless synchronous processing is necessary. This can improve the responsiveness of your app, making it easier to manage without worrying about the details. Personally, I unfortunately started using async (await and control.update_async()) with an earlier version, then upgraded to a later async-first Flet version, and found I had to rewrite a lot of code… anyway, from line 378 to 738, most of the methods are defined as async def, and self.update() is used to update the view.
Below, I’ll describe some of the methods that I’d like to explain.
Process after completion of loading audio file, async def loaded(self, e)
The method from line 378 is called when an audio file has been loaded. It contains various changes to properties, as well as conversion processing for using subtitle files within the app. This is the longest single method in the entire code.
The first 30 lines or so are quite straightforward, setting values for properties of controls such as sliders, text, and buttons. The first three lines do something like this.
self.audio_slider.max = int(await self.audio1.get_duration_async())We are using the get_duration_async() method of the Audio control to retrieve the duration (in milliseconds) of the audio, and assigning it to the max property of the slider control audio_slider. In Flet version 0.21.2, when using a method that returns a value like this, we
need to use the await ~ <method>_async() syntax, which is different from other parts of the code.
self.duration_text.value = f'{ms_to_hhmmssnnn(self.audio_slider.max)}'We are taking the milliseconds obtained earlier and converting it to the format “00:00:00,000” for display as a text on the right side of the slider. The function ms_to_hhmmssnnn() (which I got from Copilot) is used for this conversion.
self.audio_slider.divisions = self.audio_slider.max//1000We are dividing the slider into 1-second intervals (1000 milliseconds) using its divisions property. This is because the slider does not display numerical values unless it is divided. Furthermore, Flet only generates audio playback events at 1-second intervals, so we do this to match that timing. In reality, since the slider’s value cannot be changed from the millisecond display in this app, displaying the numerical value has little significance here.
The next if block (from line 383) handles processing when a subtitle file is found. The create_subtitles() function processes the subtitle file internally and stores it in a list format in self.subtitles. When a text file (.txt) is loaded, it does not contain timestamps, so all timestamps are stored as 55:55:55,555 (20135.55) seconds for simplicity’s sake. This value can be referenced throughout the code where necessary. There’s no specific reason to select fives, but reading a 56-hour audio file is unlikely.
The code from lines 397 to 406 mainly focuses on making buttons for audio playback clickable. In this app, audio playback and pause buttons are usually focused by default, allowing users to control playback with space or enter keys. Initially, I wanted to focus on the Open Speech File button at startup, then switch to the play/pause button once a file is loaded, but it didn’t work out that way. Some leftover code from this attempt remains in lines 398-403.
The code from lines 408 to 433 processes a list of subtitle files already generated, adjusting various settings for both TXT files without timestamps and SRT files with timestamps. For each subtitle line, a button is created. The actual content of the button is created in another
class SubButton(), but here, an instance named sub is assigned and appended to the controls list of the app’s bottom half screen area using self.subs_view.controls.append(sub).
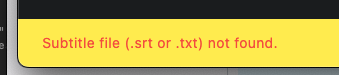
The code from lines 436 to 443 displays a message at the bottom of the screen depending on whether a subtitle file exists. The self.open_notification_bar method is used, which takes only text and simply sends a notification when called. In cases where a subtitle file was not found, it is called with the type set to ‘error’ and displayed for a longer time in an error color.
See the code:
    # Called once audio file is loaded. Enable/disable buttons, create subtitles list, etc.
    async def loaded(self, e):
        self.audio_slider.max = int(await self.audio1.get_duration_async())
        self.duration_text.value = f'{ms_to_hhmmssnnn(self.audio_slider.max)}'
        self.audio_slider.divisions = self.audio_slider.max//60
        # Enables buttons if associated text file exists.
        if self.text_file != 'No Text File.':
            # Call function to create the list of subtitles, self.subtitles.
            self.subtitles = create_subtitles(self.text_file)
            self.save_button.text = 'Save'
            self.save_button.disabled=False
            self.export_button.disabled=False
            self.export_as_srt_button.disabled=False
            self.export_as_txt_button.disabled=False
        # Disable buttons if associated text file does not eixt.
        else:
            self.save_button.disabled=True
            self.export_button.disabled=True
            self.export_as_srt_button.disabled=True
            self.export_as_txt_button.disabled=True
            self.subtitles = []
        self.speech_file_button.autofocus=False
        self.speech_file_button.update()
        self.play_button.disabled=False
        self.play_button.focus()
        self.play_button.autofocus=True
        self.play_button.update()
        self.rewind_button.disabled=False
        self.text_file_button.disabled=False
        self.subs_view.controls.clear()

        # Create buttons of subtitles from the list self.subtitles.
        if self.subtitles != []:
            # .txt or .srt file
            for i in range(len(self.subtitles)):
                index = self.subtitles[i][0]
                start_time = self.subtitles[i][1]
                # .txt file (timestap is dummy, 55:55:55,555) disable buttons.
                if self.subtitles[0][1]== 201355555:
                    self.sub_scroller_sw.value=False
                    self.sub_scroller_sw.disabled=True
                    self.export_dialog.actions[0].disabled=True
                    self.export_as_srt_button.disabled=True
                # .srt file
                else:
                    self.sub_scroller_sw.value=True
                    self.sub_scroller_sw.disabled=False
                self.sub_scroller_sw.update()
                end_time = self.subtitles[i][2]
                text = self.subtitles[i][3]

                # Create button instance of each subtitle. Include methods and controls for the instance to call or update.
                sub = SubButton(index, start_time, end_time, text, self.sub_time_clicked, self.play_button,
                                self.save_button, self.subtitles)

                # Add button to the subtitle button area, subs_view.
                self.subs_view.controls.append(sub)

            # Call snackbar to show a notification.
            notification = f'Subtitle file loaded: {os.path.basename(self.text_file)}'
            await self.open_notification_bar(notification)

        # No text file found. Call snackbar to show an alert.
        else:
            notification = f'Subtitle file (.srt or .txt) not found.'
            await self.open_notification_bar(notification, type='error')
            print('Subtitle file not found.')

        self.update()
Method when playback position changes, async def position_changed(self, e)
The methods from lines 447 to 454 are called when the playback position of an audio file changes, specifically when the on_position_changed event of self.audio1 occurs. In concrete cases, this will be triggered automatically every second during playback, and also when the user manually moves the slider or clicks on a timestamp in other situations. Let’s take a look at the code.
self.audio_slider.value = e.data
#print("Position:", self.audio_slider.value)
self.position_text.value = ms_to_hhmmssnnn(int(e.data))
The on_position_changed property receives an argument e within a method. The value of e.data is the playback position (elapsed time) in milliseconds, so this value is assigned to the value property of the audio_slider control to update its position. Additionally, the converted value is inserted into the value property of the position_text control, which will display a readable format and appear on the left side of the slider.
if (self.sub_scroller_sw.value == True) and (self.text_file_name.value != 'No Text File.'):
   self.scroll_to(self.audio_slider.value)
self.update()
The code above checks two conditions: the state of the auto-scroll switch for subtitles and whether a subtitle file exists. If no subtitle file is loaded, it displays “No Text File.” and uses this as a flag itself. When both conditions are true, it calls the scroll_to method to scroll the subtitles, passing self.audio_slider.value as an argument. Finally, self.update() updates the playback time of this method itself.
Process when the slider position changes, async def slider_changed(self, e)
The method from lines 457 to 460 is called when the slider position changes, specifically when the on_change method of self.audio_slider control is triggered.
self.audio1.seek(int(self.audio_slider.value))The seek method of self.audio1 is called with the value of the slider (self.audio_slider.value) to change the playback position. After that, it’s just a matter of updating; changing the audio playback position is extremely simple.
Play button, async def play_button_clicked(self, e) and async def playback_completed(self, e)
The code from lines 463 to 488 handles processing related to the Play button. When an audio file is loaded, during playback, when paused, and after playback has ended, each state uses methods of self.audio1 to control playback or pause through button clicks. Additionally, icons and text are also updated accordingly.
I thought would be possible to get the playing status (e.g., “playing”) from e.data, but unfortunately, it didn’t work out. Instead, I created a class variable self.isPlaying to determine the state. Although the button could have displayed the same content consistently, such as “(Play / Pause)”, I wanted to display icons that change depending on the situation, which also came in handy during debugging when I wanted to see the status.
See the code:
    # Change Play/Pause status and icon when called.
    async def play_button_clicked(self, e):
        self.position = await self.audio1.get_current_position_async()
        if (self.isPlaying == False) and (self.position == 0):
            self.audio1.play()
            self.isPlaying = True
            self.play_button.icon=ft.icons.PAUSE
            self.play_button.text = "Playing"
        elif self.isPlaying == False:
            self.audio1.resume()
            self.isPlaying = True
            self.play_button.icon=ft.icons.PAUSE
            self.play_button.text = "Playing"
        else:
            self.audio1.pause()
            self.isPlaying = False
            self.play_button.icon=ft.icons.PLAY_ARROW
            self.play_button.text = "Paused"
        self.update()

    # When audio playback is complete, reset play button and status.
    async def playback_completed(self, e):
        if e.data == "completed":
            self.isPlaying = False
            self.play_button.icon=ft.icons.PLAY_ARROW
            self.play_button.text = "Play"
        self.update()
Rewind and 1.5x speed, async def rewind_clicked(self, e) and async def playback_rate(self, e)
The code from lines 491 to 507 handles processing for the rewind button and the 1.5x playback speed switch. The rewind function is a simple one that ensures the value doesn’t become negative. The 1.5x playback speed is also straightforward, simply assigning 1.5 to the playback_rate method of the Audio control when the switch is on. Note that after changing the speed, it’s necessary to update the Audio control using await self.audio1.update_async().
As a fundamental principle of app design, I aimed to create a simple and intuitive design that is easy to operate. I also made sure to only add necessary features. The rewind button is one such feature. In my own experience, when editing subtitles, I often forget to pause playback temporarily. Moreover, subtitles typically appear at the top while playing, so it's convenient to have a button that allows me to go back a little bit during playback. If needed, I can click it
multiple times to rewind further. The reason why I didn't use 3 or 6 seconds is simply because there are no icons available for those numbers.
The 1.5x speed switch is designed with the trend of shortening time. I did try using 2x speed, but personally felt it was a bit too extreme, so I settled on 1.5x instead. For iOS and macOS, there's a limitation to playback rates within the range of 0.5 to 2, so you may want to experiment with changing self.audio1.playback_rate = 1.5 depending on your needs or target users.
See the code:
    # When 5 secs button is clicked, rewind 5 seconds.
    async def rewind_clicked(self, e):
        if self.audio_slider.value <= 5*1000:
            self.audio_slider.value = 0
        else:
            self.audio_slider.value -= 5*1000
        self.audio1.seek(int(self.audio_slider.value))
        #print(int(self.audio_slider.value))
        self.update()

    # Switch playback rate between normal and 1.5x faster.
    async def playback_rate(self, e):
        if self.faster_sw.value == True:
            self.audio1.playback_rate = 1.5
        else:
            self.audio1.playback_rate = 1
        #print(f'Playback rate: {self.audio1.playback_rate}')
        await self.audio1.update_async()
Timestamp buttons, async def sub_time_clicked(self, start_time)
The code from lines 510 to 514 handles processing when the timestamp button is clicked after loading an SRT file. When the button is clicked, it plays the part of the time corresponding to that timestamp. If playback has been paused, it will resume playback.
The timestamp buttons are generated by another class SubButton. When an instance of this class is created, it passes this method to be called when the button is clicked. The button then receives its own start_time from the jump_clicked() method of the SubButton class and uses the seek method of the Audio control to jump to that time.
Let’s go through the code and its explanation step by step.
# Create button instance of each subtitle. Include methods and controls for the instance to call or update.
sub = SubButton(index, start_time, end_time, text, self.sub_time_clicked, self.play_button,
                self.save_button, self.subtitles)
The instance creation code section. This method self.sub_time_clicked is being passed as an argument.
# Create button of subtitle text.
class SubButton(ft.UserControl):
    def __init__(self, index, start_time, end_time, text, sub_time_clicked, play_button, save_button, subtitles):
        super().__init__()
        # Parameter of each subtitle.
        self.index = index
        self.start_time = start_time
        self.end_time = end_time
        self.text = text
        # Passed methods and controls to call and update.
        self.sub_time_clicked = sub_time_clicked
The initialization part of another class SubButton that creates a button (only first part). This class is storing objects passed from its parent class as its own object, which are highlighted in this section.
# When timestamp clicked calls AudioSubPlayer.sub_time_clicked to jump to button position.
async def jump_clicked(self, e):
    await self.sub_time_clicked(self.start_time)
This is the method that is called when the timestamp button is clicked as a result of an on_click event. This method uses self.start_time and self.sub_time_clicked to execute a method from its parent class.
And finally, this method plays the audio at the position of start_time.
# When the timestamp is clicked, jump to its position and play if not playing.
async def sub_time_clicked(self, start_time):
    self.audio1.seek(int(start_time))
    if self.isPlaying == False:
        await self.play_button_clicked(start_time)
    self.update()
Even if you understand Python and classes, it took me a long time to figure out how to execute a method from an instance of a class. It wasn't just a simple Google search away, as I struggled to translate my intentions into searchable keywords. Those who are stuck in their ways like GOTO/GOSUB, which are extinct species of knowledge, I highly recommend thoroughly studying Python classes.
Scroll of subtitle buttons, async def scroll_to(self, e)
The code from lines 517 to 525 is scrolling subtitles. This method is only called when a time-stamped SRT file is opened, specifically from the position_changed method. The argument e passed to this method contains the playback position (in milliseconds) of the audio. The class variable self.subtitles is a 2D list where each inner list contains consecutive index number, start times, end times, and text. This method references the index index and end time end_time.
What I wanted to do here was move the subtitles corresponding to the currently playing audio to the top. However, Flet can only retrieve the playback position of an audio file once per second, so it scrolls to the subtitle button with the end time closest to that value if it’s larger than the current playback position. This may not be perfectly synchronized in real-time, but it will ensure that the currently playing subtitles are displayed either at the top or the second position.
Let’s go through the code and explanation step by step.
end_time = [item[2] for item in self.subtitles]The local variable end_time of type list is assigned with all the end times of the subtitles.
index = min(range(len(end_time)), key=lambda i: abs(end_time[i]-e))The local variable index is assigned with the position of the subtitle that has the end time closest to the current playback position. The index is an integer starting from 0.
key=str(self.subtitles[index][0])The local variable key is assigned with the index number from the SRT file converted to a string. The index numbers in the SRT file start from 1 and are not necessarily consecutive, so I’ve added an extra step to consider the possibility of missing index numbers (in reality, after writing this code, I generated the subtitles list inside the app using a code that ensures the indices become consecutive, making key = str(index+1) have the same reslut).
self.subs_view.scroll_to(key=key, duration =1000)The scroll_to method of the subs_view instance, which is a Column object, is used to scroll to the button with the index number equal to the local variable key, with a smoothness of 1000 milliseconds (1 second). The left-hand side key refers to the property of the scroll_to method, while the right-hand side key is the local variable holding the index number as a string.
I'd like to add two points to this explanation. The first point is that if you have many buttons, the Flet app's performance can become sluggish. In particular, if you have over 300 buttons, the window movement can behave strangely. This is not a problem with CPU or memory usage, but rather a specification-related issue in Flet. If you're planning to create an app that uses many lists, I think it would be better to consider using a different control. When I researched this, I couldn't find any other controls that allow scrolling and on_click event handling, but there may be some workaround.

The second point is related to NumPy usage. In Flet version 0.21.2 on macOS, if you use NumPy in your code (as I did initially at line 520), the built app will crash when run. This is a problem that occurs only when building for macOS. I rewrote my code to avoid this issue, and I've written about it in a separate article. → NumPy issue is resolved by Flet. See this post.
Loading audio file, async def pre_pick_speech_file(self, e), and related processes
From here, I will explain the methods and controls related to loading an audio file. While utilizing OS features makes things easier, it seems that Flet or FilePicker control is not sufficient for implementing “Open File” and “Save File” capabilities. Many additional elements are necessary to achieve this. Specifically, when opening a file, you basically need to do the following:
- Create an instance of the dialog control.
- Add it to the page.
- Create a button that triggers the “Open File” dialog event and place it on the page.
- Create a method to receive the file selection event and process it.
In this application, I also created methods to handle the case where changes have been made to the subtitle text and prompt the user to either discard or keep those changes. This resulted in having two methods for handling each type of file (audio and text) separately, although they perform similar operations. In hindsight, it would be better to reuse code by making them more modular, but as it stands, there are separate codes for each. The process of reading and writing files is quite complex and requires a lot of attention to detail, so I found this part of the project to be the most challenging. From now on, I will explain the code in a step-by-step manner, following the actual workflow.
# Speech file picker control
self.pick_speech_file_dialog = ft.FilePicker(on_result=self.pick_speech_file_result)
This is an instance of the FilePicker control, which opens the OS’s “Open File” dialog. When a file is actually selected, the on_result event occurs and calls the self.pick_speech_file_result method.
# Adds dialog instance methods to the page.
page.overlay.extend([app.pick_speech_file_dialog, app.pick_text_file_dialog,
                     app.export_as_srt_dialog, app.export_as_txt_dialog])
The dialog is added to the page using overlay.extend, which will be used for all file reading and writing operations. This is similar to adding an Audio control, and it’s being done outside of the class in the async def main() method.
# Open speech file button
self.speech_file_button = ft.ElevatedButton(
    text='Open Speech File',
    icon=ft.icons.RECORD_VOICE_OVER_OUTLINED,
    width=210,
    on_click=self.pre_pick_speech_file,
)
This is a button that calls self.pre_pick_speech_file when clicked.
# Called once Open Speech File button is clicked to pause playback and check if changes saved.
async def pre_pick_speech_file(self, e):
    if self.isPlaying == True:
        await self.play_button_clicked(e)
    if self.save_button.text == '*Save':
        #print('Save is not done.')
        await self.speech_save_or_cancel()
    else:
        await self.pick_speech_file()
This method is added to perform some processing before actually opening the “Open File” dialog. First, if playback is in progress, it stops. Then, if there are unsaved changes to the subtitles (indicated by an asterisk next to the “Save” button), a prompt dialogue is displayed to ask moving forward without save, and only after that, the method for opening the “Open File” dialog is called. In this case, all method calls require await. To temporarily stop playback, self.play_button_clicked(e) is called with the argument e since it’s required even if it’s not being used.
# Opens a dialog if change is not saved.
async def speech_save_or_cancel(self):
    self.page.dialog = self.speech_save_or_cancel_dialog
    self.speech_save_or_cancel_dialog.open = True
    self.page.update()
This method is called when there are unsaved changes. What’s being done are specifying an instance of AlertDialog (self.speech_save_or_cancel_dialog) as the dialog for the page, and setting its open property to enable displaying the dialog.
# Alert dialog that opens if subtitle was edited but not saved when Open Speech File button is clicked.
self.speech_save_or_cancel_dialog = ft.AlertDialog(
    modal=True,
    title=ft.Text('Change not saved.'),
    content=ft.Text('Do you want to discard the change?'),
    actions=[
         #ft.TextButton('Save', on_click=self.save_then_open, tooltip='Save then open another file.'),
         ft.TextButton('Open without save', on_click=self.open_speech_without_save, tooltip='Change will be lost.'),
         ft.TextButton('Cancel', on_click=self.close_speech_save_or_cancel_dialog),
    ]
)
This is a dialog that opens when there are unsaved changes. It has buttons for “Open without save” and “Cancel”, which allow you to open the file without saving or cancel the operation respectively. Although I wanted to add a button to save here as well, it didn’t work out and the “Save” button remains commented out.
# Closes the above dialog.
async def close_speech_save_or_cancel_dialog(self, e):
    self.speech_save_or_cancel_dialog.open = False
    self.page.update()
This is the cancel processing. It simply sets the open property of the dialog to False, closing it.
# Opens audio file pick.
async def open_speech_without_save(self, e):
    self.speech_save_or_cancel_dialog.open = False
    self.page.update()
    await self.pick_speech_file()
This is a method called when the user selects to open the file without saving in the dialog. It closes the dialog, updates the page, and then calls self.pick_speech_file().
# Opens audio file pick dialog. Only allow compatible extensions.
async def pick_speech_file(self):
    self.pick_speech_file_dialog.pick_files(
        dialog_title='Select a speech (audio) file',
        allow_multiple=False,
        allowed_extensions=['mp3', 'm4a', 'wav', 'mp4', 'aiff', 'aac'],
        file_type=ft.FilePickerFileType.CUSTOM,
    )
Finally, this is the method for opening the “Open File” dialog. This method is used to limit the file types that can be opened by setting two properties: allowed_extensions and file_type=ft.FilePickerFileType.CUSTOM. This method opens the “Open File” dialog using the pick_files() method of the self.pick_speech_file_dialog control, which was previously defined. When a file is selected, the on_result event occurs and calls the self.pick_speech_file_result method. Since this method uses OS functionality, it does not require keeping track of the previously opened folder within the Flet app; when opening a file again, the same folder will be opened.
# Called when audio file pick dialog is closed. If file is selected, call self.check_text_file to load text file.
async def pick_speech_file_result(self, e: ft.FilePickerResultEvent):
    if e.files:
        #print(f'e.files = {e.files}')
        self.speech_file_name.value = ''.join(map(lambda f: f.name, e.files))
        self.speech_file = ''.join(map(lambda f: f.path, e.files))
        #print(f'Full path= {self.speech_file}')
        self.audio1.src = self.speech_file
        self.base_dir.value=f"Directory: {os.path.dirname(self.speech_file)}"
        await self.check_text_file()
        self.update()
        await self.load_audio()
This method takes an argument e in the ft.FilePickerResultEvent, which contains information about the opened file. It extracts the file name f.name and absolute path f.path from e.files. It assigns the file name and path to self.speech_file_name.value for display purposes and self.audio1.src for loading the audio file into self.speech_file. It then calls the async self.check_text_file() method, which checks if file exists, updates the display, and finally loads the audio file using theload_audio() function.
# Checks if audioFileName.srt or .txt exists to automatically load it.
async def check_text_file(self):
    #print(f'Speech file = {self.speech_file}')
    tmp_file = os.path.splitext(self.speech_file)[0]
    if os.path.exists(tmp_file+'.srt'):
        self.text_file = tmp_file+'.srt'
        self.text_file_name.value = os.path.basename(self.text_file)
    elif os.path.exists(tmp_file+'.txt'):
        self.text_file = tmp_file+'.txt'
        self.text_file_name.value = os.path.basename(self.text_file)
    else:
        self.text_file = self.text_file_name.value = 'No Text File.'
        self.save_button.disabled=True
        self.export_button.disabled=True
        self.sub_scroller_sw.disabled=True
    #print(f'Subtitle file = {self.text_file_name.value}')
This method prepares to read the selected audio file, checking if a file with the same name but with an extension of .srt or .txt exists. If neither exists, it disables buttons such as Save.
After this, the method self.load_audio() on line 801 is called, which adds the audio file to the page. When the loading of the audio file is complete, the event on_loaded is triggered for self.audio1, and then the method self.loaded explained at the beginning is called.
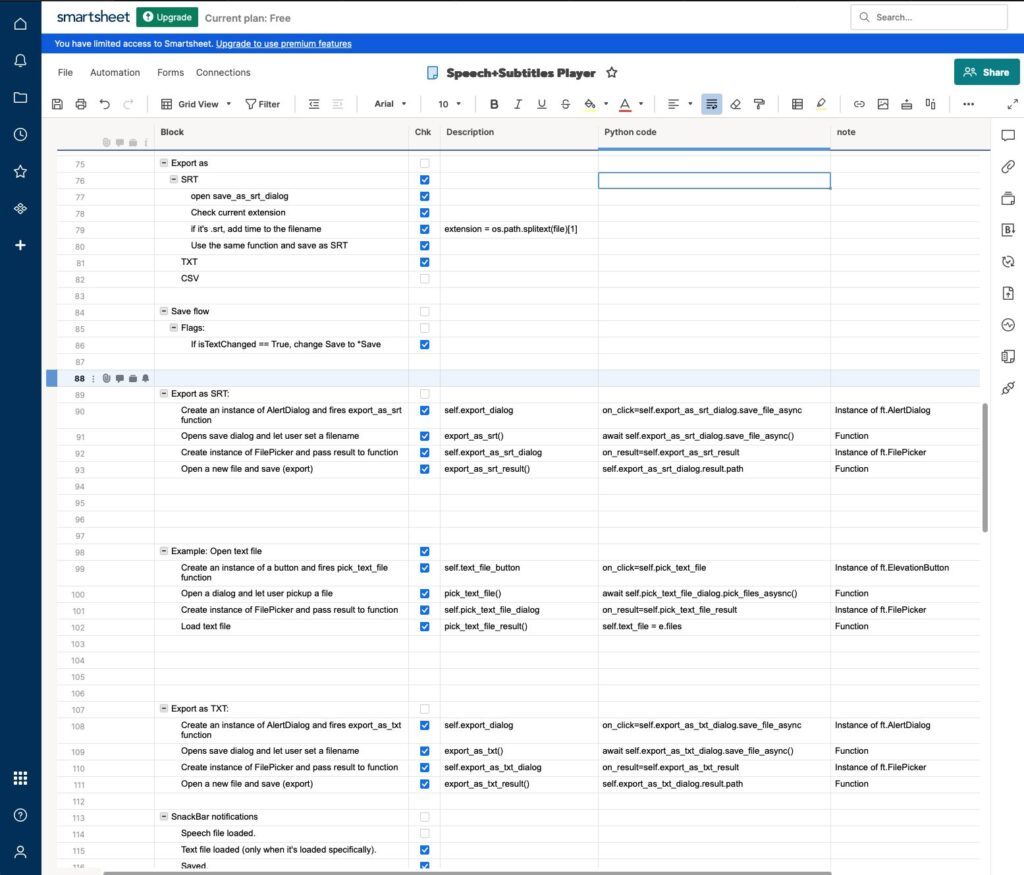
There is no code to evaluate whether the file contents are correct, but the combination of codes is this length. Although understanding the process can make it less complex, going through it in one's head can be quite challenging. When adding code for reading subtitle files, I created a checklist on Smartsheet free version (example capture below) and made progress by coding accordingly. This article will not cover the part related to reading text files because it's doing pretty much the same thing.
async def save_clicked(self, e), called to save and overwrite subtitle files
This method, located on lines 641-651, calls a method to overwrite the open subtitle file with the changed content. The call happens only when changes are made based on the open file type, .srt or .txt.
See the code:
    # Updates current open file.
    async def save_clicked(self, e):
        #print(f'File: {self.text_file}')
        extension = os.path.splitext(self.text_file)[1]
        #print(f'Extension: {extension}')
        if self.save_button.text==('*Save'):
            if extension == '.srt':
                await self.save_as_srt(self.text_file)
            elif extension == '.txt':
                await self.save_as_txt(self.text_file)
            self.save_button.text=('Save')
        self.update()
Overwriting SRT file, async def save_as_srt(self, save_file_name)
This method, located on lines 670-684, overwrites an SRT file. The save_file_name variable contains the absolute path of the file that was opened. The self.subtitles list is formatted for ease of use within the app, so it writes to the file in the format of index number, start time –> end time, and subtitle text with a following blank line (\n). After writing is complete, it sends a notification message to the bottom of the window and updates the display.
See the code:
    # Saves as .srt file.
    async def save_as_srt(self, save_file_name):
        with open(save_file_name, 'w') as srt:
            for i in self.subtitles:
                for j in range(len(i)):
                    if j % 4 == 0:
                        srt.write('%sn' % i[j])
                    elif j % 4 == 1:
                        start = ms_to_hhmmssnnn(int(i[j]))
                        end = ms_to_hhmmssnnn(i[j+1])
                        srt.write(f'{start} --> {end}n')
                    elif j % 4 == 3:
                        srt.write('%snn' % i[j])
        notification = f'Subtitle saved as an SRT file: {os.path.basename(save_file_name)}'
        await self.open_notification_bar(notification)
        self.update()
Overwriting TXT file, async def save_as_txt(self, save_file_name)
This method, located on lines 705-713, overwrites a TXT file. Unlike SRT files, which contain additional information such as timestamps and blank lines, the subtitles are simply represented as strings in this format. Therefore, it only writes the string parts of the self.subtitles list to the file. After writing is complete, it sends a message to the bottom of the window and updates the display.
See the code:
    # Saves as .txt file.
    async def save_as_txt(self, save_file_name):
        with open(save_file_name, 'w') as txt:
            for i in self.subtitles:
                for j in range(len(i)):
                    if j % 4 == 3:
                        txt.write('%sn' % i[j])
        notification = f'Subtitle saved as a TXT file: {os.path.basename(save_file_name)}'
        await self.open_notification_bar(notification)
        self.update()
Export as SRT/TXT, async def export_as_srt(self, e) and async def export_as_txt(self, e)
The lines 654-667 for exporting as SRT and 687-702 for exporting as TXT could have been merged and simplified, but I was too lazy to do it. When either button is clicked, if a file with the same name already exists, it will suggest a new name by adding the date and time to the filename and open a file save dialog. When a TXT file is open, only export as TXT is enabled since there is no timestamp information (it’s unable to generate a SRT file).

Similarly, when opening a dialog to allow the user to specify the file name and save location, separate code is needed for adding controls, pages, and processing. The flow is almost identical to audio file loading, so I won’t go into details. However, depending on which button was clicked, the final result is writing to a file using either the save_as_srt or save_as_txt method introduced earlier.
See the code to export as SRT:
# Exports current open SRT file as another SRT file.
async def export_as_srt(self, e):
    if os.path.splitext(self.text_file)[1] == '.srt':
        suggested_file_name = os.path.basename(self.text_file).split('.', 1)[0]+'_'+datetime.now().strftime("%Y%m%d%H%M")+'.srt'
    self.export_as_srt_dialog.save_file(
        dialog_title='Export as an SRT file',
        allowed_extensions=['srt'],
        file_name = suggested_file_name,
        file_type=ft.FilePickerFileType.CUSTOM,
    )

# Checks result of Export as SRT File Picker and passes absolute path to self.save_as_srt if exists.
async def export_as_srt_result(self, e: ft.FilePicker.result):
    if e.path:
        await self.save_as_srt(e.path)
See the code to export as TXT:
# Exports current open text file as a TXT file.
async def export_as_txt(self, e):
    if os.path.exists(os.path.splitext(self.text_file)[0]+'.txt'):
        suggested_file_name = os.path.basename(self.text_file).split('.', 1)[0]+'_'+datetime.now().strftime("%Y%m%d%H%M")+'.txt'
    else:
        suggested_file_name = os.path.basename(self.text_file).split('.', 1)[0]+'.txt'
    self.export_as_txt_dialog.save_file(
        dialog_title='Export as a TXT file',
        allowed_extensions=['txt'],
        file_name = suggested_file_name,
        file_type=ft.FilePickerFileType.CUSTOM,
    )

# Checks result of Export as TXT File Picker and passes absolute path to self.save_as_txt if exists.
async def export_as_txt_result(self, e: ft.FilePicker.result):
    if e.path:
        await self.save_as_txt(e.path)
Notification at the bottom, async def open_notification_bar(self, notification, type=’normal’)
This method, located on lines 716-725, displays a notification at the bottom of the window. This feature utilizes the SnackBar control defined at line 370 in Flet, which is displayed only when needed and automatically disappears. Sample notification content:

This method displays a notification with the specified text and type (normal or error). If no type is specified, it defaults to a 2-second notification duration. For error notifications, it displays a red notification on yellow backend with a longer duration of 4 seconds (4000 ms). There are various ways to specify colors, but I used named colors from this page. The text color is specified as a property of the Text control within the SnackBar’s content property, while the notification area color bgcolor is specified as a property of the SnackBar itself – it is not intuitive. After configuring the content, open the notification with open=True, and it disappears after the specified time automatically.
Definition of the control is right below (line 369~), and the method starts from line 715.
    # Notification bar control at the bottom
    self.notification_bar=ft.SnackBar(
        content=ft.Text('Speech + Subtitle Player'),
        duration=2000,
        bgcolor=ft.colors.BLUE_GREY_700,
    )
Upon reviewing it again, I realize that the control definition above already specifies the notification area color, so there shouldn’t be no need to specify it again in the method.
    # Opens notification bar with given text. If type is 'error', shows message longer with caution color.
    async def open_notification_bar(self, notification, type='normal'):
        if type == 'normal':
            self.notification_bar.content=ft.Text(notification, color=ft.colors.LIGHT_BLUE_ACCENT_400)
            self.notification_bar.bgcolor=ft.colors.BLUE_GREY_700
        elif type == 'error':
            self.notification_bar.content=ft.Text(notification, color=ft.colors.RED)
            self.notification_bar.bgcolor=ft.colors.YELLOW
            self.notification_bar.duration=4000
        self.notification_bar.open=True
        self.notification_bar.update()
Class to generate subtitle buttons, SubButton
The class that creates buttons from subtitles and timestamps is a custom control class that inherits from UserControl and implements user-defined controls. This class was created by modifying the official Flet Tutorial’s “To-Do app” example, so its internal structure is slightly different from the main class. It follows the order of initialization, layout building, button click method, etc.
Initialization method, def init(self, index, start_time, end_time, text, sub_time_clicked, play_button, save_button, subtitles)
When the parent class creates an instance of a button, it passes not only the index number, start time, and text of the subtitle related to display, but also methods of the parent class and the save button. The subtitles list, which holds the loaded subtitles as a 2D list, is passed so that it can be directly manipulated when editing the text. Passing the entire subtitles to each instance is not a good example to follow – it can be the reason of laggy window movement.
See the code:
def __init__(self, index, start_time, end_time, text, sub_time_clicked, play_button, save_button, subtitles):
    super().__init__()
    # Parameter of each subtitle.
    self.index = index
    self.start_time = start_time
    self.end_time = end_time
    self.text = text
    # Passed methods and controls to call and update.
    self.sub_time_clicked = sub_time_clicked
    self.play_button = play_button
    self.save_button = save_button
    self.subtitles = subtitles
Layout of time stamp and subtitle buttons, etc., def build(self)
In lines 97-150, the control instance is generated and initialized, and then returned to the parent class. The first half of the code up to line 123 creates buttons for timestamps, subtitles, and a placeholder for editing mode, and then wraps them together into the display control self.display_view.
The key of self.display_start_time is the index number, which serves as a target specification for scrolling when a timestamp button is clicked.
The if block starting from line 126 checks the type of subtitle file loaded and modifies the tooltip displayed when hovering over the timestamp button.
Lines 132-149 are setting up the editing mode for subtitle text. By default, it is set to visible=False, making it invisible.
The official To-Do app example has edit and delete buttons for each item, but in this application, the delete button is not necessary. Instead, the edit button is replaced with a subtitle itself that serves as a button, making it more intuitive to use. Additionally, by allowing the editing mode to be cancelled, I avoided implementing an undo feature.

See the code:
# === BUILD METHOD ===
def build(self):
# Start time button
self.display_start_time = ft.TextButton(text=f"{ms_to_hhmmssnnn(int(self.start_time))}",
# Disable jump button if loaded text is TXT, no timestamp.
disabled=(self.start_time==201355555),
# When enabled, jump to the key when clicked.
key=self.index,
width=130,
on_click=self.jump_clicked,)
# Subtitle text button in display view. Click to edit.
self.display_text= ft.TextButton(text=f"{self.text}",
on_click=self.edit_clicked,
tooltip='Click to edit')
# Placeholder of subtitle text button in edit view.
self.edit_text = ft.TextField(expand=1)
# Put controls together. Left item is the key=index.
self.display_view = ft.Row(
alignment=ft.MainAxisAlignment.START,
controls=[
ft.Text(value=self.index, width=30),
self.display_start_time,
self.display_text,
]
)
# Change tool tip of start time button which is only clickable for SRT.
if self.start_time==201355555:
self.display_start_time.tooltip='Jump not available'
else:
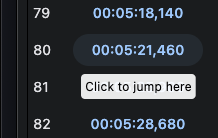
self.display_start_time.tooltip='Click to jump here'
# Subtitle edit view visible when clicked.
self.edit_view = ft.Row(
visible=False,
#alignment=ft.MainAxisAlignment.SPACE_BETWEEN,
#vertical_alignment=ft.CrossAxisAlignment.CENTER,
controls=[
self.edit_text,
ft.IconButton(
icon=ft.icons.DONE_OUTLINE_OUTLINED,
tooltip='Update Text',
on_click=self.save_clicked,
),
ft.IconButton(
icon=ft.icons.CANCEL_OUTLINED,
tooltip='Close wihout change',
on_click=self.cancel_clicked,
)
]
)
return ft.Column(controls=[self.display_view, self.edit_view])Subtitle editing mode, async def edit_clicked(self, e)
Lines 155-161 enable the editing mode when a subtitle button is clicked. By calling the focus() method, it immediately allows keyboard input to be made, and sets up the on_submit event to call the self.save_clicked method when the Enter key is pressed.
See the code:
# Opens editable text button with subtitle. Hit enter key or click checkmark to call save_clicked.
async def edit_clicked(self, e):
    self.edit_text.value = self.display_text.text
    self.edit_text.focus()
    self.display_view.visible = False
    self.edit_view.visible = True
    self.edit_text.on_submit = self.save_clicked
    self.update()
Update of subtitle, async def save_clicked(self, e)
Lines 164-172 handle the processing when a check (overwrite) button is clicked or when Enter is pressed, settling the edited subtitle. The save button will have an asterisk (*) indicating that it’s been edited, and the self.subtitles list, which holds the subtitles, is updated with the changed text. Focus is returned to the audio file playback button, allowing for playback and pause control via Space or Enter keys.
See the code:
# Updates edited subtitle, change save button, revert focus back to Play button.
async def save_clicked(self, e):
    self.display_text.text= self.edit_text.value
    self.display_view.visible = True
    self.edit_view.visible = False
    self.save_button.text = '*Save'
    self.subtitles[int(self.index)-1][3]=self.display_text.text
    self.play_button.focus()
    self.save_button.update()
    self.update()
Cancel editing, async def cancel_clicked(self, e)
Lines 175-179 handle the editing cancellation processing when the (×) button is clicked. Although it’s called “cancel”, it simply discards the changed content and ends the editing mode, returning focus to the playback button. Unfortunately, I had wanted to achieve this same behavior using the Esc key, but unfortunately, Flet didn’t have a simple way to do so, so I had to give up on that idea.
See the code:
# When timestamp clicked calls AudioSubPlayer.sub_time_clicked to jump to button position.
async def jump_clicked(self, e):
    await self.sub_time_clicked(self.start_time)
Jump by timestamp button, async def jump_clicked(self, e)
Lines 182-183 pass the start_time of the subtitle to the parent class’s sub_time_clicked method when a timestamp button is clicked, setting up playback from that point. This is necessary to use await because we need to use the seek method of the Audio control, which requires an asynchronous operation.
Functions not related to Flet GUI
Functions that are necessary for the app, but not related to Flet GUI, have been grouped together at the top of the code. Brief explanation of them are:
- A function converts milliseconds to a time string in SRT format
- A function does the reverse conversion
- A function reads and processes subtitle files (TXT or SRT) into a list that can be used within the app
This is all of the explanation of the code.
Things I Thought About While Creating This App and Why I Wrote This Article
Flet is really easy to create a modern design app, and that’s its big charm. Of course, buttons and text that become GUI elements are built-in, as well as audio file processing, sliders, notifications, and dialogs, so you can just roughly arrange them without worrying about the details and create an app quickly. I feel it’s like having a high-quality 3D printer, where Python code becomes real, just like 3D model data turns into a physical object. That’s exciting.
The official documentation is comprehensive and can be well understood, allowing you to use it for your app. Since most of the features are designed to work in a web browser, there are many live examples available that you can try out. It’s also enjoyable to explore and find components to use in your own app by modifying them. By going to this gallery page, you can likely test most of the controls and features, and even check the actual code on GitHub, which is very helpful.
However, Flet is not a mouse-operated GUI creation tool like those that were popular in the distant past. Therefore, all aspects of your app will need to be implemented using Python code. Additionally, the completed app’s interface will be implemented as a web frontend (HTML, JavaScript, CSS). While knowledge of these is not essential, having some understanding of them can make creating a finished product easier. I imagine that someone who has no intention of learning about front-end development might still be able to use Flet effectively by reading 1-2 introductory web front-end books and then understanding the documentation with ease.
It seems that there is an increasing amount of Japanese information about Flet, but when I searched for articles of Flet, most of them were just “trying it out” type of articles. I couldn’t find many articles that actually explained how to create a practical app using Flet. While the official documentation covers everything, I thought it was still not simple enough when you actually use it.
So, at the time when my app “Speech plus Subtitles Player”, was almost complete, I decided to write an article about developing an Flet app. My intention was that there must be people who really need such an article, even if it’s imperfect and has some unnecessary parts. I’m glad finally both the app and this document are done.
For the Python logic parts, I relied heavily on Copilot (free version) to help me write them. It appears that Copilot doesn’t know much about Flet itself, but in terms of Python, I found that Copilot was quite reliable. The Large Language Model (LLM, AI) has made it possible to use code generation tools that can even do debugging together with them. This means that if you have an idea, the difficulty of creating an app has significantly decreased. (by the way, I got a huge help from LLMs for translation of this article from Japanese into English. Last half was almost done by Llama 3 8B Instruct with Ollama.)
It’s a great feeling to see your own idea come to life, even if it’s a simple app. Once built, you can share it with others and get feedback. I highly recommend trying out Flet for creating apps – it’s definitely worth a shot!
Image by Stable Diffusion
It seems to be caused by the model I used, and most of the generated images were of realistic white old men. I replaced the prompt “realistic, masterpiece, best quality” with “cartoon”. From among the drawings I received, I adopted the one that mostly ignored my instructions as the eye-catching image for this article. The model remains the same, but the difference in generated image is significant due to changes in prompts.

Date:
2024-4-8 19:16:06
Model:
realisticVision-v20_split-einsum
Size:
512 x 512
Include in Image:
cartoon, retro future, guy partially gray hair with glasses, white t-shirt, typing keyboard, happy coding!
Exclude from Image:
frame, old, fat, suit
Seed:
2776787021
Steps:
50
Guidance Scale:
20.0
Scheduler:
DPM-Solver++
ML Compute Unit:
CPU & Neural Engine