Optimizing Ollama VRAM Settings for Using Local LLM on macOS (Fine-tuning: 2)

As of January 2025, there are settings for acceleration and VRAM optimization available for trial use in Ollama. It seems that both may become standard settings soon, but since the latest version 0.5.7 at the time of writing requires users to set them up themselves, I will share how to do so.

For those using local LLMs on Apple Silicon Mac (M series CPU), please also check out the previous article. It introduces how to allocate memory to the Mac’s GPU.

Environment

This is a setting for Ollama, so it should not depend on the OS, but I only touched on how to do this on macOS. Also, there seem to be ways to install it by building from source code, using brew, or running with Docker, but I don’t know how to set it up without using the app, so please look into that. Sorry.

Official sources of information

Ollama FAQ:

The blog of the contributor who introduced K/V caching features to Ollama:

Fine-tuning (2) Reduce VRAM Usage and Increase Speed with Flash Attention

The method I wrote in my previous blog post above was (1), so here I will start from (2).

First, enable Flash Attention in Ollama. Flash Attention helps reduce VRAM usage and also increases the computation speed of LLMs. As it has been explained in various documents, there don’t seem to be any negative impacts from enabling this feature. While some claim that it triples the speed, even if it doesn’t quite do that, there’s no reason not to enable it if all effects are positive. It seems likely that Ollama will default to having this enabled in the future, but for now, you need to enable it yourself. If you’re using a Mac, run the following command in Terminal:

launchctl setenv OLLAMA_FLASH_ATTENTION 1

To disable (revert), set the above value from 1 to 0. To check the current settings, run the getenv command. Below is an example of its execution when it is enabled, returning a 1.

% launchctl getenv OLLAMA_FLASH_ATTENTION
1

Fine-tuning (3) Reduce VRAM Usage by K/V Cache Quantization

K/V cache quantization seems to be a technique that improves computational efficiency by quantizing the context cache and reducing the required memory. It is also referred to as K/V context cache quantization at times. While fine-tuning (1) increased VRAM for loading LLMs to handle larger models or longer contexts, K/V cache achieves similar results by reducing the amount of memory used during model execution. While 8-bit quantization of the model itself causes only minor performance degradation and improves speed, it is expected that K/V cache quantization will have a similar effect on context cache size. When 8-bit quantization is applied to the K/V cache, the required memory amount becomes about half of what it would be without quantization, allowing for doubling the usable context length.

This feature is currently marked as Experimental in Ollama, and there is a possibility that performance may degrade when using embedding models, vision-multimodal models, or high-attention-head type models. Therefore, it seems that Ollama automatically disables this setting when an Embed model is detected. So, understanding that compatibility issues with the model could be a problem, you should try it out and if performance decreases, disable it. Unfortunately, there is no way to enable or disable this for each model at present.

Here are the settings: When it comes to quantization options, you can choose between 8-bit (q8_0) and 4-bit (q4_0), though by default there is no quantization (f16). If you opt for 4-bit, while memory reduction will be significant, performance will also decrease. Therefore, unless it’s a case where you need to use models that previously couldn’t run on GPU alone, choose 8-bit. Additionally, enabling Flash Attention is necessary as a prerequisite; please proceed after executing the fine-tuning (2) mentioned above. The command for Mac (in the case of 8-bit) would be as follows:

launchctl setenv OLLAMA_KV_CACHE_TYPE "q8_0"

To reset to default, specify “f16” as the value. To check the current setting, run the getenv command. Example:

% launchctl getenv OLLAMA_KV_CACHE_TYPE
q8_0

After setting up, you can run the model in Ollama and check the logs to see the quantization and cache size. In the following example, it is default f16 until halfway, and after the change, it becomes q8_0, showing that the overall size has decreased.

(Feb 16, 2025: corrected command.)

% grep "KV self size" ~/.ollama/logs/server2.log|tail
llama_new_context_with_model: KV self size  = 1792.00 MiB, K (f16):  896.00 MiB, V (f16):  896.00 MiB
llama_new_context_with_model: KV self size  = 1536.00 MiB, K (f16):  768.00 MiB, V (f16):  768.00 MiB
llama_new_context_with_model: KV self size  =  512.00 MiB, K (f16):  256.00 MiB, V (f16):  256.00 MiB
llama_new_context_with_model: KV self size  = 1792.00 MiB, K (f16):  896.00 MiB, V (f16):  896.00 MiB
llama_new_context_with_model: KV self size  =  952.00 MiB, K (q8_0):  476.00 MiB, V (q8_0):  476.00 MiB
llama_new_context_with_model: KV self size  =  680.00 MiB, K (q8_0):  340.00 MiB, V (q8_0):  340.00 MiB
llama_new_context_with_model: KV self size  =  816.00 MiB, K (q8_0):  408.00 MiB, V (q8_0):  408.00 MiB
llama_new_context_with_model: KV self size  = 1224.00 MiB, K (q8_0):  612.00 MiB, V (q8_0):  612.00 MiB

Set Variables Permanently

With the above two setup methods, the settings will be initialized after restarting the Mac. Below, I introduce a method to create a script that sets the environment variables and can be launched when you log in.

1. Launch Script Editor in Applications > Utilities.

2. Command + N to open a new window and copy-paste the below script. It simply sets environment variables then launch Ollama.

do shell script "launchctl setenv OLLAMA_HOST "0.0.0.0""
do shell script "launchctl setenv OLLAMA_FLASH_ATTENTION 1"
do shell script "launchctl setenv OLLAMA_KV_CACHE_TYPE "q8_0""
tell application "Ollama" to run

3. File menu > Export As > set like below and Save:

  • Export As: LaunchOllama.app
  • Where: Application
  • File Format: Application

4. Apple menu > Settings > General > Login items

5. If you already have Ollama.app, click on [ – ] button to remove it.

6. Click on [ + ] and select the app LaunchOllama.app you just created in the step #3.

7. Reboot your Mac, login, navigate to http://localhost:11434 and run command such as launchctl getenv OLLAMA_FLASH_ATTENTION to see 1 is returned.

Super Helpful Tool – Interactive VRAM Estimator

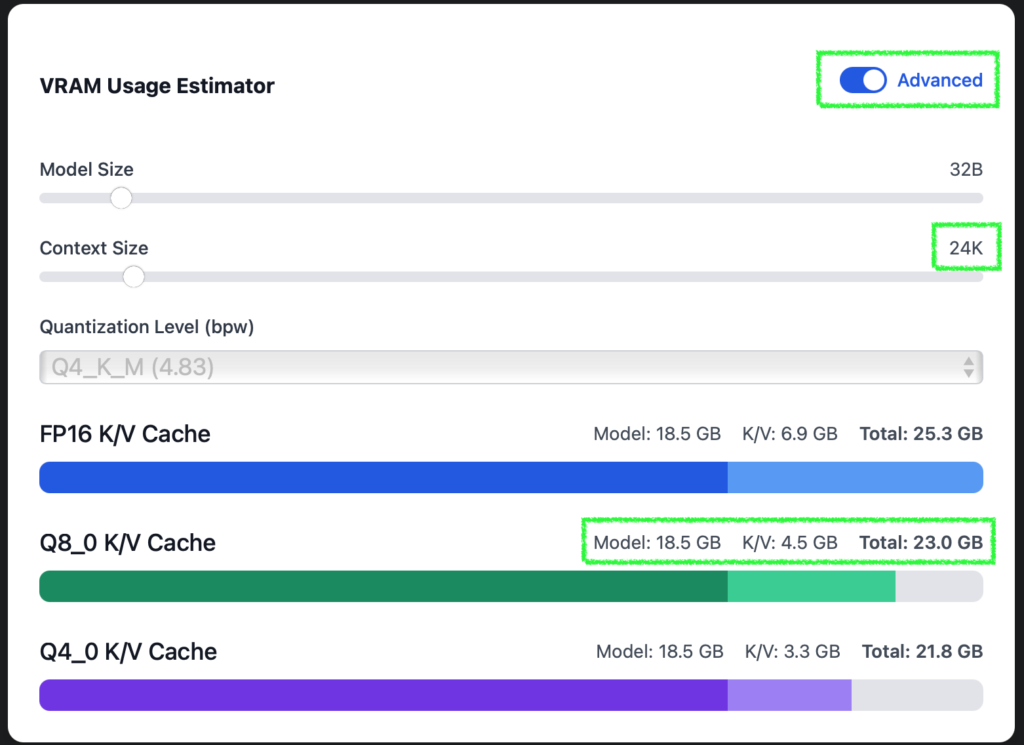
In the K/V cache feature contributor’s blog introduced earlier, there is a super useful tool called Interactive VRAM Estimator. You can find if a model you want to use will fit in your VRAM with this tool. A combination of the parameter size of the model, the context length, and the quantization level, it estimates the total size in VRAM per K/V Cache quantization level.

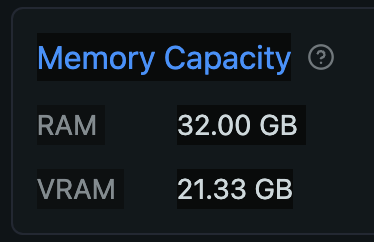
For example, in the case of DeepSeek-R1:32B_Q4_K_M, you would choose 32B and Q4_K_M. If you have set up the K/V cache for Q8_0 this time, while looking at the Total of the green bar, select the Context Size to estimate the VRAM size required to run with the combination.

It estimates 16K tokens should fit in 21.5GB VRAM

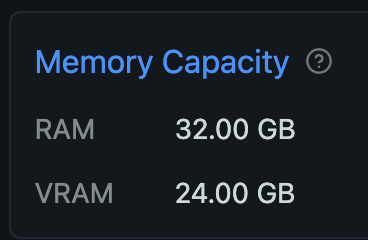
With 32K (= 32768) tokens見込み, it exceeds my Mac’s VRAM of 24GB, so I’ll enable the Advanced mode in the top right to come up with a more aggressive number. By tweaking the Context Size slider while keeping an eye on the Total of Q8_0, it seems that 24K (24 * 1024=24576) fits within 23GB RAM. Awesome, huh?

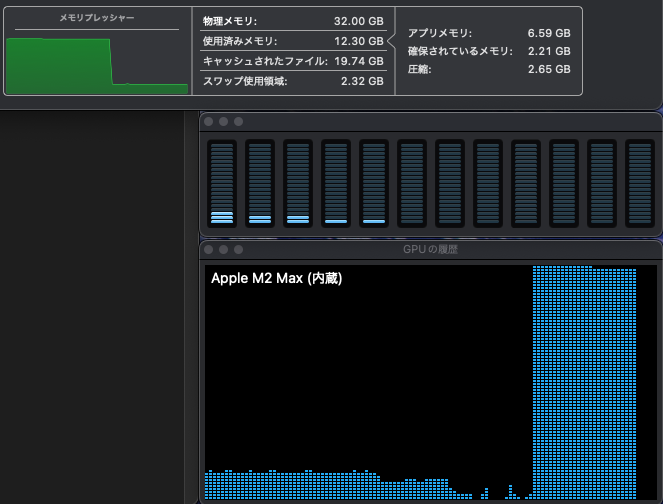
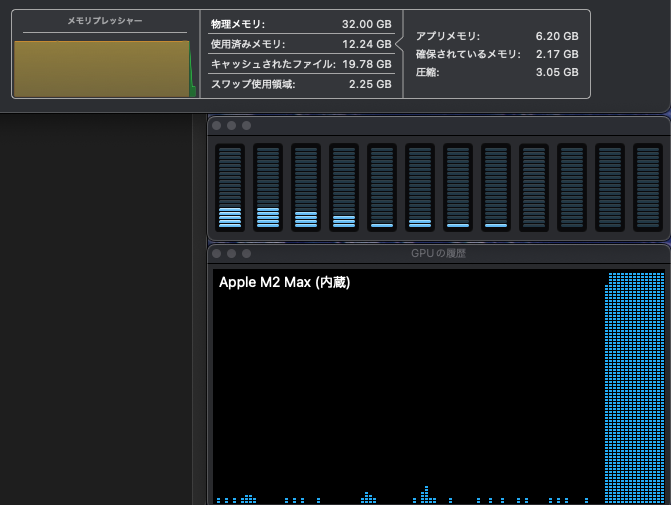
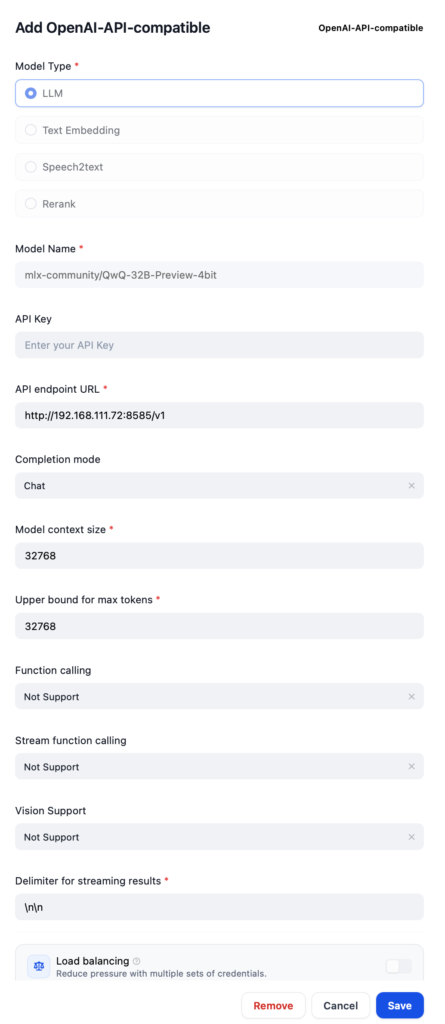
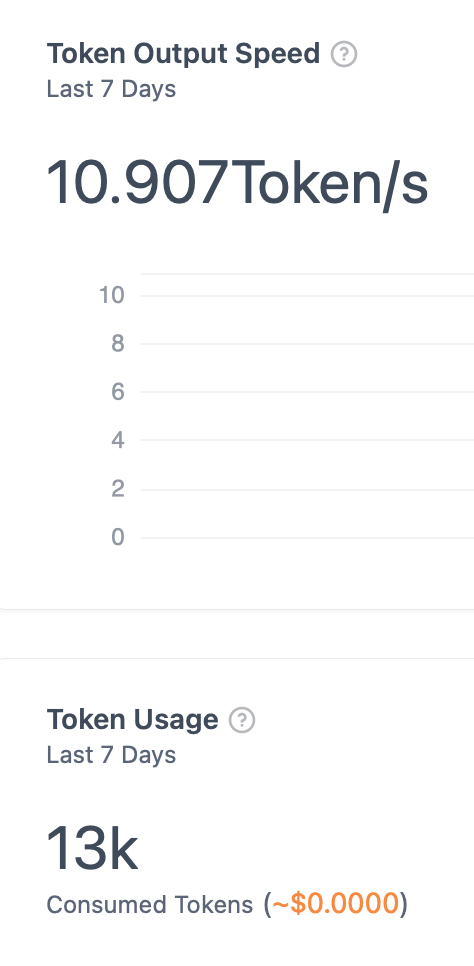
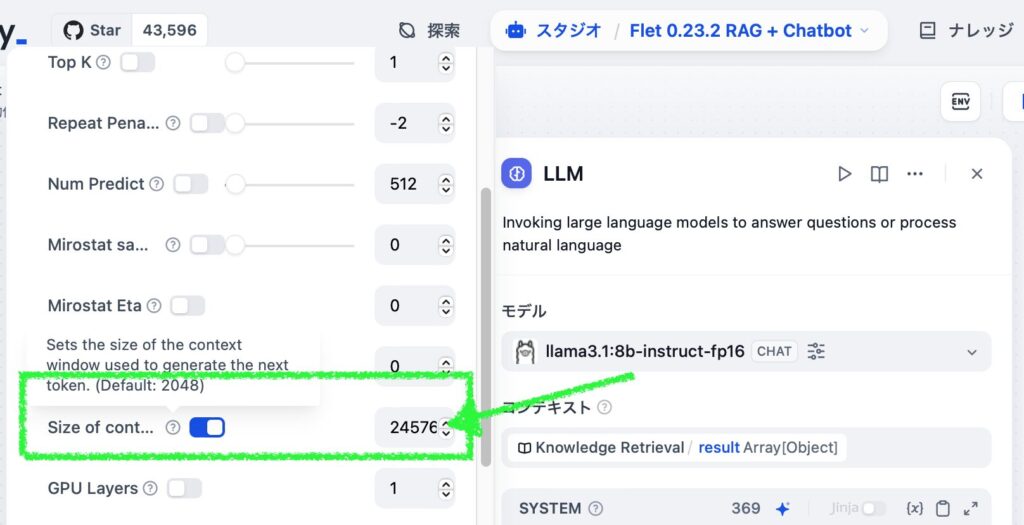
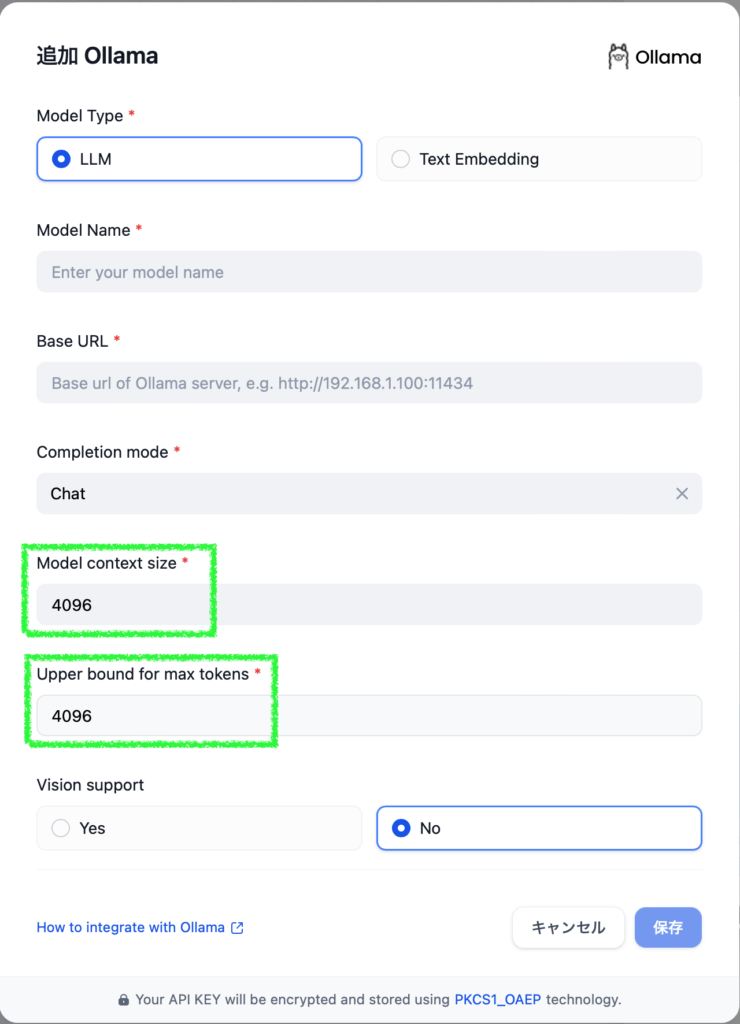
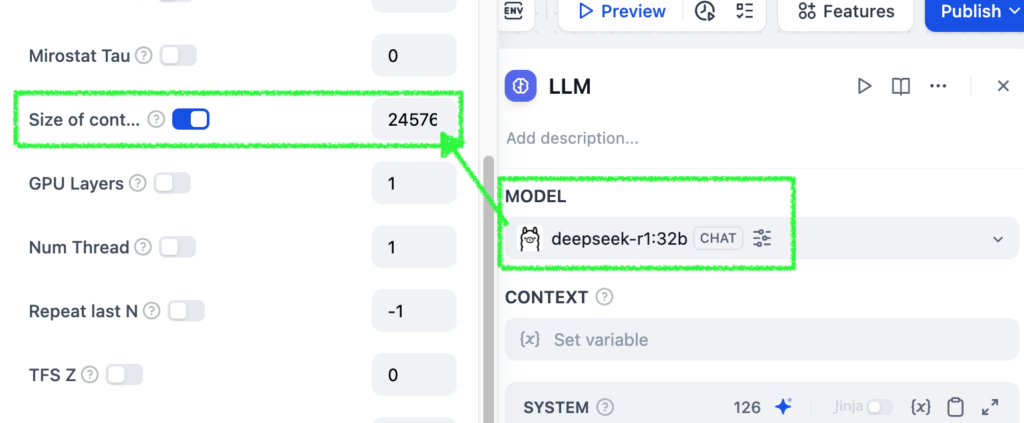
So, here’s the result of running ollama ps after putting 24576 in the Size of context window for the generative AI app I made with Dify. It’s processing at a neat 100% GPU usage. Victory!

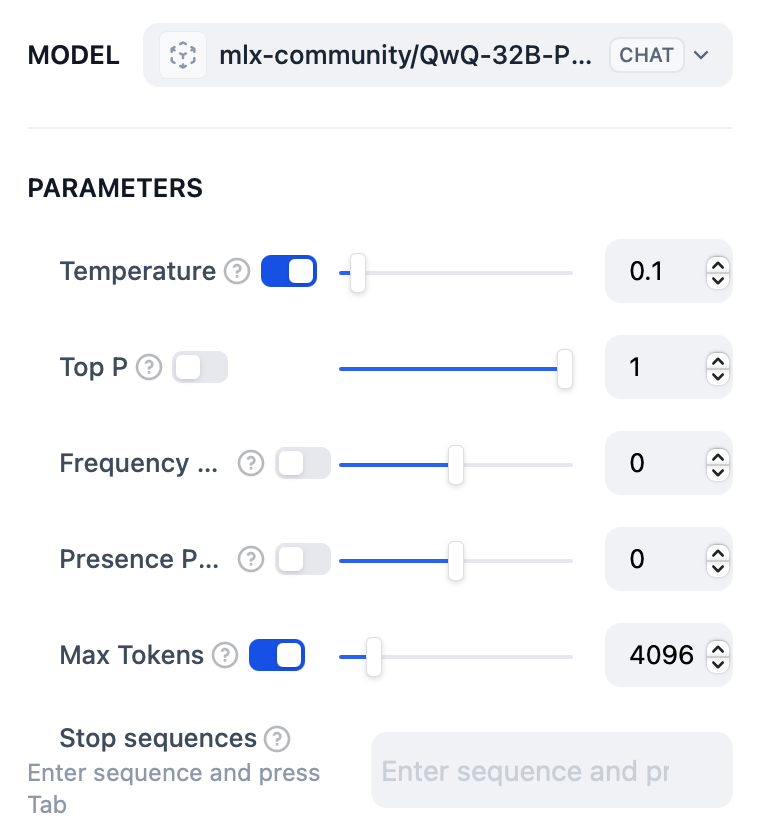
This is where you set the context length of your AI app in Dify:

Last Miscellaneous Notes

In the previous and this article, I introduced methods for fine-tuning the environment side to run LLMs effectively. Since I only have 32GB of unified memory, it’s been always challenging for me to use LLMs. Thanks to new technology, it has become easier to enjoy open-source LLMs more than before. I hope that even one more person can do so.

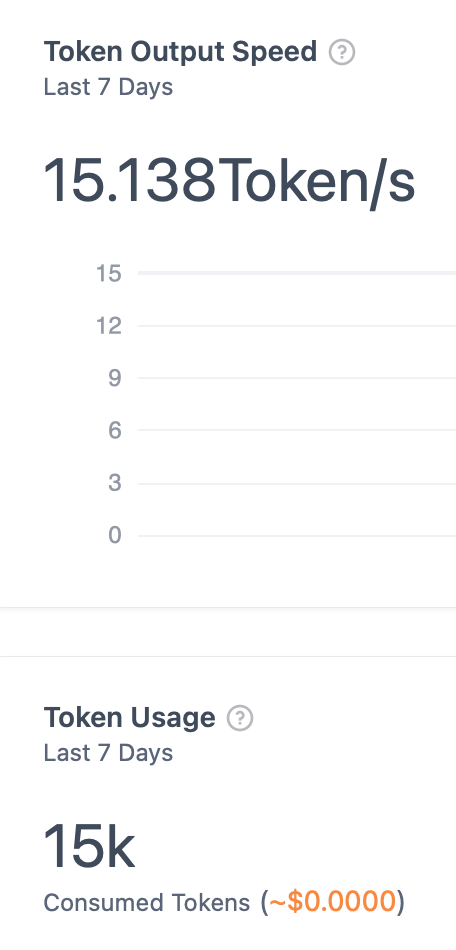
I have not conducted any investigations regarding execution speed, so please try it out yourself. At least, just by understanding and implementing the method to accommodate the memory required by LLMs or fit them into 100% VRAM, I think you will find that recent models can be quite enjoyable at a practical speed. 10 tokens per sec should be enough most cases.

To be honest, I think it’s tough to do all sorts of things with a local LLM on just 16GB. On the other hand, if you have 128GB, you could run locally LLMs in parallel.

Recently, while Chinese companies’ models have been highly praised for their performance, there are also discussions about prohibiting their use due to concerns over information leaks. Since you can run them locally, you don’t need to worry and can try them freely. Personally, I like the performance and quick response of the newly released French model mistral-small:24b. It’s also very nice that it doesn’t involve Chinese language or characters like Chinese-made models do (maybe I’m a bit sick of it). Does anyone know when the final (non-preview) version of QwQ will be available?

Image by Stable Diffusion (Mochi Diffusion)

Simply, I asked for an image of lots of goods loaded onto a llama. Initially, I had Mistral-Small 24B create prompts based on my image, but it was completely unsatisfactory. It seems that rather than writing all sorts of things, just listing essential words and repeating generation leads to something more fitting.

Date:
2025-2-2 1:55:30

Model:
realisticVision-v51VAE_original_768x512_cn

Size:
768 x 512

Include in Image:
A Llama with heavy load of luggage on it

Exclude from Image:

Seed:
2221886765

Steps:
20

Guidance Scale:
20.0

Scheduler:
DPM-Solver++

ML Compute Unit:
CPU & GPU

Optimizing VRAM Settings for Using Local LLM on macOS (Fine-tuning: 1)

When using a large language model (LLM) locally, the key point to pay attention to is how to run it at 100% GPU usage, that is, how to fit everything into VRAM (GPU memory). If the model overflows from VRAM, it can cause a decrease in response speed, make the entire OS laggy, and in the worst case, crash the OS.

When using a local LLM, the combination of the parameter size and quantization size of the model that can be run, as well as the context length available for use, is generally determined by the capacity of the Unified Memory installed on an Apple Silicon Mac. This article will share methods to exceed the “set” limitations through some deeper settings, optimizing the processing speed and usable context length of local LLMs. If your Mac has a larger amount of Unified Memory installed, it becomes possible to run multiple LLMs or even larger models (= with higher performance) that were previously difficult to execute.

Fine-tuning a generative AI model is not something amateurs can easily undertake, but since “environmental fine-tuning” is involved, you can easily try it out and see results right away. This covers the basics, so even if you’re a beginner you should give it a read if interested.

First, let’s find out the model size that works on your Mac

Mac’s Unified Memory can be accessed by both the CPU and GPU, but there is a set proportion that the GPU can use. Based on some posts I’ve seen on forums, if no settings have been changed, for Unified Memory of 64GB or more, it seems that up to 3/4 (75%) can be used by the GPU; for less than 64GB, about 2/3 (approximately 66%) can be utilized. Since my Mac has 32GB RAM installed, this means the GPU can use up to 21.33GB of it. If LM Studio is installed, you can check the hardware resources (Command + Shift + H), where VRAM will show something like the below.

When you see “Likely too large” in red while downloading a model in LM Studio, it is telling you that the model is too big for your VRAM capacity. The following screenshot shows that the DeepSeek R1 parameter size of 70B, with an 8-bit quantized MLX format model taking up 74.98GB, so it’s letting you know that it may not work on your environment.

In Ollama, similar value is output as recommendedMaxWorkingSetSize in the log file. Below are the outputs from my environment (server2.log was the latest log file):

% grep recommendedMaxWorkingSetSize ~/.ollama/logs/server2.log|tail -5
ggml_metal_init: recommendedMaxWorkingSetSize = 22906.50 MB

Looking for a model of usable size (for beginners)

Just because a model you want to use is actually smaller than your VRAM does not mean it will be usable. The prompts you input and the text output by the LLM also use VRAM. Therefore, even if a model itself is 21GB in size, it won’t run smoothly. To find a model that fits within your actual VRAM, you would try models of plausible sizes in sequence based on the following information.

  1. Look to models with fewer parameters (if 140B or 70B are not feasible, consider 32B → 14B → 7B, etc.)
  2. Search for quantized models (such as 8bit, 4bit for MLX or Q8, Q4_K_M, etc. for GGUF format models)

Models with a smaller number of parameters tend to be created by distilling the original larger model or training them on less data. The goal is to reduce the amount of knowledge while minimizing degradation in features and performance. Depending on the capabilities and use cases of the models themselves, many popular ones these days are usable at around 10 to 30 billion parameters. With fewer parameters, the computation (inference) time also becomes shorter.

The other factor “quantization” is a method to reduce the size of a model using a different approach. Although this expression may not be common and might not be entirely accurate, it can be interpreted similarly to reducing resolution or decreasing color depth in images. While it’s not exactly the same upon closer inspection, it’s a technique that reduces the size to an extent where performance degradation is barely noticeable. Quantization also increases processing speed. Generally, it is said that with 8-bit or Q8 quantization, the benefits of faster processing and smaller size outweigh the percentage of performance loss. The model size decreases as the number gets smaller, but so does performance; therefore, around 4-bit or Q4_K_M would be considered the minimum threshold to maintain decent performance (the last letters S/M/L in GGUF format stand for Small/Medium/Large sizes).

After trying out several downloads, you see the maximum model size you can use on your Mac. In my case, with models that offer multiple parameter sizes, I try downloading one that pushes it to the limit at 32B Q4_K_M, and also download either F16 or Q8 of a smaller parameter like 14B.

Please note, when choosing a vision model, VLM, or so-called multimodal models, it is better to select ones that are even smaller in size compared to language models (LLM). This is because processing tasks such as reading images and determining what is depicted often requires more VRAM, given that images tend to be larger in size than text.

Download and use LLMs

LM Studio allows you to download directly via the Download button and conduct chats through its GUI. For Ollama, after selecting a model on the Models page, if there are options for parameter counts or quantization, choose them from the dropdown menu, then download and run using the Terminal.app (ollama run modelname). Both applications can function as API servers, allowing you to use downloaded models from other apps. I often use Dify, which makes it easy to create AI applications. For methods on how to use the APIs of Ollama and LM Studio via Dify, please check my posts below. (Japanese only for now. I’ll translate in the near future.)

Japanese only for now. Get it translated by your web browser.

What is the Context Length

“Context length” refers to the size of the text (actually tokens) exchanged between a user and an LLM during chat. It seems that this varies by model (tokenizer), with Japanese being approximately 1 character = 1+α tokens, and English being about 1 word = 1 (+α) token(s). Additionally, each model has a maximum context length it can handle, which you can check using the ollama show modelname command in Ollama or by clicking on the gear icon next to the model name in My Models on the left side in LM Studio.

When chatting with Ollama from the terminal, the default context length seems to be 2048, and when chatting within the app using LM Studio, it is 4096. If you want to handle longer texts, you need to change the model settings or specify them via the API. Note that increasing the context length requires more VRAM capacity, and if it overflows, performance will slow down. I have documented the solution in the following article.

If Japanese page opens, click on “English” in the right hand.

The article you are currently reading explains how to fine-tune macOS itself by making changes. This allows for increasing the amount of VRAM (allocation) that can be used by the GPU, enabling the use of larger models and handling longer contexts.

Check Activity Monitor for resources usage

First, let’s confirm if the model is performing well by checking the system resource usage when the LLM is running. This can be done using the Activity Monitor in the Utilities folder on macOS. If memory pressure remains high and stable at green levels and the GPU stays at Max status, it indicates that AI operations are being conducted within the hardware capacity limits of your Mac. Even if memory pressure is yellow but steady without fluctuations, it’s acceptable. Below is an example from running deepseek-r1:32b Q4_K_M on Ollama from Dify (the low load on CPU and GPU is due to other applications).

When the model was loaded and working
Once inference was complete, Ollama released memory usage.
Even when the memory pressure is yellow but flat, LLM and macOS are working stably.

Also, you can see the size of the memory being used by the model with the ollama ps command and the load on the CPU/GPU. In the following example, it shows that 25GB is being processed 100% on GPU VRAM.

%  ollama ps
NAME ID SIZE PROCESSOR UNTIL
deepseek-r1:32b 38056bbcbb2d 25 GB 100% GPU 29 minutes from now

Fine-tuning (1) Increase the usable VRAM capacity

The blog post above describes how to manipulate context length so as not to exceed the VRAM size specified for macOS (66% or 75% of unified memory). Below, I will explain a method to change this limitation and increase the amount of VRAM capacity available to the GPU. This setting is likely to be effective on Macs with more than 32GB of RAM. The larger the installed RAM capacity, the higher the effect (with 128GB of RAM, standard 96GB of VRAM can be increased to 120GB !!).

One note, the commands I am introducing are only valid for macOS version 15.0 and above. There seem to be another command that works with earlier versions, but since I haven’t tried them myself, I won’t introduce those here. Also, obviously, you cannot specify more than your actual RAM size (referenced from: mlx.core.metal.set_wired_limit). As a positive point, the settings specified by command revert to default upon a restart of your Mac, so you can try them with almost no risk.

How to change, check, and reset VRAM capacity

Before making changes, let’s decide how much VRAM capacity to allocate for the GPU. It’s good to assign the remaining RAM capacity to the GPU after reserving what is needed by the apps you frequently use. If you’re unsure, you could keep 8GB (the minimum RAM size of Macs up to M3) for the CPU and allocate all the rest to VRAM (that’s what I did). The unit for allocation is MB (megabytes), so multiply the number by 1024. In my case, since I want to set 24GB as VRAM from a total of 32GB minus 8GB for the CPU, I allocate 24 * 1024 = 24576. The command would look like this, but you should change 24576 to your desired allocation value and execute it:

sudo sysctl iogpu.wired_limit_mb=24576

Example:

% sudo sysctl iogpu.wired_limit_mb=24576
Password: (input password if required)
iogpu.wired_limit_mb: 0 -> 24576

This will be reflected immediately. In LM Studio, you just need to quit and relaunch it, then open Command + Shift + H to see the set VRAM size.

It was 21.33 GB previously, so gained 2.67 GB!

Check Ollama log after running an LLM to see the new VRAM size (although it is not the specified value, you can see the increased value):

% grep recommendedMaxWorkingSetSize ~/.ollama/logs/server2.log|tail
ggml_metal_init: recommendedMaxWorkingSetSize = 22906.50 MB
ggml_metal_init: recommendedMaxWorkingSetSize = 22906.50 MB *before*
ggml_metal_init: recommendedMaxWorkingSetSize = 25769.80 MB *now*
ggml_metal_init: recommendedMaxWorkingSetSize = 25769.80 MB

Here are couple of more related commands:

Check the current value:

% sudo sysctl iogpu.wired_limit_mb
Password:
iogpu.wired_limit_mb: 24576

(Default is zero)
iogpu.wired_limit_mb: 0

Set the value to default:

% sudo sysctl iogpu.wired_limit_mb=0
Password:
iogpu.wired_limit_mb: 24576 -> 0

If something goes wrong with this setting, go ahead and reboot the Mac, and it will revert to the default value.

If the current state seems to work fine with a certain amount, you may want to use the new VRAM capacity even after rebooting. In that case, you can achieve this by adding the following command to the /etc/sysctl.conf file. Please replace the number in the last line with the size you want to specify. However, since an error occurs and it cannot be specified if a value greater than the RAM capacity is designated, to avoid having the startup fail, please proceed with the work carefully.

sudo touch /etc/sysctl.conf
sudo chown root:wheel /etc/sysctl.conf
sudo chmod 0644 /etc/sysctl.conf
echo "iogpu.wired_limit_mb=24576" >> /etc/sysctl.conf

After rebooting, if the value set by sudo sysctl iogpu.wired_limit_mb is as expected, you are done. If you want to manually reset it to the default value, use sudo sysctl iogpu.wired_limit_mb=0. To completely revert to the default settings, remove the added line from /etc/sysctl.conf.

Part 2 is now available.

Actually, I was planning to include the settings for Ollama’s K/V cache in this article as well, but it has become quite long, so I wrote it in a different post below. By configuring the K/V cache (and Flash attention), you can reduce the VRAM usage while minimizing the performance degradation of the LLM, and also improve processing speed.

Image by Stable Diffusion (Mochi Diffusion)

“Growing juicy apple” or “apple started shining” are closer explanations of an image in my mind, but none of generated images satisfied me. Finally this simple prompt generated an image looked fine.

Date:
2025-1-29 23:50:07

Model:
realisticVision-v51VAE_original_768x512_cn

Size:
768 x 512

Include in Image:
an apple turning shiny red

Exclude from Image:

Seed:
3293091901

Steps:
20

Guidance Scale:
20.0

Scheduler:
DPM-Solver++

ML Compute Unit:
CPU & GPU

MLX-LM API streaming QwQ-32B-Preview with Dify (faster than Ollama)

In this Ollama GitHub issue, there are many comments requesting support for the MLX backend, and some even write that it is 20-40% faster than llama.cpp (GGUF). Curious about these comments, I decided to try the MLX version of my favorite QwQ-32B-Preview – QwQ is Alibaba Qwen team’s open reasoning large language model (LLM) similar to OpenAI’s o1, which iteratively improves answer accuracy.

In conclusion, MLX version is indeed slightly faster. The person who wrote the comment mentioned using an M3 Mac, so the difference might be more noticeable on newer Mac models with M4 chips. Since I tried it out, I’ll leave the method here for reference, Dify with MLX-LM as a local LLM model provider.

By the way, is this an official Ollama X post? It could also be interpreted as hinting that Ollama will officially support the MLX backend.

What’s MLX?

To put it simply, MLX is Apple’s official machine learning framework for Apple Silicon. It can utilize both the GPU and CPU. Although it may not always achieve peak performance, some reports from various experiments show that it can be faster than using PyTorch with MPS in certain cases.

MLX official GitHub: https://ml-explore.github.io/mlx/build/html/index.html

So, when we refer to an “MLX version of LLM,” we are talking about an open large language model (LLM) that has been converted to run using the MLX framework.

What’s MLX-LM?

MLX-LM is an execution environment for large language models (LLMs) that have been converted to run using MLX. In addition to running the models, it also includes features such as converting models from Hugging Face into MLX format and running an API server. This article introduces how to use it as an API server.

MLX-LM official GitHub: https://github.com/ml-explore/mlx-examples/blob/main/llms/README.md

There is also a similar execution environment MLX-VLM, which supports vision models such as Pixtral and Qwen2-VL.

MLX-VLM official GitHub: https://github.com/Blaizzy/mlx-vlm

There is also a Python package FastMLX that can function as an API server for both MLX-LM and MLX-VLM. Functionally, it is quite appealing. However, the vision models only accept image URLs or paths (which makes them unusable with Dify), and text streaming often fails and throws exceptions. It requires a lot of effort to make it work properly, so I have given up for now. If you are interested, give it a try.

FastMLX official GitHub: https://github.com/arcee-ai/fastmlx

You can use LM Studio

LM Studio can use MLX models, so if you don’t need to use Dify or prefer not to, you can stop reading here. Additionally, you can register LM Studio as an OpenAI API-compatible model provider in Dify. However, with LM Studio, responses from the LLM may not stream smoothly. Therefore, if you plan to use MLX LLMs with Dify, it is better to utilize the API server functionality of MLX-LM.

Launch MLX-LM API Server

Install

To use MLX-LM install MLX-LM in your virtual environment. The version I confirmed was the latest, 0.20.4.

pip install mlx-lm

Start API Server Once

To set up the server, use the mlx_lm.server command (note that the actual command uses an underscore instead of a dash as installed). If Dify or other API clients are running on different hosts or if other servers are using the port, you can specify options as shown in the example below. In my case, Dify is running on another Mac and there’s also a text-to-speech server running on my main Mac, so I specify each accordingly. For more details on the options, check mlx_lm --help. The --log-level option is optional.

mlx_lm.server --host 0.0.0.0 --port 8585 --log-level INFO

The server must be running when you see something like below:

% mlx_lm.server --host 0.0.0.0 --port 8585 --log-level INFO
/Users/handsome/Documents/Python/FastMLX/.venv/lib/python3.11/site-packages/mlx_lm/server.py:682: UserWarning: mlx_lm.server is not recommended for production as it only implements basic security checks.
  warnings.warn(
2024-12-15 21:33:25,338 - INFO - Starting httpd at 0.0.0.0 on port 8585...

Download LLM

I selected the 4-bit quantized model of QwQ (18.44GB) because it must fit in 32GB of RAM.

HuggingFace: https://huggingface.co/mlx-community/QwQ-32B-Preview-4bit

Open another terminal window while the MLX-LM server is running, write and save a simple script like the one below, and then run it with Python to download the model.

import requests

url = "http://localhost:8585/v1/models"
params = {
    "model_name": "mlx-community/QwQ-32B-Preview-4bit",
}

response = requests.post(url, params=params)
print(response.json())
python add_models.py

Once the download is complete, you can stop the server by pressing Ctrl + C. By the way, the model downloaded using this method can also be loaded by LM Studio. If you want to try both applications, downloading via command line will help reduce storage space (although the folder names become non-human friendly in LM Studio).

Start API Server with a LLM

The model is saved in ~/.cache/huggingface/hub/, and for this example, it will be in the folder models--mlx-community--QwQ-32B-Preview-4bit. The path passed to the server command needs to go deeper into the snapshot directory where the config.json file is located.

The command to start the API server would look like this:

mlx_lm.server --host 0.0.0.0 --port 8585 --model /Users/handsome/.cache/huggingface/hub/models--mlx-community--QwQ-32B-Preview-4bit/snapshots/e3bdc9322cb82a5f92c7277953f30764e8897f85

Once the server starts, you can confirm installed models by navigating to: http://localhost:8585/v1/models

{"object": "list", "data": [{"id": "mlx-community/QwQ-32B-Preview-4bit", "object": "model", "created": 1734266953}

Register in Dify

Add as an OpenAI-API Compatible Model

To register the model in Dify, you will add it as an OpenAI-API-compatible LLM model. The model name is the one mentioned frequently above. The URL needs to include the port number and /v1, and you can use something like \n\n for the Delimiter.

Create a Chatbot

When creating a Chatbot Chatflow, select the model you just added with 4096 for the Max Tokens. This size fits in 32GB RAM and runs 100% on GPU. To avoid getting answers in Chinese, try the sample System prompt below. QwQ may still use some Chinese sentences from time to time though.

Never ever use Chinese. Always answer in English or language used to ask.
Comparing to Ollama, configurable parameters are limited for OpenAI API compatible models.

That’s about it. Enjoy the speed of MLX version of your LLM.

Dify judged MLX was the winner

Now that everything is set up, I created chatbots using the same conditions with both GGUF (ollama pull qwq:32b-preview-q4_K_M) and MLX. The settings were as follows: Temperature=0.1, Size of context window=4096, Keep Alive=30m, with all other settings at their default values. I asked seven different types of questions to see the differences.

Based on Dify’s Monitoring, it seems that the MLX version was 30-50% faster. However, in practical use, I didn’t really notice a significant difference; both seemed sufficiently fast to me. Additionally, the performance gap tended to be more noticeable with larger amounts of generated text. In this test, MLX produced more text before reaching an answer, which might have influenced the results positively for MLX. The nature of the QwQ model may also have contributed to these favorable outcomes.

Overall, it’s reasonable to say that MLX is about 30% faster than GGUF, without exaggeration. First image below is MLX and the next one is GGUF.

MLX-LM (MLX) generated more tokens.
Ollama (GGUF) 10 T/s is also fast enough.

Prompts I used for performance testing:

(1) Math:
I would like to revisit and learn calculus (differential and integral) now that I am an adult. Could you teach me the basics?

(2) Finance and documentation:
I would like to create a clear explanation of a balance sheet. First, identify the key elements that need to be communicated. Next, consider the points where beginners might make mistakes. Then, create the explanation, and finally, review the weak points of the explanation to produce a final version.

(3) Quantum biology:
Explain photosynthesis in quantum biology using equations.

(4) Python scripting:
Please write a Python script to generate a perfect maze. Use "#" for walls and " " (space) for floors. Add an "S" at the top-left floor as the start and a "G" at the bottom-right floor as the goal. Surround the entire maze with walls.

(5) Knowledge:
Please output the accurate rules for the board game Othello (Reversi).

(6) Planning:
You are an excellent web campaign marketer. Please come up with a "Fall Reading Campaign" idea that will encourage people to share on social media.

### Constraints
- The campaign should be easy for everyone to participate in.
- Participants must post using a specific hashtag.
- The content should be engaging enough that when others read the posts, they want to mention or create their own posts.
- This should be an organic buzz campaign without paid advertising.

(7) Logic puzzle:
Among A to D, three are honest and one is a liar. Who is the liar?

A: D is lying.
B: I am not lying.
C: A is not lying.
D: B is lying.

Can MLX-LM Replace Ollama?

If you plan to stick with a single LLM, I think MLX-LM is fine. However, in terms of ease of use and convenience, Ollama is clearly superior, so it may not be ideal for those who frequently switch between multiple models. FastMLX, which was mentioned earlier, allows model switching from the client side, so it could be a viable option if you are seriously considering migrating. That said, based on what seems to be an official X post from Ollama, they might eventually support MLX, so I’m inclined to wait for that.

Regardless, this goes slightly off the original GGUF vs MLX comparison, but personally, I find QwQ’s output speed sufficient for chat-based applications. It’s smart as well (I prefer Qwen2.5 Coder for coding, though). Try it out if you haven’t.

Oh, by the way, most of this post was translated by QwQ from Japanese. Isn’t that great?

Image by Stable Diffusion (Mochi Diffusion)

When I asked images of “a robot running on a big apple”, most of them had robot in NYC. Yeah, sure. Simply ran several attempts and picked one looked the best. If the model learned from old school Japanese anime and manga, I could get something closer to my expectation.

Date:
2024-12-16 0:38:20

Model:
realisticVision-v51VAE_original_768x512_cn

Size:
768 x 512

Include in Image:
fancy illustration, comic style, smart robot running on a huge apple

Exclude from Image:

Seed:
2791567837

Steps:
26

Guidance Scale:
20.0

Scheduler:
DPM-Solver++

ML Compute Unit:
CPU & GPU

A solution for slow LLMs on Ollama server when accessing from Dify or Continue

Recently, the performance of open-source and open-weight LLMs has been amazing, and for coding assistance, DeepSeek Coder V2 Lite Instruct (16B) is sufficient, while for Japanese and English chat or translation, Llama 3.1 Instruct (8B) is enough. When running Ollama from the Terminal app and chatting, the generated text and response speed are truly surprising, making it feel like you can live without the internet for a while.

However, when using the same model through Dify or Visual Studio Code’s LLM extension Continue, you may notice the response speed becomes extremely slow. In this post, I will introduce a solution to this problem. Your problem may be caused by something else, but since it is easy to check and fix, I recommend checking the Conclusion section of this post.

Confirmed Environment

OS and app versions:

macOS: 14.5
Ollama: 0.3.8
Dify: 0.6.15
Visual Studio Code - Insiders: 1.93.0-insider
Continue: 0.8.47

LLM and size

Model nameModel sizeContext lengthOllama download command
llama3.1:8b-instruct-fp1616 GB131072ollama pull llama3.1:8b-instruct-fp16
deepseek-coder-v2:16b-lite-instruct-q8_016 GB163840ollama run deepseek-coder-v2:16b-lite-instruct-q8_0
deepseek-coder-v2:16b-lite-instruct-q6_K14 GB163840ollama pull deepseek-coder-v2:16b-lite-instruct-q6_K
Mac with 32GB RAM is capable of running them on memory.

Conclusion

Check the context length and lower it.

By setting “Size of context window” in Dify or Continue to a sufficiently small value, you can solve this problem. Don’t set a number just because the model supports it or for future use; instead, use the default value (2048) or 4096 and test chatting with a small number of words. If you get a response as you expect, congrats, the issue is resolved.

Context size: It is also called "context window" or "context length." It represents the total number of tokens that an LLM can process in one interaction. Token count is approximately equal to word count in English and other supported languages. In the table above, Llama 3.1 has a context size of 131072, so it can handle approximately 65,536 words text as input and output.

Changing Context Length

Dify

  • Open the LLM block in the studio app and click on the model name to access detailed settings.
  • Scroll down to find “Size of cont…” (Size of content window) and uncheck it or enter 4096.
  • The default value is 2048 when unchecked.

Continue (VS Code LLM extension)

  • Open the config.json file in the Continue pane’s gear icon.
  • Change the contextLength and maxTokens values to 4096 and 2048, respectively. Note that maxTokens is the maximum number of tokens generated by the LLM, so we set it half.
    {
      "title": "Chat: llama3.1:8b-instruct-fp16",
      "provider": "ollama",
      "model": "llama3.1:8b-instruct-fp16",
      "apiBase": "http://localhost:11434",
      "contextLength": 4096,
      "completionOptions": {
        "temperature": 0.5,
        "top_p": "0.5",
        "top_k": "40",
        "maxTokens": 2048,
        "keepAlive": 3600
      }
    }

Checking Context Length of LLM

The easiest way is to use the Ollama’s command ollama show <modelname> to display the context length. Example:

% ollama show llama3.1:8b-instruct-fp16
  Model                                          
  	arch            	llama 	                         
  	parameters      	8.0B  	                         
  	quantization    	F16   	                         
  	context length  	131072	                         
  	embedding length	4096  	                         
  	                                               
  Parameters                                     
  	stop	"<|start_header_id|>"	                      
  	stop	"<|end_header_id|>"  	                      
  	stop	"<|eot_id|>"         	                      
  	                                               
  License                                        
  	LLAMA 3.1 COMMUNITY LICENSE AGREEMENT        	  
  	Llama 3.1 Version Release Date: July 23, 2024

Context Length in App Settings

Dify > Model Provider > Ollama

When adding an Ollama model to Dify, you can override the default value of 4096 for Model context length and Upper bound for max tokens. Since setting a upper limit may make debugging difficult if issues arise, it’s better to set both values to the model’s context length and adjust the Size of content window in individual AI apps.

Continue > “models”

In the “models” section of the config.json, you can add multiple settings for different context length by including a description like “Fastest Max Size” or “4096“. For example, I set the title to “Chat: llama3.1:8b-instruct-fp16 (Fastest Max Size)” and changed the contextLength value to 24576 and maxTokens value to 12288. This combination was the highest that I confirmed working perfectly on my Mac with 32 GB RAM.

    {
      "title": "Chat: llama3.1:8b-instruct-fp16 (Fastest Max Size)",
      "provider": "ollama",
      "model": "llama3.1:8b-instruct-fp16",
      "apiBase": "http://localhost:11434",
      "contextLength": 24576,
      "completionOptions": {
        "temperature": 0.5,
        "top_p": "0.5",
        "top_k": "40",
        "maxTokens": 12288,
        "keepAlive": 3600
      }
    }

What’s happening when LLM processing is slow (based on what I see)

When using ollama run, LLM runs quickly, but when using Ollama through Dify or Continue, it becomes slow due to large size of context length. Let’s check the process with ollama ps. Below are examples – first one had the max context length 131072 and the second one had 24576: 

% ollama ps
NAME                     	ID          	SIZE 	PROCESSOR      	UNTIL               
llama3.1:8b-instruct-fp16	a8f4d8643bb2	49 GB	54%/46% CPU/GPU	59 minutes from now	

% ollama ps
NAME                     	ID          	SIZE 	PROCESSOR	UNTIL              
llama3.1:8b-instruct-fp16	a8f4d8643bb2	17 GB	100% GPU 	4 minutes from now

In the slow case, SIZE is much larger than the actual model size (16 GB), and processing occurs on CPU at 54% and GPU at 46%. It seems that Ollama processes LLM as a larger size model when a large size context length is passed via API regardless of the actual number of tokens being processed. This is only my assumption, but the above tells.

Finding a suitable size of context length

After understanding the situation, let’s take countermeasures. If you can live with 4096 tokens, it’s fine, but I want to process as many tokens as possible. Unfortunately, I couldn’t find Ollama’s specifications, so I tried adjusting the context length by hand and found that a value of 24576 (4096*6) works for Llama 3.1 8B F16 and DeepSeek-Coder-V2-Lite-Instruct Q6_K.

Note that using non-multiple-of-4096 values may cause character corruption, so be careful. Also, when using Dify, the SIZE value will be smaller than in Continue.

Ollama, I’m sorry (you can skip this)

I thought Ollama’s server processing was malfunctioning because LLM ran quickly when running on CLI but became slow when used through API. However, after trying an advice “Try setting context length to 4096” from an issue discussion about Windows + GPU, I found that it actually solved the problem.

Ollama, I’m sorry for doubting you!

Image by Stable Diffusion (Mochi Diffusion)

This time I wanted an image of a small bike overtaking a luxurious van or camper, but it wasn’t as easy as I thought somehow. Most of generated images had two bikes, a bike and a van on reversing lanes, a van cut off of the sight, etc. Only this one had a bike leading a van.

Date:
2024-9-1 2:57:00

Model:
realisticVision-v51VAE_original_768x512_cn

Size:
768 x 512

Include in Image:
A high-speed motorcycle overtaking a luxurious van

Exclude from Image:

Seed:
2448773039

Steps:
20

Guidance Scale:
20.0

Scheduler:
DPM-Solver++

ML Compute Unit:
All

Run Meta’s Audio Generation AI model, AudioGen, on macOS with MPS (GPU)

Meta, the company behind Facebook, released AudioCraft – an AI capable of generating music and sound effects from English text. The initial version, v0.0.1, dropped in June 2023, followed by few revisions and the latest (as of now writing this) v1.3.0 in May 2024. The best part? You can run it locally for free!

However, there’s a catch: official support is limited to NVIDIA GPUs or CPUs. macOS users are stuck with CPU-only execution. Frustrating, right?

After much research and experimentation, I discovered a way to speed up the generation process for AudioGen, AudioCraft’s sound effects generator, by leveraging Apple Silicon’s GPU – MPS (Metal Performance Shaders)!

In this article, I’ll share my findings and guide you through the steps to unlock faster audio generation on your Mac.

AudioCraft: https://ai.meta.com/resources/models-and-libraries/audiocraft

GitHub: https://github.com/facebookresearch/audiocraft

Notes

While AudioCraft’s code is released under the permissive MIT license, it’s important to note that the model weights (the pre-trained files downloaded from Hugging Face) are distributed under the CC-BY-NC 4.0 license, which prohibits commercial use. Therefore, be mindful of this restriction if you plan to publicly share any audio generated using AudioCraft.

AudioCraft also includes MusicGen, a model for generating music, as well as MAGNeT, a newer, faster, and supposedly higher-performing model. Unfortunately,
I wasn’t able to get these models running with MPS.

While development isn’t stagnant, there are a few open issues on GitHub, hinting at possible future official support. However, even though you can run AudioCraft locally for free, unlike platforms like Stable Audio which offer commercial licenses for a fee, it seems unlikely that any external forces besides the passionate efforts of open-source programmers will drive significant progress. So, let’s manage our expectations!

Environment Setup

Confirmed Working Environment

macOS: 14.5
ffmpeg version 7.0.1

Setup Procedure

Install ffmpeg if not installed yet. You need brew installed.

brew install ffmpeg

Create a directory and clone the AudioCraft repository. Choose your preferred directory name.

mkdir AudioCraft_MPS
cd AudioCraft_MPS
git clone https://github.com/facebookresearch/audiocraft.git .

Set up a virtual environment. I prefer pipenv, but feel free to use your favorite. Python 3.9 or above is required.

pipenv --python 3.11
pipenv shell

Install PyToch with a specific version 2.1.0.

pip install torch==2.1.0

Set xformer’s version to 0.0.20 in requirements.txt. MPS doesn’t support xformers, but this was the easiest workaround. The example below uses vim, but feel free to use your preferred text editor.

vi requirements.txt
#xformer<0.0.23
xformers==0.0.20

Install everything, and the environment is set up!

pip install -e .

Edit one file to use MPS for generation.

Modify the following file to use MPS only for encoding:

audiocraft/models/encodec.py

The line numbers might vary depending on the version of the cloned repository, but the target is the decode() method within the class EncodecModel(CompressionModel):. Comment out the first out = self.decoder(emb) in the highlighted section and add the if~else block below it.

    def decode(self, codes: torch.Tensor, scale: tp.Optional[torch.Tensor] = None):
        """Decode the given codes to a reconstructed representation, using the scale to perform
        audio denormalization if needed.

        Args:
            codes (torch.Tensor): Int tensor of shape [B, K, T]
            scale (torch.Tensor, optional): Float tensor containing the scale value.

        Returns:
            out (torch.Tensor): Float tensor of shape [B, C, T], the reconstructed audio.
        """
        emb = self.decode_latent(codes)
        #out = self.decoder(emb)
        # Below if block is added based on https://github.com/facebookresearch/audiocraft/issues/31
        if emb.device.type == 'mps':
            # XXX: Since mps-decoder does not work, cpu-decoder is used instead
            out = self.decoder.to('cpu')(emb.to('cpu')).to('mps')
        else:
            out = self.decoder(emb)

        out = self.postprocess(out, scale)
        # out contains extra padding added by the encoder and decoder
        return out

The code mentioned above was written by EbaraKoji (whose name suggests he might be Japanese?) from the following issue. I tried using his forked repository, but unfortunately, it didn’t work for me.

https://github.com/facebookresearch/audiocraft/issues/31#issuecomment-1705769295

Sample Code

This code below is slightly modified from something found elsewhere. Let’s put it in the demos directory along with other executable demo codes.

from audiocraft.models import AudioGen
from audiocraft.data.audio import audio_write
import argparse
import time

model = AudioGen.get_pretrained('facebook/audiogen-medium', device='mps')
model.set_generation_params(duration=5)  # generate [duration] seconds.

start = time.time()
def generate_audio(descriptions):
  wav = model.generate(descriptions)  # generates samples for all descriptions in array.
  
  for idx, one_wav in enumerate(wav):
      # Will save under {idx}.wav, with loudness normalization at -14 db LUFS.
      audio_write(f'{idx}', one_wav.cpu(), model.sample_rate, strategy="loudness", loudness_compressor=True)
      print(f'Generated {idx}.wav.')
      print(f'Elapsed time: {round(time.time()-start, 2)}')

if __name__ == "__main__":
    parser = argparse.ArgumentParser(description="Generate audio based on descriptions.")
    parser.add_argument("descriptions", nargs='+', help="List of descriptions for audio generation")
    args = parser.parse_args()
    
    generate_audio(args.descriptions)

The key part is device='mps' on line 6. This instructs it to use the GPU for generation. Changing it to 'cpu' will make generation slower but won’t consume as much memory. Also, there is another pre-trained smaller audio model facebook/audiogen-small available, (I haven’t tested this one).

Usage

Note: The first time you run it, the pre-trained audio model will be downloaded, which may take some time.

You can provide the desired sound in English as arguments, and it will generate audio files named 0.wav, 1.wav,…. The generation speed doesn’t increase much whether you provide one or multiple arguments, so I recommend generating several at once.

python demos/audiogen_mps_app.py "text 1" "text 2"

Example:

python demos/audiogen_mps_app.py "heavy rain with a clap of thunder" "knocking on a wooden door" "people whispering in a cave" "racing cars passing by"

/Users/handsome/Documents/Python/AudioCraft_MPS/.venv/lib/python3.11/site-packages/torch/nn/utils/weight_norm.py:30: UserWarning: torch.nn.utils.weight_norm is deprecated in favor of torch.nn.utils.parametrizations.weight_norm.
  warnings.warn("torch.nn.utils.weight_norm is deprecated in favor of torch.nn.utils.parametrizations.weight_norm.")
Generated 0.wav.
Elapsed time: 53.02
Generated 1.wav.
Elapsed time: 53.08
Generated 2.wav.
Elapsed time: 53.13
Generated 3.wav.
Elapsed time: 53.2

On an M2 Max with 32GB RAM, starting with low memory pressure, a 5-second file takes around 60 seconds to generate, and a 10-second file takes around 100 seconds.

There’s a warning that appears right after running it, but since it works, I haven’t looked into it further. You can probably ignore it as long as you don’t
upgrade the PyTorch (torch) version.

MPS cannot be used with MusicGen or MAGNeT.

I tried to make MusicGen work with MPS using a similar approach, but it didn’t succeed. It does run on CPU, so you can try the GUI with python demos/musicgen_app.py.

MAGNeT seems to be a more advanced version, but I couldn’t get it running on CPU either. Looking at the following issue and the linked commit, it appears that it might work. However, I was unsuccessful in getting it to run myself.

https://github.com/facebookresearch/audiocraft/issues/396

So, that concludes our exploration for now.

Image by Stable Diffusion (Mochi Diffusion)
This part, which I’ve been writing at the end of each article, will now only be visible to those who open this specific title. It’s not very relevant to the main content.
This time, it generated many good images with a simple prompt. I chose the one that seemed least likely to trigger claustrophobia.

Date:
2024-7-22 1:52:43

Model:
realisticVision-v51VAE_original_768x512_cn

Size:
768 x 512

Include in Image:
future realistic image of audio generative AI

Exclude from Image:

Seed:
751124804

Steps:
20

Guidance Scale:
20.0

Scheduler:
DPM-Solver++

ML Compute Unit:
All

© Peddals.com