ローカルで LLM (大規模言語モデル) を使うときに特に注意を払うべきなのは、いかにして GPU 100% で動かすか、つまり、いかにして全てを VRAM (GPU 用メモリ) に載せるか、ということになると思います。モデルが VRAM からこぼれると応答速度の低下を引き起こしたり、OS 全体がカクついたり、最悪のケースでは OS がクラッシュします。
ローカル LLM を使用する際、基本的には Apple Silicon Mac に搭載されているユニファイドメモリの容量から、動かせるモデルのパラメータサイズと量子化サイズ、そして使えるコンテキスト長の組み合わせが決まってきます。この記事では少し深い設定によって「決まっている」制限を超え、ローカル LLM の処理速度と利用できるコンテキスト長を最適化する方法を共有します。お持ちの Mac に搭載されているユニファイドメモリのサイズが大きければ、複数の LLM を動かすとか、これまで実行がきびしかった大きめの (=性能が高い) モデルを動かすということも可能になります。
生成 AI モデルのファインチューニングは素人には手が出せませんが、「環境のファインチューニング」なので、簡単に試してしてすぐに結果が確認できます。基本的なところからカバーしますので、初心者の方も気になれば読んでみてください。
まずは自分の Mac で使えるモデルのサイズを知ろう
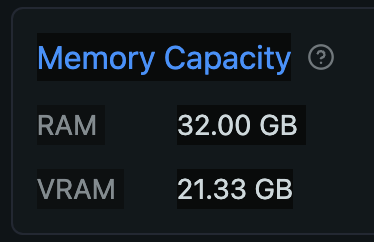
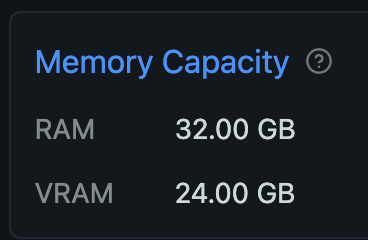
Mac のユニファイドメモリは CPU と GPU それぞれからアクセスできますが、GPU が使える割合は決まっています。海外の掲示板などの書き込みをいくつか見た限り、設定変更をしていなければ 64GB 以上のユニファイドメモリならその 3/4 (75%)、64GB 未満なら 2/3 (約 66%) までは GPU から利用できるようです (以降、ユニファイドメモリを RAM と表記します)。ボクの Mac は 32GB RAM を搭載しているので、21.33GB までを GPU が利用できる計算です。LM Studio がインストールされていれば、ハードウェアリソースの確認画面 (Command + Shift + H) で、VRAM がこの値を示しているのがわかります。
LM Studio でモデルをダウンロードするときに赤く Likely too large と書かれていれば、VRAM 容量に対してそのモデルが大きすぎることを教えてくれています。以下のスクショは、DeepSeek R1 のパラメータサイズ 70B、8bit 量子化 MLX 形式のモデルが 74.98GB なので、あなたの環境ではきびしいですよ、と教えてくれているわけです。

Ollama なら、ログファイルにrecommendedMaxWorkingSetSizeとして近しい値が出力されているはずです。以下はボクの環境での出力です (server2.logが最新のログファイルでした):
% grep recommendedMaxWorkingSetSize ~/.ollama/logs/server2.log|tail -5
ggml_metal_init: recommendedMaxWorkingSetSize  = 22906.50 MB
ggml_metal_init: recommendedMaxWorkingSetSize  = 22906.50 MB
ggml_metal_init: recommendedMaxWorkingSetSize  = 22906.50 MB
ggml_metal_init: recommendedMaxWorkingSetSize  = 22906.50 MB
ggml_metal_init: recommendedMaxWorkingSetSize  = 22906.50 MB
使えそうなサイズのモデルを探る (初心者向け)
さて、実際に利用したいモデルが自分の VRAM サイズ以下なら使えるかというと、そう簡単な話でもありません。自分が入力するプロンプトや LLM が出力するテキストも VRAM を使用するからです。なので、モデル自体のサイズが 21GB あると、なめらかには動いてくれません。では実際に自分の VRAM に収まるモデルを探すにはどうするかというと、以下の情報から動きそうなサイズのモデルを順にあたってみる、ということになります (ファインチューニング 2 の記事に、必要な VRAM サイズを調べる便利ツールの紹介を書きました)。
- パラメータ数が小さいモデルに目を向ける (140B や 70B が無理なら、 32B → 14B → 7B, etc.)
- 量子化されたモデルを探す (8bit、4bit、Q8、Q4_K_M 等と書かれる)
パラメータ数が小さめのモデルは、元となった大きなモデルを蒸留したり、少ないデータで学習させたりして作るようです。特徴や性能をなるべく下げずに知識量を減らすわけですね (ちなみに最近話題の DeepSeek-R1 シリーズのパラメータ違いのモデルは、同じくオープンソース/ウェイトとなっている Meta の Llama3.3 や Alibaba の Qwen2.5 をファインチューニングして作ったということです。グローバルで知名度のある会社としては珍しいやり方なんじゃないでしょうか)。モデルそのものの能力や使い道によりますが、最近の有名どころは 10~30数B あれば十分使えるレベルだったりします。 パラメータ数が小さいと計算 (推論) の時間も短くなります。
もう一つの「量子化」とは、こういう表現をあまり見ないので適切ではないのでしょうが、画像であれば「解像度を下げる」とか「色数を減らす」に近いと解釈して良いかと思います。よく見れば完全に同じでは無いものの、性能の低下はあまり気にならない程度にサイズを小さくする技術です。量子化によって処理速度も速くなります。一般的に、8bit や Q8 なら性能低下の割合以上に処理速度の向上やサイズの小型化によるメリットがあると言われています。数字が小さいほどモデルのサイズは小さくなりますが性能も低下するため、4bit や Q4_K_M あたりがそれなりの性能を保つ最低ラインと思って良いでしょう (GGUF 形式の最後にある文字の S/M/L はサイズの Small/Medium/Large)。
いくつかダウンロードして使ってみると、実際にどれくらいのサイズのモデルなら快適に動かせるかわかります。ボクの場合、複数のパラメータサイズが利用できるモデルでは、ひとつはギリギリを攻めて 32B の Q4_K_M、それと安全パイでひとつ下のサイズの F16 か Q8 をダウンロードして使ってみます。
ちなみに、ビジョンモデル (Vision model) や VLM、マルチモーダル等といわれるモデルは、言語モデル (LLM) よりもさらにモデル自体が小さいサイズを選びましょう。テキストよりもサイズが大きくなりがちな画像を読み込んで何が写っているか等の処理するため、その分 VRAM も多く必要となるからです (下にリンクを貼った Pixtral の記事にも書いてあります)。
モデルをダウンロード&使ってみる
LM Studio ならそのまま Download ボタンでダウンロードし、アプリの GUI でチャットができます。Ollama は Models のページでモデルを選んでから、パラメータ数や量子化のオプションがあればドロップダウンメニューから選び、ターミナルアプリでダウンロード・実行します (Ollama でモデルを探す細かい手順は別記事に書いてあるので参考にしてください)。また、どちらのアプリも API サーバとして動作できるので、他のアプリなどからダウンロード済みのモデルを使用することができます。ボクは自分専用 AI アプリが簡単に作れる Dify を使うことが多いです。Dify から Ollama や LM Studio の API を使用する方法は以下の記事を読んでみてください。
コンテキスト長について
「コンテキスト長 (context length)」とは、ユーザと LLM がチャットをするときにやりとりするテキスト (というかトークン) のサイズです。モデル (トークナイザ) によって異なると思いますが、日本語では 1文字=1+αトークン、英語なら 1単語=1+αトークンとなるようです。また、モデル毎に扱えるコンテキスト長の最大サイズが決まっていて、その値は Ollama なら ollama show モデル名 コマンド、LM Studio なら左手の My Models を開いてモデル名の横にあるギアアイコンをクリックすると確認できます。
ターミナルから Ollama とチャットする場合は 2048、LM Studio でアプリ内のチャットする場合は 4096 がデフォルトのコンテキスト長になるようです。長い文章を取り扱いたい場合には、それぞれモデルの設定を変更するか、API 経由で指定する事になります。そしてその際に注意しなければならないのは、コンテキスト長を大きくすると必要な VRAM 容量が増えるので、下手すると遅くなるということです。そのことについては以下の記事にまとめています。
今お読みの本記事では、以降で macOS 自体に変更を加えるファインチューニングを説明しています。GPU が使える VRAM の容量 (割り当て) を増やし、より大きなモデルを使う、より長いコンテキストを扱う、ということが可能になります。
使用しているリソースの状況を見る
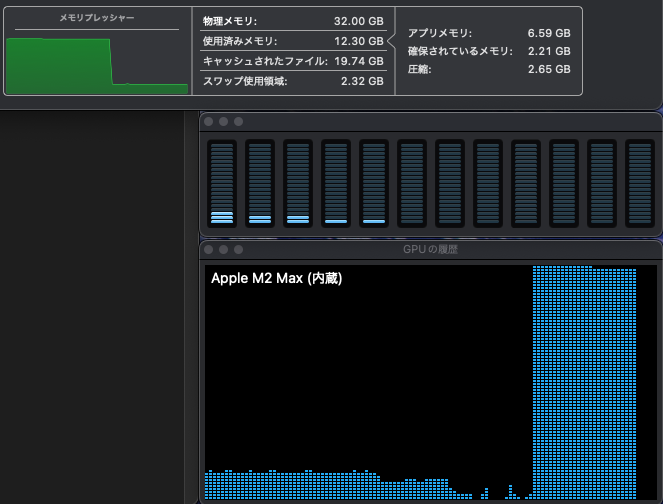
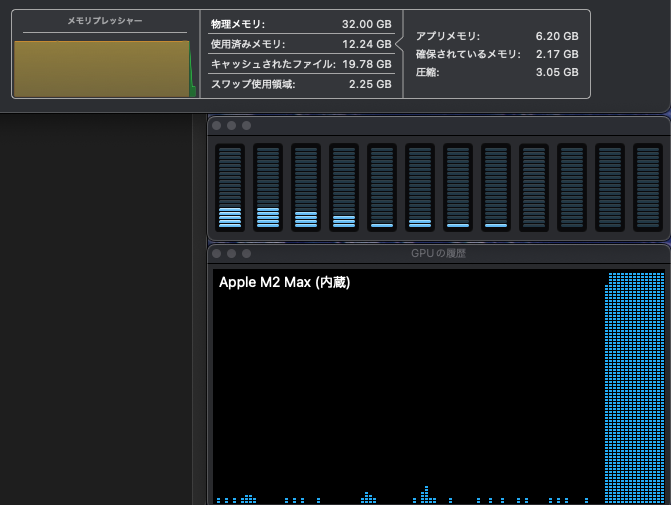
まず、使用しているモデルが力を発揮できているかを確認しましょう。それには実際に LLM を動かしているときの、システムリソースの使用状況を見れば良く、macOS のユーティリティフォルダにあるアクティビティモニタで確認できます。メモリプレッシャーが緑のまま高い位置で安定し、GPU も Max の状態で推移していると、お使いの Mac のハードウェアキャパシティ限界で AI が動いていると読み取れます。メモリプレッシャーが黄色い状態でも、波が無く安定していれば大丈夫です。以下は、Dify から Ollama の deepseek-r1:32b Q4_K_M を実行したときの様子です (CPU と GPU の低い負荷は、別のアプリが原因です)。

また、ollama psコマンドでモデルが使用しているメモリのサイズと、CPU/GPU の負荷がわかります。以下の例では、25GB が 100% GPU の VRAM で処理されていることを示しています。アクティビティモニタが上の状態を示していたときです。
%  ollama ps
NAME               ID              SIZE     PROCESSOR    UNTIL
deepseek-r1:32b    38056bbcbb2d    25 GB    100% GPU     29 minutes from now
ファインチューニング (1) GPU が使える VRAM 容量を増やす
上のブログ記事に書いてあるのは、macOS で決められた VRAM サイズ (ユニファイドメモリの 66% または 75%) からはみ出ないようにコンテキスト長を操作する方法です。以下ではその制限を変更し、GPU が使える VRAM 容量を増やす方法を説明します。この設定で効果が期待できるのは、おそらく 32GB 以上の RAM を積んだ Mac になります。搭載 RAM 容量が大きいほど効果が高いです (例えば 128GB RAM の場合、標準で 96GB の VRAM を 120GB にできます)。
ひとつ注意点ですが、紹介するコマンドは macOS バージョン 15.0 以上でのみ有効です。以前のバージョンに対応したコマンドもあるようですが、自分で試していないのでここでは紹介しません。また、当然ながら実際の RAM サイズ以上を指定することはできません (参照元: mlx.core.metal.set_wired_limit)。良い点として、コマンドでの指定は macOS の再起動でデフォルトにもどるため、ほぼリスク無く試せます。
VRAM 容量の変更、確認、リセットの方法
さて、作業をする前に GPU 用の VRAM 容量をいくつにするかを決めましょう。自分がよく使うアプリ群を実行しているときに必要な RAM 容量以外を GPU に割り当てるということで良いと思います。よくわからなければ、M3 までの Mac の最小 RAM サイズだった 8GB を CPU 用に残し、残り全てを割り振ってみても良いでしょう (ボクはそうしました)。指定する単位は MB (メガバイト) なので 1024倍して数値を出します。ボクのケースを例にしますと、32-8 の 24GB を VRAM にするので 24 * 1024 で 24576 を割り振ることになります。コマンドは以下となりますが、24576 は自分の割り当てたい数値に変更して実行してください:
sudo sysctl iogpu.wired_limit_mb=24576実行例:
% sudo sysctl iogpu.wired_limit_mb=24576
Password: (パスワードが要求されたら入力)
iogpu.wired_limit_mb: 0 -> 24576
これだけですぐに反映されます。LM Studio なら一度 Quit して再度立ち上げ、Command + Shift + H を開くと設定した VRAM サイズになっています。
当然 Ollama で LLM を動かした時のログにも新しい VRAM サイズが反映されます (指定した値とは異なりますが、下から 4行目から値が大きくなっているのがわかります):
% grep recommendedMaxWorkingSetSize ~/.ollama/logs/server2.log|tail
ggml_metal_init: recommendedMaxWorkingSetSize  = 22906.50 MB
ggml_metal_init: recommendedMaxWorkingSetSize  = 22906.50 MB
ggml_metal_init: recommendedMaxWorkingSetSize  = 22906.50 MB
ggml_metal_init: recommendedMaxWorkingSetSize  = 22906.50 MB
ggml_metal_init: recommendedMaxWorkingSetSize  = 22906.50 MB
ggml_metal_init: recommendedMaxWorkingSetSize  = 22906.50 MB *これが*
ggml_metal_init: recommendedMaxWorkingSetSize  = 25769.80 MB *これに*
ggml_metal_init: recommendedMaxWorkingSetSize  = 25769.80 MB
ggml_metal_init: recommendedMaxWorkingSetSize  = 25769.80 MB
ggml_metal_init: recommendedMaxWorkingSetSize  = 25769.80 MB
その他、関連したコマンドも紹介します。
現在の値を確認するコマンドと実行例:
% sudo sysctl iogpu.wired_limit_mb
Password:
iogpu.wired_limit_mb: 24576

(デフォルト値はゼロ)
iogpu.wired_limit_mb: 0
デフォルト値に戻す:
% sudo sysctl iogpu.wired_limit_mb=0
Password:
iogpu.wired_limit_mb: 24576 -> 0
また、この方法で設定した場合は再起動でもデフォルト値に戻るので、おかしな事になってしまったら Mac を再起動してしまいましょう。
この状態である程度使って問題がなさそうであれば、新しい VRAM 容量を再起動後にも使えるようにしたいですよね。その場合は以下のコマンド手順で/etc/sysctl.confファイルに書き加えてしまえば実現できます。数字はご自身の指定したいサイズに置き換えてください。また、実 RAM 容量以上を指定するとエラーになって指定できないということではありますが、起動に失敗するようになると面倒なので、作業は十分に注意して行ってください。
sudo touch /etc/sysctl.conf
sudo chown root:wheel /etc/sysctl.conf
sudo chmod 0644 /etc/sysctl.conf
echo "iogpu.wired_limit_mb=24576" >> /etc/sysctl.conf再起動後にsudo sysctl iogpu.wired_limit_mbで、指定した値になっていれば完了です。その状態で手動でデフォルト値にしたければsudo sysctl iogpu.wired_limit_mb=0で戻りますし、完全にデフォルト値に戻すなら/etc/sysctl.confから追加した行を削除しましょう。
次回予告
本当は、Ollama の K/V cache の設定もこの記事にまとめるつもりだったのですが、長くなったので別に分けます。K/V cache (と Flash attention) を設定すると、LLM の性能低下をに抑えつつも、消費する VRAM 容量を削減して処理速度の向上ができます。気になる方は適当にググってください。記事ができたらここにリンクを貼ります。
できました:
Image by Stable Diffusion (Mochi Diffusion)
「大きくなりつつあるリンゴ」とか「輝きを増したリンゴ」とか、今回の記事のようにポテンシャルが高まるリンゴのイメージを描いてもらいましたが、指示が貧弱でただただ大量のリンゴが生成されました。そのうち「赤く輝きを増すリンゴ」としてみたら、なるほどそうか、という感じになったので、採用です。”AI 感” みたいな要素はゼロですけど。
Date:
2025年1月29日 23:50:07
Model:
realisticVision-v51VAE_original_768x512_cn
Size:
768 x 512
Include in Image:
an apple turning shiny red
Exclude from Image:
Seed:
3293091901
Steps:
20
Guidance Scale:
20.0
Scheduler:
DPM-Solver++
ML Compute Unit:
CPU & GPU