

When using a large language model (LLM) locally, the key point to pay attention to is how to run it at 100% GPU usage, that is, how to fit everything into VRAM (GPU memory). If the model overflows from VRAM, it can cause a decrease in response speed, make the entire OS laggy, and in the worst case, crash the OS.
When using a local LLM, the combination of the parameter size and quantization size of the model that can be run, as well as the context length available for use, is generally determined by the capacity of the Unified Memory installed on an Apple Silicon Mac. This article will share methods to exceed the “set” limitations through some deeper settings, optimizing the processing speed and usable context length of local LLMs. If your Mac has a larger amount of Unified Memory installed, it becomes possible to run multiple LLMs or even larger models (= with higher performance) that were previously difficult to execute.
Fine-tuning a generative AI model is not something amateurs can easily undertake, but since “environmental fine-tuning” is involved, you can easily try it out and see results right away. This covers the basics, so even if you’re a beginner you should give it a read if interested.
Contents
First, let’s find out the model size that works on your Mac
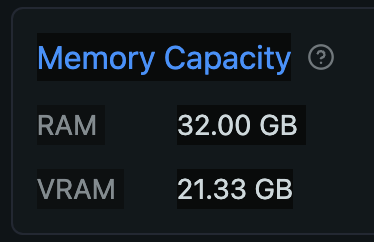
Mac’s Unified Memory can be accessed by both the CPU and GPU, but there is a set proportion that the GPU can use. Based on some posts I’ve seen on forums, if no settings have been changed, for Unified Memory of 64GB or more, it seems that up to 3/4 (75%) can be used by the GPU; for less than 64GB, about 2/3 (approximately 66%) can be utilized. Since my Mac has 32GB RAM installed, this means the GPU can use up to 21.33GB of it. If LM Studio is installed, you can check the hardware resources (Command + Shift + H), where VRAM will show something like the below.
When you see “Likely too large” in red while downloading a model in LM Studio, it is telling you that the model is too big for your VRAM capacity. The following screenshot shows that the DeepSeek R1 parameter size of 70B, with an 8-bit quantized MLX format model taking up 74.98GB, so it’s letting you know that it may not work on your environment.

In Ollama, similar value is output as recommendedMaxWorkingSetSize in the log file. Below are the outputs from my environment (server2.log was the latest log file):
% grep recommendedMaxWorkingSetSize ~/.ollama/logs/server2.log|tail -5
ggml_metal_init: recommendedMaxWorkingSetSize  = 22906.50 MB
ggml_metal_init: recommendedMaxWorkingSetSize  = 22906.50 MB
ggml_metal_init: recommendedMaxWorkingSetSize  = 22906.50 MB
ggml_metal_init: recommendedMaxWorkingSetSize  = 22906.50 MB
ggml_metal_init: recommendedMaxWorkingSetSize  = 22906.50 MB
Looking for a model of usable size (for beginners)
Just because a model you want to use is actually smaller than your VRAM does not mean it will be usable. The prompts you input and the text output by the LLM also use VRAM. Therefore, even if a model itself is 21GB in size, it won’t run smoothly. To find a model that fits within your actual VRAM, you would try models of plausible sizes in sequence based on the following information.
- Look to models with fewer parameters (if 140B or 70B are not feasible, consider 32B → 14B → 7B, etc.)
- Search for quantized models (such as 8bit, 4bit for MLX or Q8, Q4_K_M, etc. for GGUF format models)
Models with a smaller number of parameters tend to be created by distilling the original larger model or training them on less data. The goal is to reduce the amount of knowledge while minimizing degradation in features and performance. Depending on the capabilities and use cases of the models themselves, many popular ones these days are usable at around 10 to 30 billion parameters. With fewer parameters, the computation (inference) time also becomes shorter.
The other factor “quantization” is a method to reduce the size of a model using a different approach. Although this expression may not be common and might not be entirely accurate, it can be interpreted similarly to reducing resolution or decreasing color depth in images. While it’s not exactly the same upon closer inspection, it’s a technique that reduces the size to an extent where performance degradation is barely noticeable. Quantization also increases processing speed. Generally, it is said that with 8-bit or Q8 quantization, the benefits of faster processing and smaller size outweigh the percentage of performance loss. The model size decreases as the number gets smaller, but so does performance; therefore, around 4-bit or Q4_K_M would be considered the minimum threshold to maintain decent performance (the last letters S/M/L in GGUF format stand for Small/Medium/Large sizes).
After trying out several downloads, you see the maximum model size you can use on your Mac. In my case, with models that offer multiple parameter sizes, I try downloading one that pushes it to the limit at 32B Q4_K_M, and also download either F16 or Q8 of a smaller parameter like 14B.
Please note, when choosing a vision model, VLM, or so-called multimodal models, it is better to select ones that are even smaller in size compared to language models (LLM). This is because processing tasks such as reading images and determining what is depicted often requires more VRAM, given that images tend to be larger in size than text.
Download and use LLMs
LM Studio allows you to download directly via the Download button and conduct chats through its GUI. For Ollama, after selecting a model on the Models page, if there are options for parameter counts or quantization, choose them from the dropdown menu, then download and run using the Terminal.app (ollama run modelname). Both applications can function as API servers, allowing you to use downloaded models from other apps. I often use Dify, which makes it easy to create AI applications. For methods on how to use the APIs of Ollama and LM Studio via Dify, please check my posts below. (Japanese only for now. I’ll translate in the near future.)
What is the Context Length
“Context length” refers to the size of the text (actually tokens) exchanged between a user and an LLM during chat. It seems that this varies by model (tokenizer), with Japanese being approximately 1 character = 1+α tokens, and English being about 1 word = 1 (+α) token(s). Additionally, each model has a maximum context length it can handle, which you can check using the ollama show modelname command in Ollama or by clicking on the gear icon next to the model name in My Models on the left side in LM Studio.
When chatting with Ollama from the terminal, the default context length seems to be 2048, and when chatting within the app using LM Studio, it is 4096. If you want to handle longer texts, you need to change the model settings or specify them via the API. Note that increasing the context length requires more VRAM capacity, and if it overflows, performance will slow down. I have documented the solution in the following article.
The article you are currently reading explains how to fine-tune macOS itself by making changes. This allows for increasing the amount of VRAM (allocation) that can be used by the GPU, enabling the use of larger models and handling longer contexts.
Check Activity Monitor for resources usage
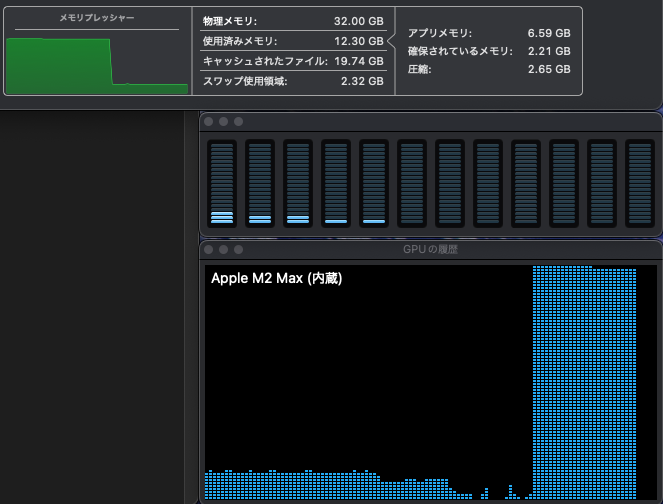
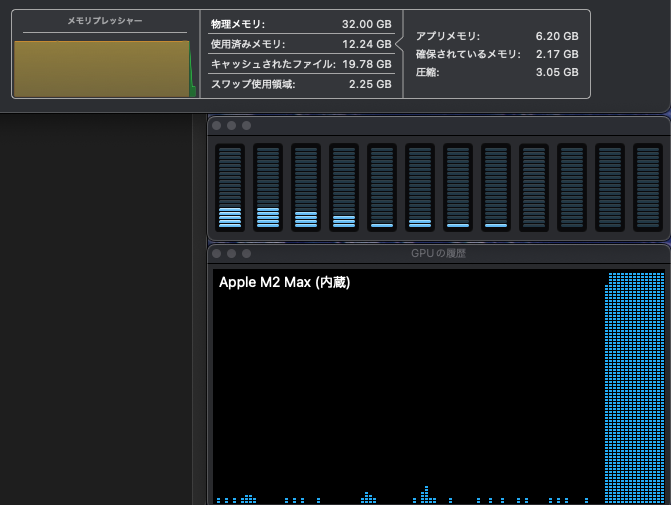
First, let’s confirm if the model is performing well by checking the system resource usage when the LLM is running. This can be done using the Activity Monitor in the Utilities folder on macOS. If memory pressure remains high and stable at green levels and the GPU stays at Max status, it indicates that AI operations are being conducted within the hardware capacity limits of your Mac. Even if memory pressure is yellow but steady without fluctuations, it’s acceptable. Below is an example from running deepseek-r1:32b Q4_K_M on Ollama from Dify (the low load on CPU and GPU is due to other applications).

Also, you can see the size of the memory being used by the model with the ollama ps command and the load on the CPU/GPU. In the following example, it shows that 25GB is being processed 100% on GPU VRAM.
%  ollama ps
NAME               ID              SIZE     PROCESSOR    UNTIL
deepseek-r1:32b    38056bbcbb2d    25 GB    100% GPU     29 minutes from now
Fine-tuning (1) Increase the usable VRAM capacity
The blog post above describes how to manipulate context length so as not to exceed the VRAM size specified for macOS (66% or 75% of unified memory). Below, I will explain a method to change this limitation and increase the amount of VRAM capacity available to the GPU. This setting is likely to be effective on Macs with more than 32GB of RAM. The larger the installed RAM capacity, the higher the effect (with 128GB of RAM, standard 96GB of VRAM can be increased to 120GB !!).
One note, the commands I am introducing are only valid for macOS version 15.0 and above. There seem to be another command that works with earlier versions, but since I haven’t tried them myself, I won’t introduce those here. Also, obviously, you cannot specify more than your actual RAM size (referenced from: mlx.core.metal.set_wired_limit). As a positive point, the settings specified by command revert to default upon a restart of your Mac, so you can try them with almost no risk.
How to change, check, and reset VRAM capacity
Before making changes, let’s decide how much VRAM capacity to allocate for the GPU. It’s good to assign the remaining RAM capacity to the GPU after reserving what is needed by the apps you frequently use. If you’re unsure, you could keep 8GB (the minimum RAM size of Macs up to M3) for the CPU and allocate all the rest to VRAM (that’s what I did). The unit for allocation is MB (megabytes), so multiply the number by 1024. In my case, since I want to set 24GB as VRAM from a total of 32GB minus 8GB for the CPU, I allocate 24 * 1024 = 24576. The command would look like this, but you should change 24576 to your desired allocation value and execute it:
sudo sysctl iogpu.wired_limit_mb=24576Example:
% sudo sysctl iogpu.wired_limit_mb=24576
Password: (input password if required)
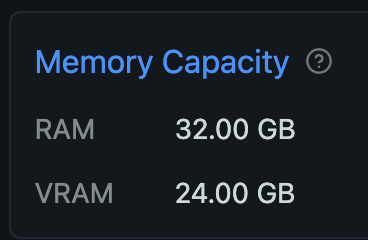
iogpu.wired_limit_mb: 0 -> 24576This will be reflected immediately. In LM Studio, you just need to quit and relaunch it, then open Command + Shift + H to see the set VRAM size.
Check Ollama log after running an LLM to see the new VRAM size (although it is not the specified value, you can see the increased value):
% grep recommendedMaxWorkingSetSize ~/.ollama/logs/server2.log|tail
ggml_metal_init: recommendedMaxWorkingSetSize  = 22906.50 MB
ggml_metal_init: recommendedMaxWorkingSetSize  = 22906.50 MB
ggml_metal_init: recommendedMaxWorkingSetSize  = 22906.50 MB
ggml_metal_init: recommendedMaxWorkingSetSize  = 22906.50 MB
ggml_metal_init: recommendedMaxWorkingSetSize  = 22906.50 MB
ggml_metal_init: recommendedMaxWorkingSetSize  = 22906.50 MB *before*
ggml_metal_init: recommendedMaxWorkingSetSize  = 25769.80 MB *now*
ggml_metal_init: recommendedMaxWorkingSetSize  = 25769.80 MB
ggml_metal_init: recommendedMaxWorkingSetSize  = 25769.80 MB
ggml_metal_init: recommendedMaxWorkingSetSize  = 25769.80 MB
Here are couple of more related commands:
Check the current value:
% sudo sysctl iogpu.wired_limit_mb
Password:
iogpu.wired_limit_mb: 24576

(Default is zero)
iogpu.wired_limit_mb: 0
Set the value to default:
% sudo sysctl iogpu.wired_limit_mb=0
Password:
iogpu.wired_limit_mb: 24576 -> 0
If something goes wrong with this setting, go ahead and reboot the Mac, and it will revert to the default value.
If the current state seems to work fine with a certain amount, you may want to use the new VRAM capacity even after rebooting. In that case, you can achieve this by adding the following command to the /etc/sysctl.conf file. Please replace the number in the last line with the size you want to specify. However, since an error occurs and it cannot be specified if a value greater than the RAM capacity is designated, to avoid having the startup fail, please proceed with the work carefully.
sudo touch /etc/sysctl.conf
sudo chown root:wheel /etc/sysctl.conf
sudo chmod 0644 /etc/sysctl.conf
echo "iogpu.wired_limit_mb=24576" >> /etc/sysctl.confAfter rebooting, if the value set by sudo sysctl iogpu.wired_limit_mb is as expected, you are done. If you want to manually reset it to the default value, use sudo sysctl iogpu.wired_limit_mb=0. To completely revert to the default settings, remove the added line from /etc/sysctl.conf.
Part 2 is now available.
Actually, I was planning to include the settings for Ollama’s K/V cache in this article as well, but it has become quite long, so I wrote it in a different post below. By configuring the K/V cache (and Flash attention), you can reduce the VRAM usage while minimizing the performance degradation of the LLM, and also improve processing speed.
Image by Stable Diffusion (Mochi Diffusion)
“Growing juicy apple” or “apple started shining” are closer explanations of an image in my mind, but none of generated images satisfied me. Finally this simple prompt generated an image looked fine.
Date:
2025-1-29 23:50:07
Model:
realisticVision-v51VAE_original_768x512_cn
Size:
768 x 512
Include in Image:
an apple turning shiny red
Exclude from Image:
Seed:
3293091901
Steps:
20
Guidance Scale:
20.0
Scheduler:
DPM-Solver++
ML Compute Unit:
CPU & GPU