

Contents
HSTS preload の申請が通ったら、開発用サイトも HTTPS 接続必須となった (それは、そう)
会社で使っているドメインのセキュリティ向上のため HSTS preload の申請を行ったら良い感じでした。なので、個人所有のドメイン peddals.com も申請をしました。サブドメインを含め (includeSubDomains) 常に HTTPS で読み込む設定にしたため、クローズドな環境 (自宅 LAN 内の Raspberry Pi 3 model B) で http のみで運用していた開発サイトがアクセスできなくなりました。いくつか解決策を検討し、今回は Let’s Encrypt の無料 SSL 証明書を入れて対応してみたので、その手順を共有します。
開発環境と、その他必要だったもの
- ラズパイ (Raspberry Pi 3 model B)
- Ubuntu 20.04 LTS
- Apache 2.4.41
- ドメイン名
- DNS サーバへのアクセス (TXT レコードの追加権限)
ざっくりとした手順
- Certbot をインストール
- certbot コマンドの実行 (DNS チャレンジ)
- 出力された値を DNS に TXT レコードとして記入
- Let’s Encrypt 証明書がインストールされる
- Apache で SSL を有効にする
- 開発サイトの Apache 設定ファイルのポートを 443 に変更し、SSL 証明書の内容を追記
細かい手順
証明書の取得 (CLI + DNS レコード追加)
まずは証明書のインストールに必要な certbot をインストールします (sudo bash で管理者権限を持ってから実行しています)。念のため、$ や # 以降が入力したコマンドで、それ以外は出力サンプルです。
$ sudo bash
# apt-get update
# apt-get install certbot
自分の場合、*.dev.peddals.com を対象にしたワイルドカード証明書をインストールしたいので、そのドメイン名を加えて以下コマンドで申請しました (別記事に書くかもしれませんが、mac では DNSmasq を動かしており、*.dev.peddals.com へのアクセスは全てラズパイに飛ばしています)。この例ではトップレベルドメインも含んでいますが、必要なわけではありません。
# certbot certonly --manual --preferred-challenges dns-01 -m [email protected] -d '*.dev.peddals.com' -d peddals.com
Saving debug log to /var/log/letsencrypt/letsencrypt.log
Plugins selected: Authenticator manual, Installer None

- - - - - - - - - - - - - - - - - - - - - - - - - - - - - - - - - - - - - - - -
Please read the Terms of Service at
https://letsencrypt.org/documents/LE-SA-v1.3-September-21-2022.pdf. You must
agree in order to register with the ACME server at
https://acme-v02.api.letsencrypt.org/directory
- - - - - - - - - - - - - - - - - - - - - - - - - - - - - - - - - - - - - - - -
(A)gree/(C)ancel: A

- - - - - - - - - - - - - - - - - - - - - - - - - - - - - - - - - - - - - - - -
Would you be willing to share your email address with the Electronic Frontier
Foundation, a founding partner of the Let's Encrypt project and the non-profit
organization that develops Certbot? We'd like to send you email about our work
encrypting the web, EFF news, campaigns, and ways to support digital freedom.
- - - - - - - - - - - - - - - - - - - - - - - - - - - - - - - - - - - - - - - -
(Y)es/(N)o: Y
今回はなぜかここで止まって進まなかったので一度 ctrl + C で止め、再度同じ certbot コマンドを実行しています。問題なく進んだので原因は調べていません、あしからず。
メールアドレスの共有 (上の質問) は強制では無かったと思いますが、IP アドレスの登録 (下の質問) は必須なので Y を入力しましょう。
Saving debug log to /var/log/letsencrypt/letsencrypt.log
Plugins selected: Authenticator manual, Installer None
Obtaining a new certificate
Performing the following challenges:
dns-01 challenge for dev.peddals.com
dns-01 challenge for peddals.com
- - - - - - - - - - - - - - - - - - - - - - - - - - - - - - - - - - - - - - - -
NOTE: The IP of this machine will be publicly logged as having requested this
certificate. If you're running certbot in manual mode on a machine that is not
your server, please ensure you're okay with that.
Are you OK with your IP being logged?
- - - - - - - - - - - - - - - - - - - - - - - - - - - - - - - - - - - - - - - -
(Y)es/(N)o: Y
- - - - - - - - - - - - - - - - - - - - - - - - - - - - - - - - - - - - - - - -
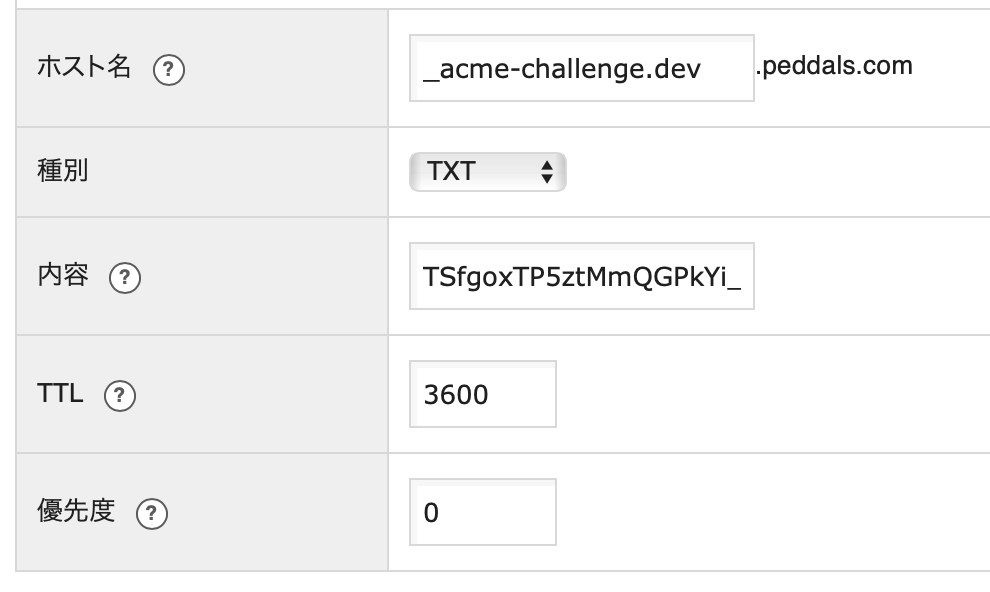
Please deploy a DNS TXT record under the name
_acme-challenge.dev.peddals.com with the following value:
(ここにコードが表示される)
Before continuing, verify the record is deployed.
- - - - - - - - - - - - - - - - - - - - - - - - - - - - - - - - - - - - - - - -
Press Enter to Continueここで一度止まるので、指示の通りに DNS に TXT レコードとして追加します。こんな感じです。
追加したら CLI に戻ってエンターキーを押します。自分の例ではトップレベルドメインも -d で追加していたので、もう一度 DNS レコード記入の指示が出ました。
- - - - - - - - - - - - - - - - - - - - - - - - - - - - - - - - - - - - - - - -
Please deploy a DNS TXT record under the name
_acme-challenge.peddals.com with the following value:

(ここにコードが表示される)

Before continuing, verify the record is deployed.
(This must be set up in addition to the previous challenges; do not remove,
replace, or undo the previous challenge tasks yet. Note that you might be
asked to create multiple distinct TXT records with the same name. This is
permitted by DNS standards.)

- - - - - - - - - - - - - - - - - - - - - - - - - - - - - - - - - - - - - - - -
Press Enter to Continue
同じ要領で DNS に追加し、エンターキーを押します。うまくいけば以下のように表示されて、証明書の取得が完了です。
Waiting for verification...
Cleaning up challenges

IMPORTANT NOTES:
 - Congratulations! Your certificate and chain have been saved at:
   /etc/letsencrypt/live/dev.peddals.com/fullchain.pem
   Your key file has been saved at:
   /etc/letsencrypt/live/dev.peddals.com/privkey.pem
   Your cert will expire on 2024-02-10. To obtain a new or tweaked
   version of this certificate in the future, simply run certbot
   again. To non-interactively renew *all* of your certificates, run
   "certbot renew"
 - If you like Certbot, please consider supporting our work by:

   Donating to ISRG / Let's Encrypt:   https://letsencrypt.org/donate
   Donating to EFF:                    https://eff.org/donate-le
秘密鍵や証明書の保存場所は IMPORTANT NOTES に書いてあります (忘れたら /etc/letsencrypt/live/ を見ましょう)。証明書の期限は 90日で、つど再取得の必要があります。再取得後も Apache の設定ファイルを書き直さなくて良いように、それぞれ実ファイルへのリンクになっています。
# ll /etc/letsencrypt/live/dev.peddals.com/
total 12
drwxr-xr-x 2 root root 4096 Nov 12 19:00 ./
drwx------ 3 root root 4096 Nov 12 19:00 ../
-rw-r--r-- 1 root root  692 Nov 12 19:00 README
lrwxrwxrwx 1 root root   39 Nov 12 19:00 cert.pem -> ../../archive/dev.peddals.com/cert1.pem
lrwxrwxrwx 1 root root   40 Nov 12 19:00 chain.pem -> ../../archive/dev.peddals.com/chain1.pem
lrwxrwxrwx 1 root root   44 Nov 12 19:00 fullchain.pem -> ../../archive/dev.peddals.com/fullchain1.pem
lrwxrwxrwx 1 root root   42 Nov 12 19:00 privkey.pem -> ../../archive/dev.peddals.com/privkey1.pem
Apache とサイトの設定ファイル
Apache で SSL が使えるようにします。最後の 2行で Apache を再起動 & 動いているか確認しています。
# a2enmod ssl
Considering dependency setenvif for ssl:
Module setenvif already enabled
Considering dependency mime for ssl:
Module mime already enabled
Considering dependency socache_shmcb for ssl:
Enabling module socache_shmcb.
Enabling module ssl.
See /usr/share/doc/apache2/README.Debian.gz on how to configure SSL and create self-signed certificates.
To activate the new configuration, you need to run:
  systemctl restart apache2
# systemctl restart apache2
# systemctl status apache2
サイトのコンフィグファイルに変更を加えます。ここでは変更、追加の部分のみ記載しています。先頭の TCP ポートを 443 に変更し、SSL の有効化、証明書と秘密鍵の指定を追加しています。最低限ブラウザでサイトが開くようにするための設定内容です。HSTS preload により全てのホストとの接続が HTTPS になるため、ポート 80 の設定ファイルに 443 へのリダイレクトを仕込むことも不要です。
<VirtualHost *:443>
	SSLEngine on
	SSLCertificateFile /etc/letsencrypt/live/dev.peddals.com/fullchain.pem
	SSLCertificateKeyFile /etc/letsencrypt/live/dev.peddals.com/privkey.pem
設定ファイルに間違いが無いかテストし、Apache に設定を読み直させます。
# apachectl configtest
Syntax OK
# systemctl reload apache2
ブラウザで確認
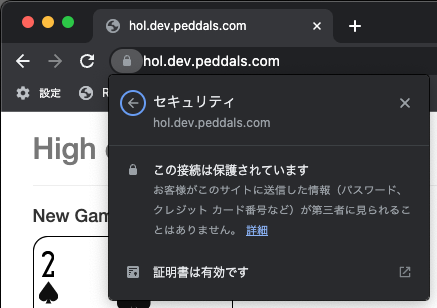
最後に、ウェブブラウザで HTTPS で開ければ無事完成です。自動的に HTTPS 通信になるので、https:// を入力する必要はありません。
Let’s Encrypt 証明書は 90日で期限が切れる
証明書の有効期限は 90日なので、なるべく切れる前に更新しましょう。期限切れまで 30日であれば更新できるようです。まぁ、開発用なのでとりあえずはつど手動で更新しましょうか。--dry-run オプションを付けてエラーが出ていなければ、オプション無しでもう一度実行して更新します。
# certbot renew --dry-run
# certbot renew
更新が必要ないときに実行すると、有効期限が切れる日付を表示してくれます。
# certbot renew
Saving debug log to /var/log/letsencrypt/letsencrypt.log

- - - - - - - - - - - - - - - - - - - - - - - - - - - - - - - - - - - - - - - -
Processing /etc/letsencrypt/renewal/dev.peddals.com.conf
- - - - - - - - - - - - - - - - - - - - - - - - - - - - - - - - - - - - - - - -
Cert not yet due for renewal

- - - - - - - - - - - - - - - - - - - - - - - - - - - - - - - - - - - - - - - -

The following certs are not due for renewal yet:
  /etc/letsencrypt/live/dev.peddals.com/fullchain.pem expires on 2024-02-10 (skipped)
No renewals were attempted.
- - - - - - - - - - - - - - - - - - - - - - - - - - - - - - - - - - - - - - - -
自動化は → この方法でインストールした証明書は、crontab コマンドへの登録で実現できますが、今回は触れません。crontabで自動化できません。以下にやり方を書きます。
証明書の更新方法
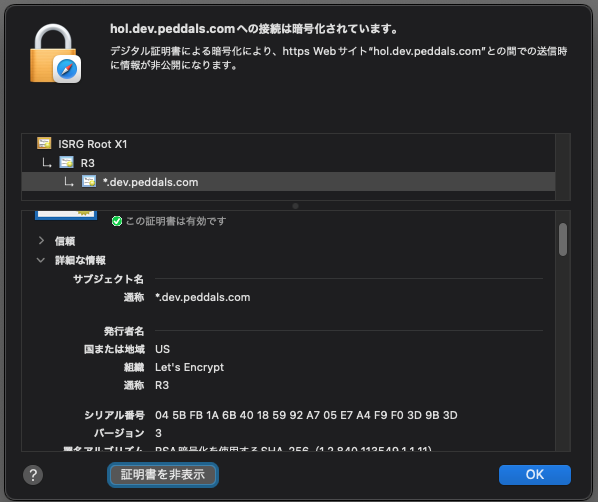
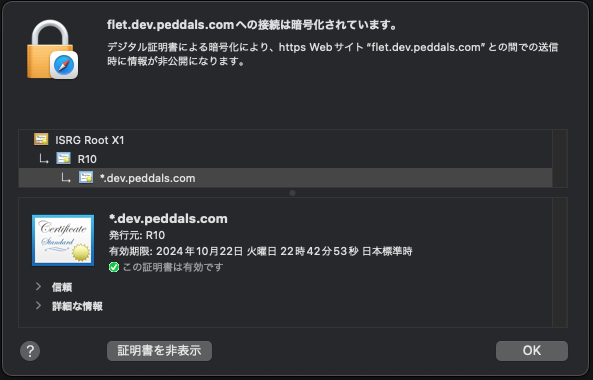
何度か書きたそうと思いつつ、2024年 7月末になってしまいました。久しぶりにラズパイで走っているウェブアプリにアクセスすると、いつまでたっても読み込まれません。証明書の状態 (Safari > URL の左のロックアイコンをクリック > [ 証明書を表示 ]) を見てみたら、こういう状況でした。月初に有効期限切れとなっていたわけです。
ラズパイでcertbot renew --dry-runを実行するとこんな結果となりました。
# certbot renew --dry-run
Saving debug log to /var/log/letsencrypt/letsencrypt.log

- - - - - - - - - - - - - - - - - - - - - - - - - - - - - - - - - - - - - - - -
Processing /etc/letsencrypt/renewal/dev.peddals.com-0001.conf
- - - - - - - - - - - - - - - - - - - - - - - - - - - - - - - - - - - - - - - -
Cert is due for renewal, auto-renewing...
Could not choose appropriate plugin: The manual plugin is not working; there may be problems with your existing configuration.
The error was: PluginError('An authentication script must be provided with --manual-auth-hook when using the manual plugin non-interactively.')
Attempting to renew cert (dev.peddals.com-0001) from /etc/letsencrypt/renewal/dev.peddals.com-0001.conf produced an unexpected error: The manual plugin is not working; there may be problems with your existing configuration.
The error was: PluginError('An authentication script must be provided with --manual-auth-hook when using the manual plugin non-interactively.'). Skipping.

- - - - - - - - - - - - - - - - - - - - - - - - - - - - - - - - - - - - - - - -
Processing /etc/letsencrypt/renewal/dev.peddals.com.conf
- - - - - - - - - - - - - - - - - - - - - - - - - - - - - - - - - - - - - - - -
Cert is due for renewal, auto-renewing...
Could not choose appropriate plugin: The manual plugin is not working; there may be problems with your existing configuration.
The error was: PluginError('An authentication script must be provided with --manual-auth-hook when using the manual plugin non-interactively.')
Attempting to renew cert (dev.peddals.com) from /etc/letsencrypt/renewal/dev.peddals.com.conf produced an unexpected error: The manual plugin is not working; there may be problems with your existing configuration.
The error was: PluginError('An authentication script must be provided with --manual-auth-hook when using the manual plugin non-interactively.'). Skipping.
All renewal attempts failed. The following certs could not be renewed:
  /etc/letsencrypt/live/dev.peddals.com-0001/fullchain.pem (failure)
  /etc/letsencrypt/live/dev.peddals.com/fullchain.pem (failure)

- - - - - - - - - - - - - - - - - - - - - - - - - - - - - - - - - - - - - - - -
** DRY RUN: simulating 'certbot renew' close to cert expiry
**          (The test certificates below have not been saved.)

All renewal attempts failed. The following certs could not be renewed:
  /etc/letsencrypt/live/dev.peddals.com-0001/fullchain.pem (failure)
  /etc/letsencrypt/live/dev.peddals.com/fullchain.pem (failure)
** DRY RUN: simulating 'certbot renew' close to cert expiry
**          (The test certificates above have not been saved.)
- - - - - - - - - - - - - - - - - - - - - - - - - - - - - - - - - - - - - - - -
2 renew failure(s), 0 parse failure(s)
上の例ではモノクロなのでわかりませんが、赤文字になっているところ (以下) を見ると、要するに認証スクリプトと一緒に実行しないとダメよ、ということです。
Attempting to renew cert (dev.peddals.com) from /etc/letsencrypt/renewal/dev.peddals.com.conf produced an unexpected error: The manual plugin is not working; there may be problems with your existing configuration.
The error was: PluginError('An authentication script must be provided with --manual-auth-hook when using the manual plugin non-interactively.'). Skipping.
All renewal attempts failed. The following certs could not be renewed:
  /etc/letsencrypt/live/dev.peddals.com-0001/fullchain.pem (failure)
  /etc/letsencrypt/live/dev.peddals.com/fullchain.pem (failure)
というわけで、結局最初に入れた方法と同じコマンド+DNS TXT レコードの追加で対応することが必要となります。
# certbot certonly --manual --preferred-challenges dns-01 -m [email protected] -d '*.dev.peddals.com'
Saving debug log to /var/log/letsencrypt/letsencrypt.log

- - - - - - - - - - - - - - - - - - - - - - - - - - - - - - - - - - - - - - - -
Processing /etc/letsencrypt/renewal/dev.peddals.com-0001.conf
- - - - - - - - - - - - - - - - - - - - - - - - - - - - - - - - - - - - - - - -
Cert is due for renewal, auto-renewing...
Could not choose appropriate plugin: The manual plugin is not working; there may be problems with your existing configuration.
The error was: PluginError('An authentication script must be provided with --manual-auth-hook when using the manual plugin non-interactively.')
Attempting to renew cert (dev.peddals.com-0001) from /etc/letsencrypt/renewal/dev.peddals.com-0001.conf produced an unexpected error: The manual plugin is not working; there may be problems with your existing configuration.
The error was: PluginError('An authentication script must be provided with --manual-auth-hook when using the manual plugin non-interactively.'). Skipping.

- - - - - - - - - - - - - - - - - - - - - - - - - - - - - - - - - - - - - - - -
Processing /etc/letsencrypt/renewal/dev.peddals.com.conf
- - - - - - - - - - - - - - - - - - - - - - - - - - - - - - - - - - - - - - - -
Cert is due for renewal, auto-renewing...
Could not choose appropriate plugin: The manual plugin is not working; there may be problems with your existing configuration.
The error was: PluginError('An authentication script must be provided with --manual-auth-hook when using the manual plugin non-interactively.')
Attempting to renew cert (dev.peddals.com) from /etc/letsencrypt/renewal/dev.peddals.com.conf produced an unexpected error: The manual plugin is not working; there may be problems with your existing configuration.
The error was: PluginError('An authentication script must be provided with --manual-auth-hook when using the manual plugin non-interactively.'). Skipping.
All renewal attempts failed. The following certs could not be renewed:
  /etc/letsencrypt/live/dev.peddals.com-0001/fullchain.pem (failure)
  /etc/letsencrypt/live/dev.peddals.com/fullchain.pem (failure)

- - - - - - - - - - - - - - - - - - - - - - - - - - - - - - - - - - - - - - - -

All renewal attempts failed. The following certs could not be renewed:
  /etc/letsencrypt/live/dev.peddals.com-0001/fullchain.pem (failure)
  /etc/letsencrypt/live/dev.peddals.com/fullchain.pem (failure)
- - - - - - - - - - - - - - - - - - - - - - - - - - - - - - - - - - - - - - - -
2 renew failure(s), 0 parse failure(s)
root@ubuntu:/home/handsome# certbot certonly --manual --preferred-challenges dns-01 -m [email protected] -d '*.dev.peddals.com'
Saving debug log to /var/log/letsencrypt/letsencrypt.log
Plugins selected: Authenticator manual, Installer None
Cert is due for renewal, auto-renewing...
Renewing an existing certificate
Performing the following challenges:
dns-01 challenge for dev.peddals.com

- - - - - - - - - - - - - - - - - - - - - - - - - - - - - - - - - - - - - - - -
NOTE: The IP of this machine will be publicly logged as having requested this
certificate. If you're running certbot in manual mode on a machine that is not
your server, please ensure you're okay with that.

Are you OK with your IP being logged?
- - - - - - - - - - - - - - - - - - - - - - - - - - - - - - - - - - - - - - - -
(Y)es/(N)o: Yで進める。
Please deploy a DNS TXT record under the name
_acme-challenge.dev.peddals.com with the following value:

(ここにコードが表示される)

Before continuing, verify the record is deployed.
- - - - - - - - - - - - - - - - - - - - - - - - - - - - - - - - - - - - - - - -
Press Enter to Continue
以前追加済みの TXT レコードがドメインのパブリック DNS に残っていれば値を上記のコードに書き換え、削除済みであれば新規で TXT レコードを追加 (上記例のホストは _acme-challenge.dev.peddals.comがホスト名。コードを値として設定)。
DNS レコードの追加後、シェルに戻って Enter キー押下。やや待つとこんな感じの内容が表示されます。
Waiting for verification...
Cleaning up challenges
IMPORTANT NOTES:
- Congratulations! Your certificate and chain have been saved at:
/etc/letsencrypt/live/dev.peddals.com-0001/fullchain.pem
Your key file has been saved at:
/etc/letsencrypt/live/dev.peddals.com-0001/privkey.pem
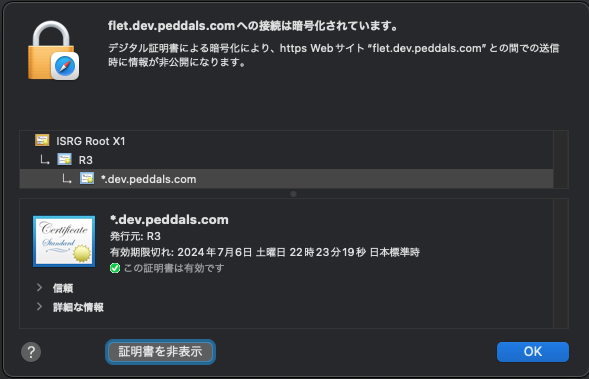
Your cert will expire on 2024-10-22. To obtain a new or tweaked
version of this certificate in the future, simply run certbot
again. To non-interactively renew *all* of your certificates, run
"certbot renew"
- If you like Certbot, please consider supporting our work by:
Donating to ISRG / Let's Encrypt: https://letsencrypt.org/donate
Donating to EFF: https://eff.org/donate-leんで、Apache の設定を再読み込み。
# systemctl reload apache2Safari で Command + Option + R でページを新規読み込みすれば、無事表示されると思います。念のため証明書を確認してみましょう。
ところで、HSTS の書き方・置き場所
本サイトはエックスサーバーに置いているので、ドキュメントルートに .htaccess を作り、そこに以下の一行を追加しています。includeSubDomains で全てのサブドメインを対象とし、preload でサイトへのアクセスは HTTPS に固定しています。
Header set Strict-Transport-Security "max-age=31536000; includeSubDomains; preload"まとめ
HSTS での設定以外にでも、開発環境に SSL 証明書をインストールしたい理由はいろいろあると思います。無料とはいえ本物の証明書が使えるので、この方法は試す価値大アリです。
Image by Stable Diffusion
Date:
2023年11月12日 17:59:44
Model:
realisticVision-v20_split-einsum
Size:
512 x 512
Include in Image:
cartoon, let’s encrypt, apache, success
Exclude from Image:
Seed:
356871963
Steps:
30
Guidance Scale:
11.0
Scheduler:
DPM-Solver++
ML Compute Unit:
CPU & Neural Engine